
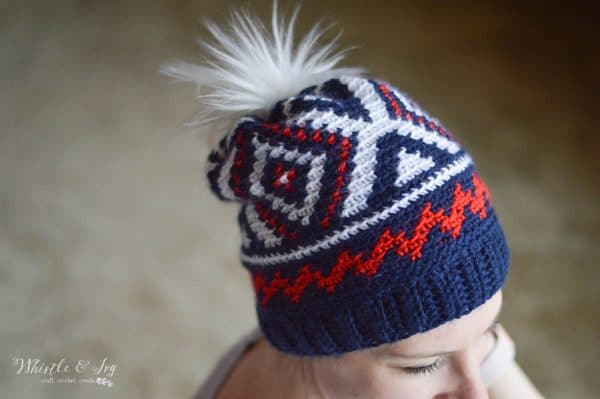
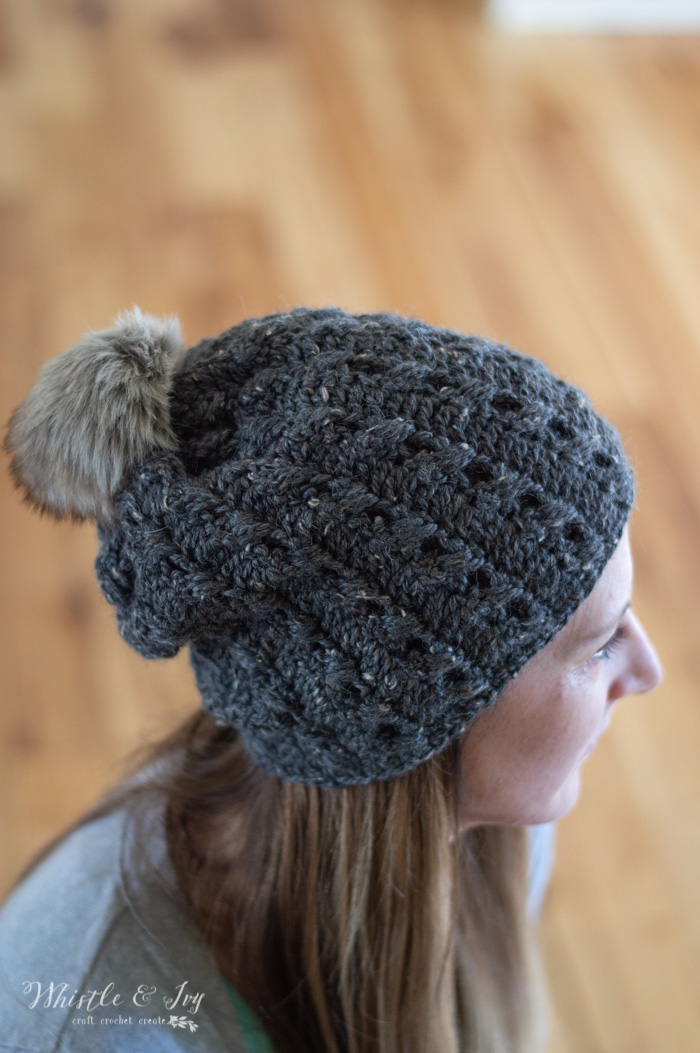
This gorgeous fair isle hat and mitten set is inspired by the 2018 winter Olympics Team USA uniforms! Switch up the colors and make it perfect for your style! The post contains affiliate links which means I get a small commission at no extra cost to you. Thanks for your support!
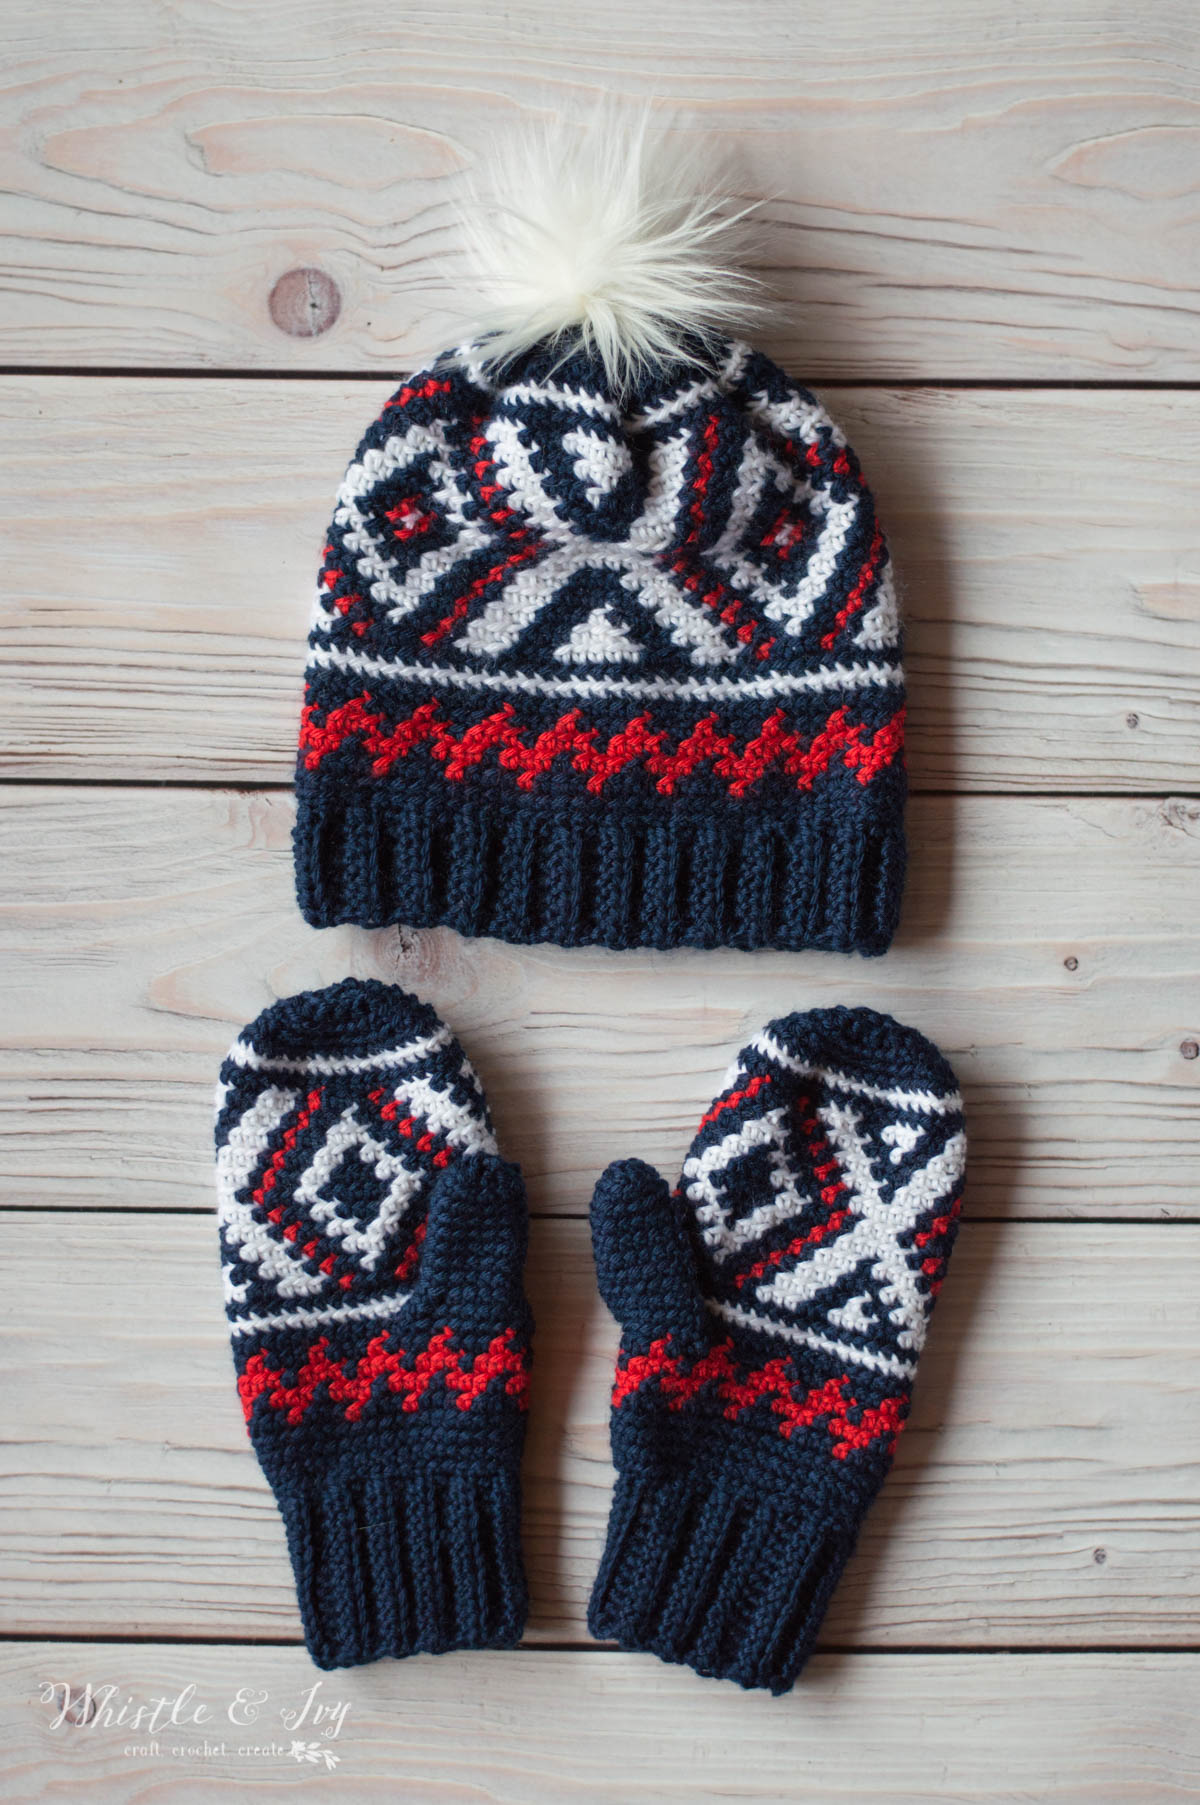
Do you like watching the Olympics? I always look forward to it and I love summer and winter equally. Summer has gymnastics, hand ball, beach volleyball; winter has snowboarding, hockey, figure skating. It’s so amazing to see so many athletes excel. I was also pretty cool to see Ralph Lauren’s designs for the Team USA closing ceremonies uniforms. The crochet olympics team hat is awesome. But holy. Guacamole. I won’t be spending $200 on one, so I decided to make one.
Join me?

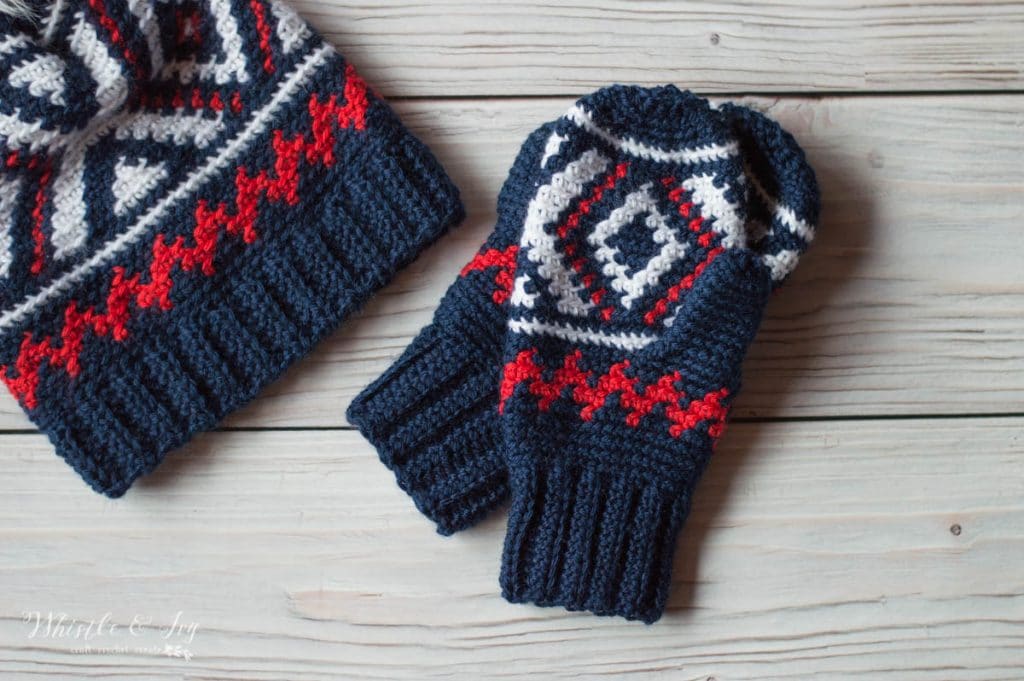
Don’t let the color work intimidate you, seriously. If you work slowly and steadily, this fair isle hat will work out for you. It’s definitely not a quick project, but it’s a very rewarding project. It turned out even prettier than I imagined, and I think you will be seeing more graphs here soon.

The trick to getting the design to line up is simply working through the back loops! I learned this neat trick from the book Modern Tapestry Crochet. It’s a perfect book for tapestry crochet beginners. She makes it SO easy.
Bear in mind that the right-leaning diagonals for right-handed crocheters (and visa versa) will look closer spaced, while the diagonal stitch going the other way will look slightly spaced out. This is normal!
Unfortunately, with crochet color work there is a give-and-take with each method. BLO method will line up much better but will have the differing look with the diagonal stitches.

You’re tired of sifting through complicated tutorials and patterns that leave you feeling overwhelmed.
Let me help.
PICTURE THIS:
Instant access to a library of modern, easy-to-follow patterns
Gifting your handcrafted treasures to your loved ones.
Feeling accomplished by your beautiful makes
It’s time to make your crafting experience as joyful as it should be.
NEVA FAIR ISLE CROCHET HAT and MITTENS (USA Olympics Team THEMED) – CROCHET PATTERN
Please remember: You are free to use this pattern to make and sell, but do not republish or distribute this pattern in any way. Please DO NOT use my photos in your listings.
What you need: (affiliate links)
– I Hook
– Mighty Stitch (Medium Weight Yarn) in Serrano, White and Navy
– Pom-Pom
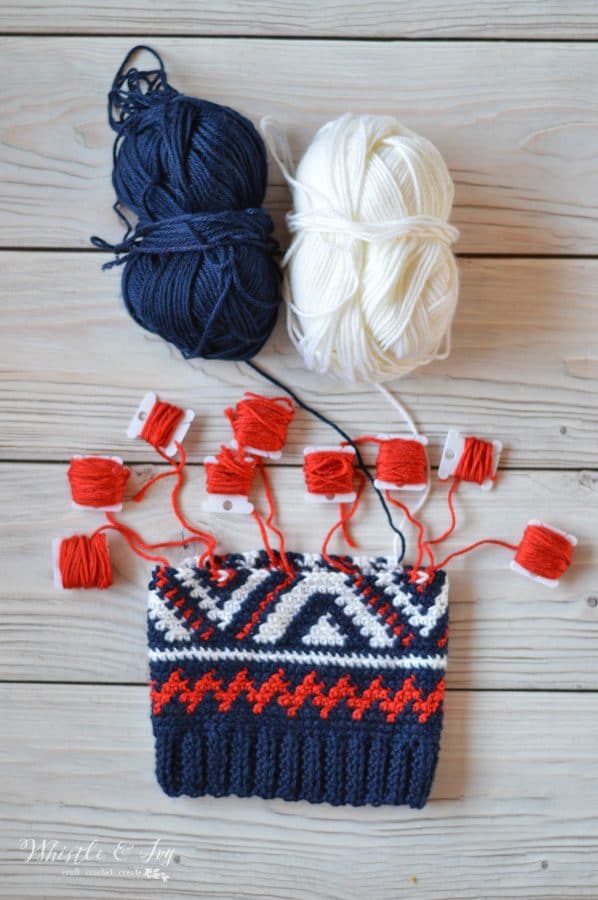
– Bobbins
– Darning Needle
Gauge: 14 sts = 4″ (Gauge Pattern)
New to colorwork? I have a small video that can help! My main tip is to take is SLOW. You can do it!
READY TO MAKE YOUR FAIR ISLE HAT AND MITTENS?
This hat and mitten set can be purchased in my shops! Where would you like to shop today?
Bobbins look intimidating, but it’s much easier than you think! The Endless Bundle includes the pattern download and a helpful video to assist in making this hat.
You can do colorwork!
So pull on your new hat and tune in to the Olympics. They start this weekend, yay!
Stay tuned for more projects featuring color work, because it is so much fun.


I am really late to the game on this hat but have loved the design since it came out. My husband wants one now so what hook size would you suggest to make it bigge? Also, should I go with 5 weight yarn or double strand 4 weight?
I would maybe go up one hook size and try a 5 weight and see what size it is! I may take a bit of trial and error.
Do you have any other sizes for this pattern?
For a toddler perhaps?
I’m sorry I don’t! The graph makes it hard to size down. You could make a shorter band and repeat the graph twice instead of three times and see what size you have.
Hello what you are making is just amazing, georgious!
Unfortunately I’ve tried one cap it was really nice but it looked like “mommy’ve done it to her big boy”… May be because of an 100% acrylic “wool ball”
(sorry for my English I’m French)
I’ll have a new try with a new “wool”…
But thank you for your sharing
I may sound dumb … but every row after the brim is BLO right? Do you mean the back loop of rhe right side or wrong side? If i zoom in on your images it doesn’t look like it’s worked in the back loops 😊
yes you will work in back loops only! You will work the back loop of the right side, you should be working from the outside with the right sides of the stitches facing you.
Hi Bethany,
I made this hat, but I used Caron Super Soft and the size hook you recommended, the hat came out small for a child not for an adult, Just an FYI
The pattern was easy to follow and on the left side for the red I went through both stitches but on the right side, I did as you recommenced. I did not find a spot to post you my finished hat so you can see it.
Hi Karen!
Did you make a gauge swatch before beginning?
Thank you for the pattern. I absolutely love the pattern and its challenge. It was my first time using bobbins and you just have to keep yourself organized. I posted a picture of if on Instagram and also in the FB group. Thank you again!!
You are welcome! It’s definitely slow going. I stopped after each row to untangle everything. But the fished hat is worth the effort. I am so glad you love the pattern, thanks for your kind comment!
Love this pattern! Would Caron Simply Soft be a good substitute for the yarn? I’m allergic to wool 😕
It’s slightly lighter, so be sure to make a gauge swatch, but it should work!
Hi Beth
This is an amazing pattern and I love the video tutorial. I would say I’m a confident beginner but I’m having massive trouble by the time I get to row 11.
My slip stitch ch1 looks messy since row 9, and my charts been lining up fine until row 11 where the left leaning reds look gappy. They look fine on the right- leaning section of the diamond
Am I doing something really obviously wrong?
Carly
No, you are doing right. If you look close at my hat, you will see. The stitches line up nicely when you are going diagonal to the right but they do look a bit choppy when you are doing diagonal to the left.
This hat was so cool to make. It took a lot of work but it was awesome in the end. I made it as a Dallas cowboys hat for my cousin. He’s gonna love it. Working on a scarf too. Pattern is much harder to capture flat but I won’t give up. You’ve inspired me to go deeper.
Thanks
It IS a lot of work, but totally worth! I would love to see a photo of yours! :)
It certainly is. I willl post it on the Facebook page when I’m done with the scarf.
what and how did you make the pompom
Thank you so much for all the different patterns, you do an awesome job!
thanks
Thanks so much! I have a fur pom-pom tutorial here:
https://www.whistleandivy.com/2017/10/diy-fur-pom-poms.html
In the future, it would certainly help to show how to start the NEXT row after completing the previous rew. Particularly when starting row 4 on the graph. Like showing exactly where to slip stitch and chain For row 4. My first graph and it was nightmare to figure out with only one third of the graph visible….but I managed…I think. But to just stop without those instructions and automatically go onto the bobbin info ……YIKES. Thanks.
I guess I don’t understand, I am sorry! You mean, show where to join the row? You will always join with the first stitch of the row, and begin each row with a ch 1, exactly like other joined round projects. I thought it would be redundant to show the graph 3 times, so I thought the repeat would be a simpler method. I am sorry it was a struggle for you.
This looks awesome! I can’t wait to try it. I’ve never done a graph before, however, and I am left-handed. Any tips for doing it left-handed? Do I need to start from the other side instead? Thanks for your help!
Thanks Kathy! Yes, I think you need to work it backwards.
Noticed on the tutorial that you stated 8 stitches total on Row. It should be 7 stitches. When you ditched the band together you show slip stitch on the written pattern but in the tutorial you did mostly sc stitches, I saw only 2 slip stitches the 5th and 7th only, The rest appear to be sc as you did yarn over before completing the stitches
I am working slip stitches, I just do it in two motions. You are not the first to think I am sc!
Shouldn’t row 2 be 7 stitches? not 8?
THank you so much for this pattern! It reminds me of my Norwegian heritage traditional knitted sweaters. Your video tutorial and written intructions are so easy to follow! My hat was snug but not tight, perfect! Thank you again!
Yes I agree! I absolutely love that traditional-looking color work. Thanks for your kind words, I am so glad you liked the pattern!
Hi, I just finished this hat for my daughter and she loves it! It was easy to follow and turned out great. I do have one question…how can I make this bigger without using a bigger size hook?
Thanks Coralee! Unfortunately there is no way to make it larger without redesigning the entire graph. The easiest way would be to use a thicker yarn and larger hook.
I absolutely Love this pattern and was so excited to make it. I actually just finished it minutes ago. had a few issues with it though. The hat when finished is so tall that it looks more like a chefs hat I was getting worried about that issue when I was half way done with the graph. I did not hadd any rows and followed your pattern to the T. I even used a 5mm instead of the 5.5 mm because a lot of hat pattens I have to do that with because they tend to run big on my head.
Also the only part of the hat I could get on my head was the brim and the blue part with the red zig zag. I am going to tear it all apart and see if I can modify it to make the hat shorter and the graph part bigger so I can get it on ly head.. I do LOVE the pattern just hoping I can get it to work for me
Hi Melissa! Sorry you don’t like the hat design, it is a slouchy hat, so it’s a taller design. To make yours shorter you can eliminate the first 2 rows of sc, and the last 2 rows of decreases, or you can eliminate the red zig-zap part of the graph. What yarn are you using? The hat should be a tube, so it shouldn’t have gotten smaller after the brim and blue/zig-zag part. I am wondering what happened there.
I’ve never used a bobbin- how do you use it, and how much yarn do you wrap around it?
It’s a way to keep your yarn organized so you don’t have to carry it. So for this hat, you only need red in a few small spots, so instead of carrying the red around and around the hat, you just use it to work the one stitch, and then drop it, so it’s there next time you come around. The bobbin keeps it neat. You don’t need much yarn for this specific project, but I tend to put way more than I think I will need because I would rather have extra than not enough.
Hi, quick question when doing the graph part of the hat when I finish a row do I join with a slip stitch? Ch. 1? I’m having some trouble. Love this pattern tho!
Yes, just like the other rows you will join wit a sl st and ch 1 to begin the next row.
There’s a tutorial? Where is it. I’ve never done graph work but this looks doable. However, what stitch is this done in? Single crochet? Half double?
I am sort of confused about that part for sure. Do you have a video tutorial somewhere?
Thank you!!
Jana
Hi Jana! The video is above the pattern, under the abbreviations and gauge.
Hi Bethany. Im having truble with the gauge and the first round. Do you go in the stitch at the base of the turning chain or the stitch qfter it? I cant make it line up.
I go into the same st as the turning chain