
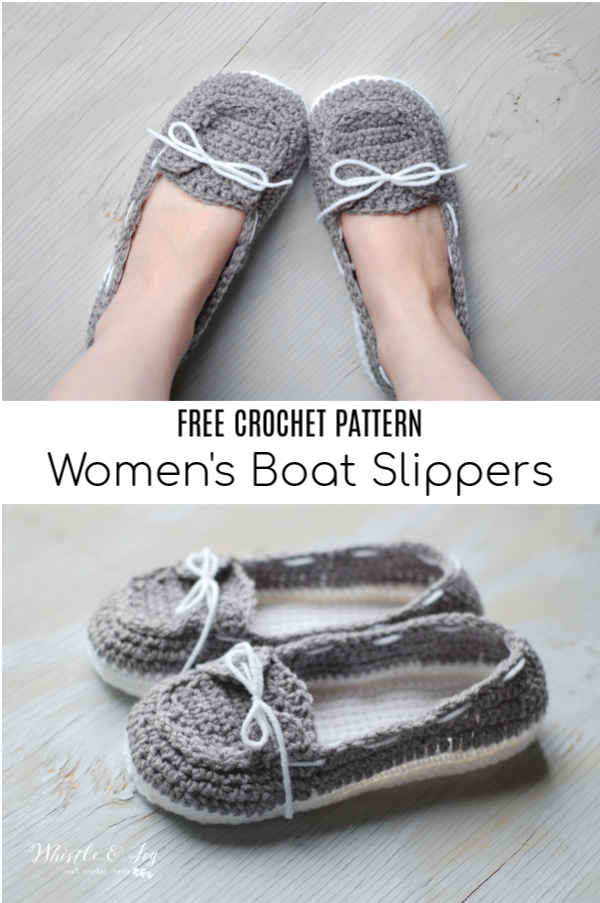
These crochet boat slippers look a bit like crochet Sperrys! You will love making them and love wearing them. They feature a double sole for extra comfort, and the ties are both decorative and to keep the slippers cozy and in place. Be sure to add one of these 7 tried and tested methods and make your slippers non-slip.
This post includes affiliate links, which means I get a small commission if you make a purchase at no extra cost to you. Thank you for your support!
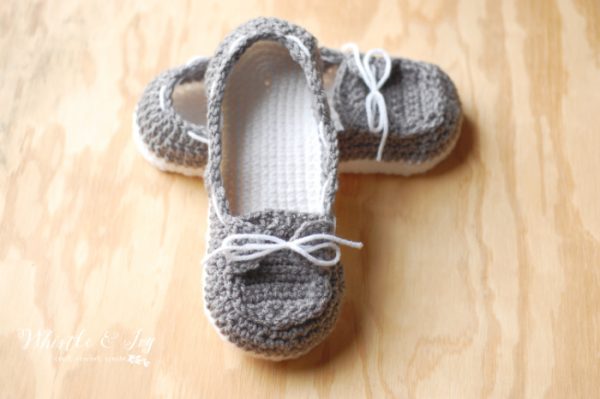
These slippers (along with my Loafer Slippers) are one of my favorite patterns. I had the idea a few years ago to make these little Baby Boat Shoes. They turned out so darling that I decided I really wanted a pair for myself!
However, despite getting the pattern testing and making at least a million pairs (okay, that’s a slight exaggeration), it still had problems and I couldn’t bring myself to get it all fixed up until just this week.
Despite getting a bit burned out initially, these slippers still make me so happy and I hope if you make a pair that they make you happy too. ❤️

I made almost all of mine with white soles, but I can’t wait to see the colors you decide to use. I bet putting a bit of leather cord for the laces would be cute too!

You’re tired of sifting through complicated tutorials and patterns that leave you feeling overwhelmed.
Let me help.
PICTURE THIS:
Instant access to a library of modern, easy-to-follow patterns
Gifting your handcrafted treasures to your loved ones.
Feeling accomplished by your beautiful makes
It’s time to make your crafting experience as joyful as it should be.
CROCHET BOAT SLIPPERS – FREE CROCHET PATTERN
Please remember: You are free to use this pattern to make and sell, but do not republish or distribute this pattern in any way. DO NOT use my photos in your listings. Please do share my blog links! It’s a quick and FREE way of supporting Whistle and Ivy and more free crochet patterns in the future.
PLEASE read my Disclaimer before working my free patterns!
What you need: (affiliate links)
– Medium Weight Yarn in 2 color
– G hook
– Darning Needle
Abbreviations: US Terms
Ch – chain
Sc – single crochet
Sc2tog – Sc Decrease
Dc – Double Crochet
Dc2tog – Dc decrease
Hdc – Half Double Crochet
Sl st – Slip Stitch
St – stitch
Gauge: 8 sts = 2″ (Gauge Pattern)
⭐️ Want more sizes? US women Sizing 6-9 is available in the downloadable PDF!
Get it in the Whistle and Ivy Shop
Get it on Ravelry
Get it on Etsy
Love this pattern but want MORE? How about more sizes? You will LOVE The Endless Bundle – my membership program full of patterns, videos, courses, community, and much more. See you on the inside!
SIZE 8
Make two sole pieces for each shoe, 4 total.
SOLE: (approx. approx. 9 ½”)
(worked in the round)
Ch 26
1. Work 3 sc in 2nd ch from hook. Sc in next 16 chs. Hdc in next 3 chs. Dc in next 4 chs. Work 7 dc in last ch.Working across opposite side of chain, dc in next 4 chs, hdc in next 3 chs, sc in next 16 chs. Place a marker. Continue to round 2. (56 sts)
2. Work 2 sc in the next 3 sts. Sc in next 24 sts. Work 2 sc in the next 5 sts. Sc in next 24 sts. (64 sts)
3. *Sc in next st, work 2 sc in next st* work 3 times. Sc in next 24 sts. *Sc in next st, work 2 sc in next st* work 5 times. Sc in next 24 sts. (72 st)
4. *Sc in next 2 sts, work 2 sc in next st* work 3 times. Sc in next 24 sts. *Sc in next 2 sts, work 2 sc in next st) 5 times. Sc in next 24 sts. (80 sts)
5. *Hdc in next 3 sts, work 2 hdc in the next st* work 3 times. Hdc in next 24 sts. *Hdc in next 3 sts, work 2 hdc in the next st* work 5 times. Hdc in next 24 sts. (88 sts)
Join with sl st and tie off.
Match up your two sole pieces and using a sl st, stitch the two soles together, (wrong sides together) going through both loops of each sole. See Photos 1 & 2. Use white, or same color as your sole piece. (88 sl sts)
Body:
1. Using white yarn (or same color as your sole) start your round on st 18 from the middle of the toe. Face the toe downwards and count 18 to the right. See Photo 3. Going through the sl st loops, and working from the outside, Ch 1. Sc in same st. Sc 50. Hdc 7. Dc 10. Hdc 7. Sc 13. Join with sl st. Tie off. (88 sts)
2. Start your second color with a sl st in the sc where you made your join. Ch 1. Hdc in same st. Hdc in next 50 sts. Dc in next 24 sts. Hdc in next 13 sts. (88 sts)
Join with sl st.
3. Ch1. Sc in same st. Sc in next 3 sts. Sc2tog twice. *Sc in next 2 sts. Sc2tog* work 4 times . Sc in next 2 sts. Sc2tog twice. Sc in next 18 sts. Hdc in next 4 sts. Dc in next 4 sts. Dc2tog. Dc in next 8 sts. Dc2tog. Dc in next 4 sts. Hdc in next 4 sts. Sc in next 12 sts. (78 sts)
Join with sl st.
4. Ch 1. Sc in same st. Sc in next 29 sts. Sc2tog 3 times. Sc in next 5 sts. Hdc in next 4 sts. Dc in next 4 sts. Dc2tog 5 times. Dc in next 4 sts. Hdc in next 4 sts. Sc in next 5 sts. Sc2tog 3 times. (67 sts)
Join with sl st.
5. This is the start of the small straps on the top of the shoe:
(Starting in next st, not the same st) Sl st 4. *Ch 4 . Sc into 1st ch. Sl st into next st on shoe. Turn.ch 1. Sc in next st. Sc 3 in loop. Sc 1. (it’s into the side of the foundation sc, but it brings you back to the top of the shoe. ) Sk the 1st st, and sl into next st onto shoe. Turn. Ch 1. Sc in next st. sc 2 in each of the next 3 sts. Sc 2 . ( the second sc will be in the side of a st) sl st onto shoe*.
Sl st in next 20 sts.
Next strap: Repeat from * to *. Sl st in next 38 sts. Join with sl st. Tie off.
TOE FLAP:
Ch 6.
1. Sc in 2nd ch from hook. Sc in next 4 chs. Turn. (5 sts)
2. Ch 1. Work 2 sc in first st. Sc in next 3 sts. Work 2 sc in last st. Turn. (7 sts)
3. Ch 1. Work 2 sc in first st. Sc in next 5 sts. Work 2 sc in last st. Turn (9 sts)
4. – 7. Ch 1. Sc in same st. Sc 8 across. Turn. (9 sts)
8. – 10. Ch 1. Sc in same st. Hdc in next 2 sts. Dc in next 3 sts. Hdc in next 2 sts. Sc in last st. Turn. (9 sts)
Tie off, leave a long tail.
Using a yarn needle, attach your toe flap. Make sure to secure where the corner of the flap meets the side of the slipper. Take your yarn needle, and go in and out through the slip stitches (they look a bit like they are on the outside of the slipper). Catch whichever piece of yarn on the flap that corresponds with the slip stitch. Finish by adding the “laces” with your yarn needle.
========================================
PHOTO 1
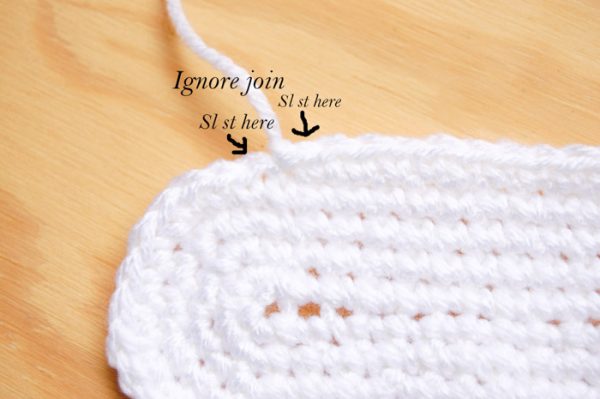
PHOTO 2

PHOTO 3

Love this pattern but want MORE? How about more sizes? You will LOVE The Endless Bundle – my membership program full of patterns, videos, courses, community, and much more. See you on the inside!
xoxo,


These slippers/shoes are so cute. The pattern is very easy to follow. I love this project and the way my completed work turned out.
Yay!! So happy you like the pattern! Thank you for your kind words.
As a beginner crocheted, I was delighted to come upon this project. It’s my very first project, so I was proud of myself for completing the soles without any help. Yes, they look chunky and uneven in some spots, but overall, I am pleased so far. Now I am ready to move onto the next part. But when you say to start crocheting in the slip stitch loops, I got confused. They are on the sides (at least they are for me) so won’t the stitches just continue to work straight out?
The sl st loops are laying on the top outer edge of the slipper. If you work through those, your stitches will go upwards and make the sides.
I absolutely ♡♡♡ this pattern! I am a size 8, but I want to use the flip flop bottoms instead of a crochet bottom. Is there a way to tell how to attach the “shoe” in the correct locations? Thank you for your time!
Thank you! Hm. That is a bit tricky, you might need to do it visually and adjust as you go. Make sure the DC are centered around the heel.
Hi Bethany
I am a new subscriber and I love these boat slippers. I have a slight issue though. The pattern goes to size nine but I have huge feet. Is there a way to size the sole to a size 11? If so, how would I do that?
Mona
Hi Mona! Thanks so much! You can go up 2 chains on the foundation for each size up, or you can use a larger hook and a slightly bulkier yarn.
I had downloaded your pattern to my iphone a while back and when i downloaded it, the pattern came out perfect with your logo a light grey watermark in the back of the pattern but now all of a sudden it is appearing as a black logo on top of everything. Any idea as to why it may have appeared like that now and was not like that at first?
Are you opening it with a different app?
This is something different than the upload of the pattern but for the size 9 and step four of the body for some reason i never end up with 71 stitches at the end and my previous rows came out perfect. When i do it and get all the way to the last part where you sc2tog 4 times and then it says to sc 2 but i never have 2 stitches left over to crochet. I have tried redoing it like 3 times and end up with the same count every time. Could you help me figure out what i am doing wrong?
This pattern is one of my older ones and I have it on my list to redo it. It needs to be completely overhauled, I am sorry! It’s very possible there is a mistake. Please bear with me, I will try to get to it this month.
Hey Bethany: I wasn’t sure if im doing this right so but I want to doing the double check it with you first… its about the body part… you said work it from the outside. is it like work from the outside as a bottom soles of soles or the inside as a top soles of the soles?
It just means you want the front of your stitches facing outwards, not inwards. When working from the outside, the fronts of your stitches will face outward.
Gotcha thanks many for your help. Now i can working on my new shoes for the house
Hiya Bethany! I have made your sole, and it was perfect and easy….but I found the women’s boat slipper, downloaded it I guess, at least I clicked on the link, and it came up on my kindle……but each page has your logo on it…blocking the middle sections of the pattern! I really would like to try these, but I really cannot figure out how to move it? Thank you, and keep crocheting!
Oh dear! I have been meaning to update this page for some time and haven’t got around to it. The pattern itself needs to be completely overhauled, and some things have a hard time loading the pattern correctly. The logo is supposed to be a washed-out light gray. You can try opening it with adobe reader, that seems to work the best. This pattern really needs to be redone, I am working furiously on Plaid Week, with is coming up in a few weeks, but I will try to get to this. So sorry for the inconvenience!
So…September 2017 to February 2018 . . . Still a big black logo obscuring everything.
Its a soft transparent gray when you view it with Adobe Reader. And I’m trying to find time to rework these this spring, thank you for your patience.
Hi! I love this pattern but I was just wondering is it UK shoes sizes or American? Thanks x
Thank you! It’s American shoe sizing.
I want to make the women’s boat slippers but I don’t know what it means in the parenthesis.
It’s a set of instructions that you will repeat in order, the indicated number of times. Does that make sense?
I love these slippers.
Thank you!
I have made a few pairs of these for members of my family, and they love them. But do you have any tips for making them a bit wider? My feet are a bit wider than “standard”, and I’m thinking maybe that’s why the one pair didn’t fit well, even though the length seemed all right.
You can work some rows in taller stitches. They would be a tad longer overall, but they would be wider! You can even take a stitch or two off the foundation to keep the length but make them wider.
It did occur to me to do some hdcs in place of scs for that purpose. But would the uppers also have to be somehow modified to coincide with the adjusted sole width?
yes. So if you go up or down on the foundation, be sure to factor that in on the SIDES. Leave the heel and toe the same, just adjust the sides with the adjusted foundation. Does that make sense?
Yes, I understood that. I was actually wondering if the side stitches should be made taller, or the toe flap made wider, so that it wouldn’t be stretched as much. Do you understand what I’m asking?
yes you can make the toe flap wider. As I have not done this myself, I can’t tell you exactly, but I think it should work for you!
Hi again. I’d like your advice with something else. I have made a pair of slippers, and they are too small for me, or anyone else in my house, so I thought I’d sell them. But I don’t know what to mark the size as. What would the ideal foot length be to fit if the outside of the sole on the finished shoe is about 8 3/4″ long?
That’s pretty small, I am not sure. That is smaller than a size 5, do women’s sizing go smaller than that?
I really don’t know… should I mark it as a children’s size then?
Maybe you could tell me how the foot length ought to compare to the length of the sole, and then I could easily find a chart to tell me what shoe size that is, and whomever it will fit.
It should be about 1/4″ smaller than the foot size for a snug fit.
So then this slipper should ideally fit a foot that’s 9″ long? According to charts I’ve found, that should be a size 5. I must admit, this all confuses me a bit.
Thank you for the quick replies. I actually didn’t see them before posting that last comment, as my browser hadn’t reloaded the page recently. Thank you for helping me find the pictures… I’m such a dunce, I don’t know how I didn’t see them there before. I did find the middle of the toe by myself, starting from the middle dc and going up. But now the straps don’t look centered, even though everything else looked fine. The 10th stitch does not lie directly over the middle, rather the 8th does. Should I adjust something, or is it supposed to be like that?
No, they are supposed to be even. Did you work around the right way? You should be working from the outside, working down towards the toe.
Yes, I have been working the right way. Everything else looked fine. Though I noticed that after the second strap, I was missing two spaces for the remaining slip stitches. I guess when I did the final slip stitch to join back onto the shoe, I actually skipped one when I shouldn’t have. I went back and fixed it and they look better now. But now I realize I didn’t measure the sole beforehand, and it’s actually an inch too short, even though I achieved the gauge. Should I go up hook sizes, or do the next slipper size?
The sole should be about a size too small. Did you try the slipper on? If the sole fits your foot exactly the finished slipper will be too big.
I actually did not measure the sole beforehand, but I tried to put on the finished slipper and it was too small. Then I measured the sole, and found it was an inch shorter than the pattern said it should be. I decided to redo it using a size H hook, and it came out to a more reasonable size. So I’ve finished them and am wearing them now. :) Sorry for my ineptitude, and thank you for all your help, and for the lovely pattern. :)
Oh good! Please don’t apologize, I am always here to help. You are very welcome!
I am trying to make these now, but I don’t understand something.
-In the first row on the sole, it says place a marker. Where exactly should the marker go? What is it’s purpose?
-At the beginning of row 2, into what 3 sts do the next scs go into? Should I do skip the last chain, and jump to the 3 sts that are done in it at the beginning of the 1st row? It does seem to me that this is going to be done around, rather than in rows or regular rounds.
-There are apparently supposed to be some pictures, it says. Maybe it’s ridiculous, but I can’t for the life of me figure out where they are.
Any help would be much appreciated. Thank you.
I think I’ve figured it out… The scs are done in the 3 sts worked in the first chain. The sole is worked in continuous rounds, not joined rounds, and the marker is to keep track of the beginning stitch. Is that correct? I have done several rounds and it all seems to be working out fine. I hope to finish these soon. They are lovely, and I’m looking forward to having something between my feet and the cold floor. Thank you for the pattern!
Yes! I am sorry I didn’t see this to clear things up for you. Glad you got it, let me know if you have other questions!
When stitching the two soles together, does it matter where I start? Do I tie off afterwards? I also would like to see the pictures, but I don’t know where they are.
It doesn’t matter where you start, and yes you tie off.
Okay, so I have gotten past that… I guess I should have given it a little more thought before leaving more comments. I am now doing the straps, and have run into a little problem. I did the first strap, 20 sl sts, and then the second one, but they look offset. It seems the second one ought to be about 2-3 sts back. What do you suggest? Is it supposed to be like that? Everything else worked out fine. Sorry for filling up your page with all my questions.
I am also having trouble figuring out exactly where the middle of the toe should be.
You can find the middle of the toe by laying down your hook on the middle of the sole (working on both sides of the foundation chain makes a seam) and using the stitch it touches as the middle. The photos are at the very bottom of the pattern.
These slippers are cute! Thank you for sharing the pattern. I plan on making myself a pair as soon as I can go out to get some yarn. I just have one question. Exactly how much yarn do they need? Unfortunately, I do not think they have Red Heart yarn around here. So I really need to know how much is in one of the skeins you used. Thanks.
I am not sure what the exact yardage is, but I made 2 pairs from one skein (with yarn leftover), so they don’t take a huge amount.
When doing the first row of the sides going through the slip stitch DO the half doubles and doubles get done by the toe OR by the heel? thank-you
They are around the heel.
These are so cute! I’m in the process of making a pair for myself! This is prob a stupid question, I’m just wanting to make sure since it doesn’t say for a 7, do you tie off after you’ve stitched the soles together?
Thanks! Oh dear, I am sorry. Yes, you tie off. My apologies! This pattern needs a bit of love and attention, and it’s on my list. Sorry about that!
I’ve just made these but they look tiny, I think I’ve made these is uk terms should it be us ? I’m new to crochet and get so confused lol
Oh dear! Yes, this pattern is in US terms.
Hi Bethany,
I love the pattern! I started to make a pair of size 7 and it is not anywhere close to the correct size. My hook size must be wrong. I’m using my F hook, which is 3.75mm. I must need to go up hook sizes? After the first 3 rows the sole is measuring 51/2″ long and 1 1/2″ wide at its biggest spot. I am an experienced crocheter but cannot imagine how going up hook sizes will even fit. I’m not crocheting that tightly either. I’m really confused; have I missed something??
It sounds like you crochet tighter than I do, so I would think going up a hook size might help, but I am surprised yours is so small. What yarn are you using? Did you make a gauge swatch and meet the gauge?
I’m using red heart super saver (size 4) and the gauge was pretty close. I will try it going up a hook size and hopefully that works. I just can’t picture it since it was so small after 3 rows.
hi i am up set not one pair of these slipper are the right size you say they are using F hook you got them from size 5 6-7-8-9-10 my 10s are bi a man can were them if he has a 13 foot.i just made a pair of 9’s i thought and my husband lol at me he said these must be 12. Tell me what to do to fix this.
Thank You
Mary
Did you achieve the indicated gauge?
I imagine someone must have asked this before, but how much yarn was used for the slippers? I know it depends on the size of the slipper, but I’d appreciate a bit of guidance… I need to crochet size 8 slippers for myself. I think 1 skein of worsted-weight yarn should be quite enough for the top part, is that correct? Same for the bottom part (soles).
Thank you so much!
You can make both of them with 1 skein. You will need two colors, if you plan on doing two, of course.
Hi Bethany,
Thanks for the quick reply! Great pattern. Can’t wait to make my slippers. Do you have, by any chance, a slipper pattern for men? I’d like to make a pair for my fiance so he can keep his feet warm and cozy. :)
Cheers,
Corina
I don’t! I might need to though, I have had a few people ask :)