
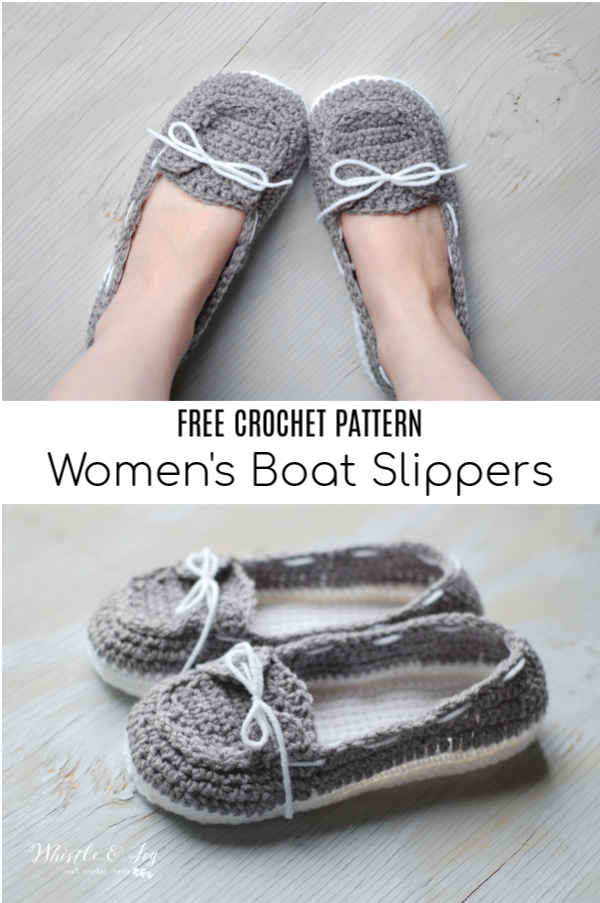
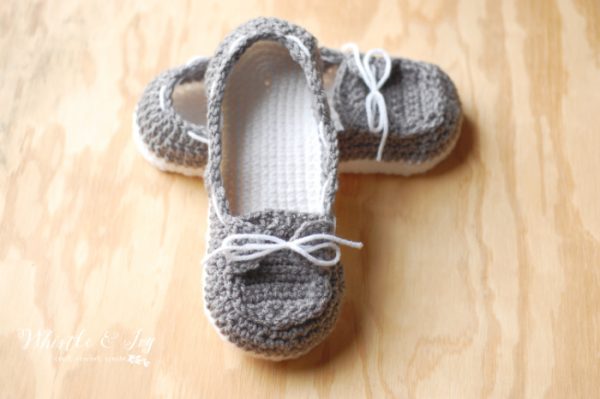
These crochet boat slippers look a bit like crochet Sperrys! You will love making them and love wearing them. They feature a double sole for extra comfort, and the ties are both decorative and to keep the slippers cozy and in place. Be sure to add one of these 7 tried and tested methods and make your slippers non-slip.
This post includes affiliate links, which means I get a small commission if you make a purchase at no extra cost to you. Thank you for your support!
These slippers (along with my Loafer Slippers) are one of my favorite patterns. I had the idea a few years ago to make these little Baby Boat Shoes. They turned out so darling that I decided I really wanted a pair for myself!
However, despite getting the pattern testing and making at least a million pairs (okay, that’s a slight exaggeration), it still had problems and I couldn’t bring myself to get it all fixed up until just this week.
Despite getting a bit burned out initially, these slippers still make me so happy and I hope if you make a pair that they make you happy too. ❤️

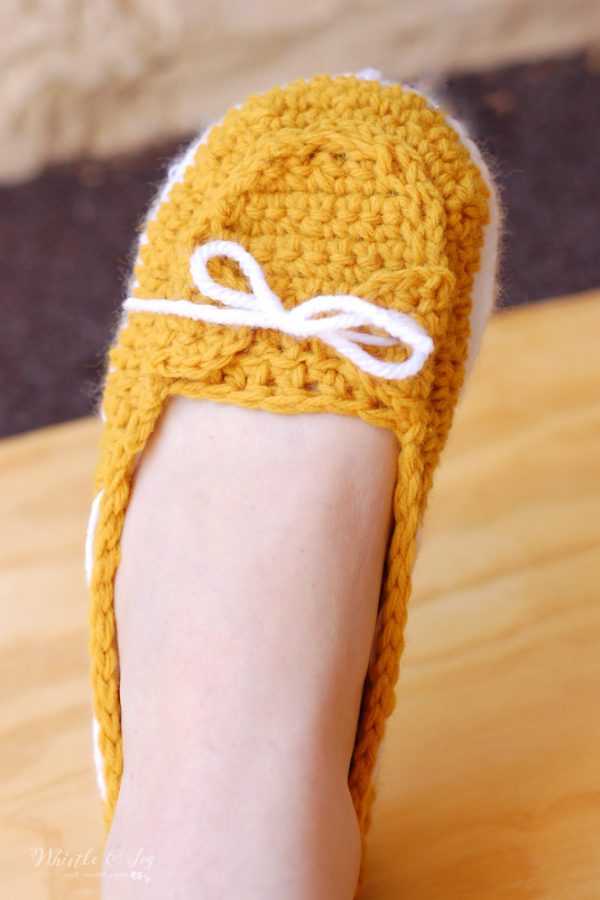
I made almost all of mine with white soles, but I can’t wait to see the colors you decide to use. I bet putting a bit of leather cord for the laces would be cute too!

You’re tired of sifting through complicated tutorials and patterns that leave you feeling overwhelmed.
Let me help.
PICTURE THIS:
Instant access to a library of modern, easy-to-follow patterns
Gifting your handcrafted treasures to your loved ones.
Feeling accomplished by your beautiful makes
It’s time to make your crafting experience as joyful as it should be.
CROCHET BOAT SLIPPERS – FREE CROCHET PATTERN
Please remember: You are free to use this pattern to make and sell, but do not republish or distribute this pattern in any way. DO NOT use my photos in your listings. Please do share my blog links! It’s a quick and FREE way of supporting Whistle and Ivy and more free crochet patterns in the future.
PLEASE read my Disclaimer before working my free patterns!
What you need: (affiliate links)
– Medium Weight Yarn in 2 color
– G hook
– Darning Needle
Abbreviations: US Terms
Ch – chain
Sc – single crochet
Sc2tog – Sc Decrease
Dc – Double Crochet
Dc2tog – Dc decrease
Hdc – Half Double Crochet
Sl st – Slip Stitch
St – stitch
Gauge: 8 sts = 2″ (Gauge Pattern)
⭐️ Want more sizes? US women Sizing 6-9 is available in the downloadable PDF!
Get it in the Whistle and Ivy Shop
Get it on Ravelry
Get it on Etsy
Love this pattern but want MORE? How about more sizes? You will LOVE The Endless Bundle – my membership program full of patterns, videos, courses, community, and much more. See you on the inside!
SIZE 8
Make two sole pieces for each shoe, 4 total.
SOLE: (approx. approx. 9 ½”)
(worked in the round)
Ch 26
1. Work 3 sc in 2nd ch from hook. Sc in next 16 chs. Hdc in next 3 chs. Dc in next 4 chs. Work 7 dc in last ch.Working across opposite side of chain, dc in next 4 chs, hdc in next 3 chs, sc in next 16 chs. Place a marker. Continue to round 2. (56 sts)
2. Work 2 sc in the next 3 sts. Sc in next 24 sts. Work 2 sc in the next 5 sts. Sc in next 24 sts. (64 sts)
3. *Sc in next st, work 2 sc in next st* work 3 times. Sc in next 24 sts. *Sc in next st, work 2 sc in next st* work 5 times. Sc in next 24 sts. (72 st)
4. *Sc in next 2 sts, work 2 sc in next st* work 3 times. Sc in next 24 sts. *Sc in next 2 sts, work 2 sc in next st) 5 times. Sc in next 24 sts. (80 sts)
5. *Hdc in next 3 sts, work 2 hdc in the next st* work 3 times. Hdc in next 24 sts. *Hdc in next 3 sts, work 2 hdc in the next st* work 5 times. Hdc in next 24 sts. (88 sts)
Join with sl st and tie off.
Match up your two sole pieces and using a sl st, stitch the two soles together, (wrong sides together) going through both loops of each sole. See Photos 1 & 2. Use white, or same color as your sole piece. (88 sl sts)
Body:
1. Using white yarn (or same color as your sole) start your round on st 18 from the middle of the toe. Face the toe downwards and count 18 to the right. See Photo 3. Going through the sl st loops, and working from the outside, Ch 1. Sc in same st. Sc 50. Hdc 7. Dc 10. Hdc 7. Sc 13. Join with sl st. Tie off. (88 sts)
2. Start your second color with a sl st in the sc where you made your join. Ch 1. Hdc in same st. Hdc in next 50 sts. Dc in next 24 sts. Hdc in next 13 sts. (88 sts)
Join with sl st.
3. Ch1. Sc in same st. Sc in next 3 sts. Sc2tog twice. *Sc in next 2 sts. Sc2tog* work 4 times . Sc in next 2 sts. Sc2tog twice. Sc in next 18 sts. Hdc in next 4 sts. Dc in next 4 sts. Dc2tog. Dc in next 8 sts. Dc2tog. Dc in next 4 sts. Hdc in next 4 sts. Sc in next 12 sts. (78 sts)
Join with sl st.
4. Ch 1. Sc in same st. Sc in next 29 sts. Sc2tog 3 times. Sc in next 5 sts. Hdc in next 4 sts. Dc in next 4 sts. Dc2tog 5 times. Dc in next 4 sts. Hdc in next 4 sts. Sc in next 5 sts. Sc2tog 3 times. (67 sts)
Join with sl st.
5. This is the start of the small straps on the top of the shoe:
(Starting in next st, not the same st) Sl st 4. *Ch 4 . Sc into 1st ch. Sl st into next st on shoe. Turn.ch 1. Sc in next st. Sc 3 in loop. Sc 1. (it’s into the side of the foundation sc, but it brings you back to the top of the shoe. ) Sk the 1st st, and sl into next st onto shoe. Turn. Ch 1. Sc in next st. sc 2 in each of the next 3 sts. Sc 2 . ( the second sc will be in the side of a st) sl st onto shoe*.
Sl st in next 20 sts.
Next strap: Repeat from * to *. Sl st in next 38 sts. Join with sl st. Tie off.
TOE FLAP:
Ch 6.
1. Sc in 2nd ch from hook. Sc in next 4 chs. Turn. (5 sts)
2. Ch 1. Work 2 sc in first st. Sc in next 3 sts. Work 2 sc in last st. Turn. (7 sts)
3. Ch 1. Work 2 sc in first st. Sc in next 5 sts. Work 2 sc in last st. Turn (9 sts)
4. – 7. Ch 1. Sc in same st. Sc 8 across. Turn. (9 sts)
8. – 10. Ch 1. Sc in same st. Hdc in next 2 sts. Dc in next 3 sts. Hdc in next 2 sts. Sc in last st. Turn. (9 sts)
Tie off, leave a long tail.
Using a yarn needle, attach your toe flap. Make sure to secure where the corner of the flap meets the side of the slipper. Take your yarn needle, and go in and out through the slip stitches (they look a bit like they are on the outside of the slipper). Catch whichever piece of yarn on the flap that corresponds with the slip stitch. Finish by adding the “laces” with your yarn needle.
========================================
PHOTO 1
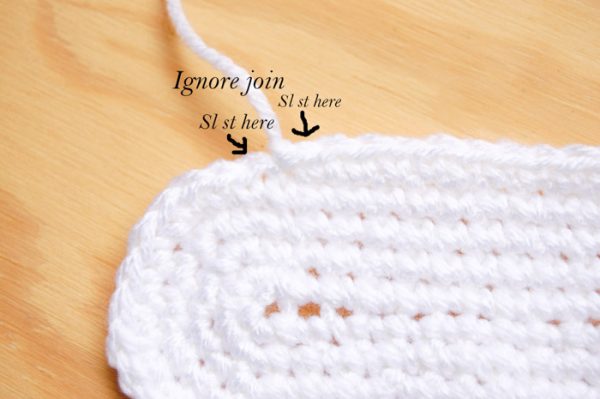
PHOTO 2

PHOTO 3

Love this pattern but want MORE? How about more sizes? You will LOVE The Endless Bundle – my membership program full of patterns, videos, courses, community, and much more. See you on the inside!
xoxo,


hello for women size 36 which pattern sole i choose plz
I am not familiar with European sizing, but I am sure you can google a conversion chart. The sizing is US women shoe sizing.
I need help with the size 8. Starting at row 3, I am missing 2 stiches to get to marker. How is it possible to increase and still only need 24 sc to reach marker? As I continue, the sole gets lopsided and I’m missing more stiches.
Because the sides stay the same length, the toe and heel get rounder and bigger. Did you do the increases correctly? It’s possible you are miscounting there. Be sure you are doing 5 increases around the toe and 3 increases around the heel (with a single worked in-between).
I think I’m doing them correctly. If I do 1 sc, 2 sc 3 times around the heel in round 3, then I have a total of 9 stitches. However in round 4, it’s 2 sc, 2 sc 3 times. That would be 6 holes, but there are 9 stitches from previous round. How do I manage those?
Okay, I wasn’t increasing correctly. Got it now. Thanks.
Okay! Let me know if you need more help.
I’ve confused myself here also. I’m not getting the (2sc,2sc) increase right. Why am I having so much trouble? I’ve watched video(great btw) but not seeing the increase correctly. Sorry to bug ya but thanks for any help!
Sorry you are struggling! Are you short stitches?
So I started a new one. Making sure nothing is missed. Whats happening(size 9) is @ row 3-5 after sc26 my ends are going off center. I count and count and just dont understand. Is there anyway there’s a misprint?
I am trying to help, can you help me? So you have the right counts, you are ending up with the correct row count but the toe and heel are off center?
Yes exactly correct. My SC26 seams fine till end of row 4. My last 26 side going into row 5 with sc2, sc2. Is starting well before it seams to be starting therefore ending my”curve” at dead center. Would this be easier to text about via youtube video? Thank you for trying to help. Also my heel/toes are falling off center slightly @ end of row 3. More obviously off the closer to row 5 hope I’m being clear.
So duh! I went back and worked slowly with your video. Found I was not increasing correctly I was not understanding the written pattern. I FINALLY have it and completely understand what I was doing wrong. Thanks for the sound board and your video’s are fabulous!
Thank you very much! Glad you got it!
Hello, Bethany. I’ve already made one pair of your slippers and I love them! I’m trying to make another pair for my sister, and I’m almost finished. However, the website won’t let me see the pdf instructions for some reason. Could you tell me the directions for making the toe piece (the one you have to sew on, i don’t know the name for it) for a size 9 shoe? Her birthday is this weekend and I really want to get it done by tomorrow. Thank you so much!
I am sorry! I recently switched hosts and it looks like a few things got scrambled! I added the pattern back. Sorry for the inconvenience!
Thank you so much for your help!
When I click I the link for the pattern, it takes me to a page that says it can’t be found and brings me right back here. Please help.
Oh dear! I recently switched hosts and it seems a few things got scrambled along the way. I am adding the pattern back now.
Thank you so very much! I appreciate it, the pattern is lovely!
You are welcome! Thank you!
Hello, these are so super cute. I made a pair for a friend and everyone loves them. Now my cousin, aunt and co-worker all want a pair. I took a picture as well if you’re interested. Thank you so much, I will definitely be following you!
Thank you very much! I would love to see! You can join our Facebook group and share with everyone if you would like too!
https://www.facebook.com/groups/1522119841444252/
Thanks, will do!
Hello, I apologize if you’ve already answered this but I’m a very, VERY new crochet-er. And when you say join the ‘wrong sides’ together what do you mean by that? Sorry, like u said I’m an amateur.
Don’t apologize! Basically because you made a seam when you sewed both pieces, you now have a “right side” and a “wrong side” (like in sewing, if you sew at all). The wrong side would be the side with the seam. Does that make sense?
Hi! I am working on the size 8 and my sole only came out to 8 inches. I am using worsted weight and a 4.00 hook. just slightly bigger than an F……..any suggestions?
It is worsted weight redheart. if that helps.
Yes, go up a few hook sizes. You must crochet tighter than me.
I can’t read all the pattern because the whistle & Ivy logo covers the print.
Please open the pattern in Adobe Reader.
Hi,
Love the look of these and dowry keen to give it a go! I am new to crochet and live in New Zealand. Yarn thickness is gauged by ply here. Any idea what ply yarn is best to make these?
Thanks!
I used medium/worsted weight. I don’t know the conversion off hand, but I googled and found this chart:
http://www.crochet-knit.com/yarn_conversion.html
Hello, I love this pattern its written so well. I make these slipper alot, Today i was asked to make a 9 1/2, would the size 9 fit or it the half size difference going to make them too snug?
I would definitely go down a size! They stretch over time with use.
Okay so i used the pattern for a size 8. i thought the soles came out perfectly. they stitched together smoothly, however i didnt end up with 88 sl st i ended up with 92. and i realize that is the amount of sl st for a size 9 but i can assure you i follwed 8. so im a bit lost any help would be awesome.
Hm. If you are absolutely positive you worked 8, the only thing I can think is if you worked extra increases around the toe?
Hey i keep having trouble with the size 9. At the 4th part for the body, its supposed to end at 71, but i can’t fit the last two single crochets. That row uses 84 stiches but the previous one only made 82 :l
It’s very possible there is a mistake! I haven’t gone back in added stitch counts to this pattern yet. I hope to do that soon! I am sorry, for now you can just end at 82 and move on to the next row.
Thanks for the pattern. I think I would like to try it. But….. I think, the boots are verry slippery, aren´t they? We´ve got a wooden floor and I think the boots could be dangerous. What kind of yarn did you use?
Worsted aryclic. There are a few methods for making them non-slip. A few commenters suggested spray-on silicone.
When I click the link to get pattern nothing happens
It might your browser. You can try clearing your cache, some computers won’t load it when their caches are very full.
My sole keeps coming out so small. Am I supposed to be using 2 strands of yarn on the soles? I looked on the instructions and don’t see anywhere how many strands to use or am I looking over it?
No just one strand. Your tension must be a lot tighter than mine. Go up a few hook sizes and make sure 4 sts across = 1″ long.
I just went ahead and used 2 strands and it came out perfect
Perfect! Glad you got it!
I am crocheting a size 9 and I’m having trouble between rows 3 and 4 of the body. At the end of row 3 I have 82 stitches but I’m short when I crochet row 4. Any idea what I’m doing wrong?
Are you working the increases correctly?
I love boat shoes! I bought my husband a pair a couple summers ago. And today my friend came over and she was wearing a pair of boat shoes, so maybe I can make her some boat slippers for her birthday or Christmas present. I’m pinning these!
Navy Wifey Peters @ The Submarine Sunday Link Party
Thanks so much! They are so comfy, I wear mine all the time :)
I downloaded the pattern and when I went to go read it there was a big picture in the middle of the page that blocked out the pattern. Is there something you can do?
Make sure you are opening with Adobe Reader, and it is up-to-date. You can also try tapping “reader view”.
could you make the toddler boat slippers a double sole? i wanna make some for my son he will be 2 in a few months and wears 7-8 and now i found these and wanna make some for me lol but i made the bitty bow sandles and love the double soles
You could! It would take a bit of tweaking, but it could definitely work! Just tie off after row 4, make 2, sl st together, and I think if you work the rest of the pattern, it should turn out okay. (hopefully!)
I was making a pair of these for my fiance and of course I adjusted the pattern to fit a man size 12 but he asked if I could add something in the soles to give it extra padding so I used some stuffing that you can buy for toys. He loves the added cushioning
Awesome!!
I crochet very tightly, I wanted to make size 8 slippers, and to get them to be size 8, I used the size 9 pattern and an H hook! I have completed steps 1-4 for the body, but the body is not tall enough to move onto the adding the flaps. And suggestions for making it taller? Should I continue with more rows, or try increasing sc to hdc and hdc to dc? I was going to just contine going around, but I don’t know how to work the decreases if I do. Thanks!
Oh man! You do work it tightly! I would not add extra rows, but just go up a few more hooks sizes until the stitches are the right size. Keep in mind, the straps are not supposed to touch each other.
Thank you! Roughly how tall should the body be from the sole in the front?
Really just a couple inches. The heel should come to the top of your heel, so it cups around it.