
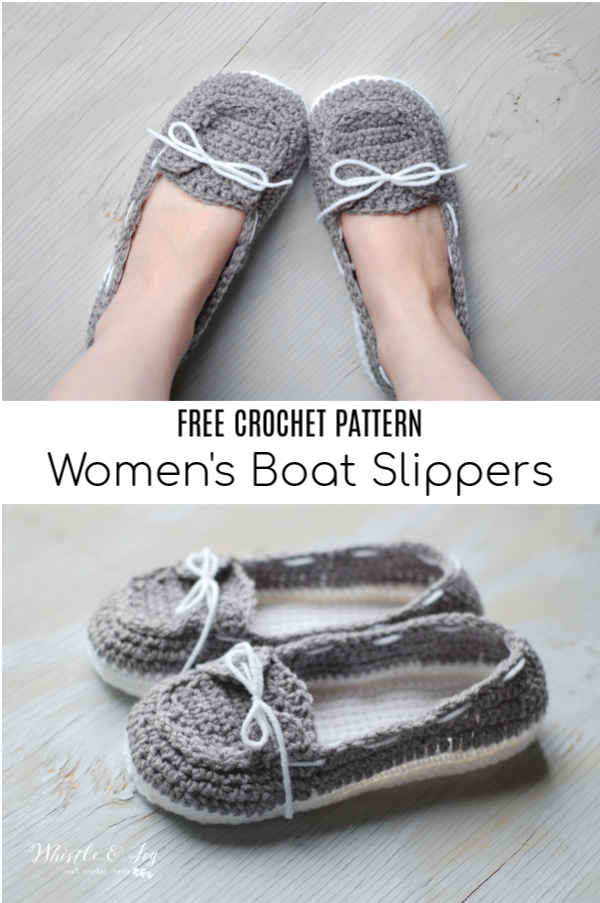
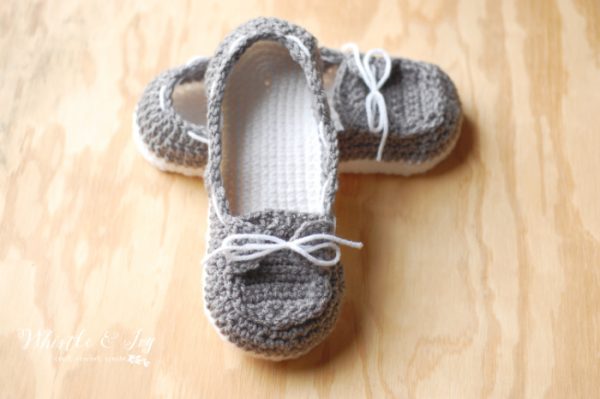
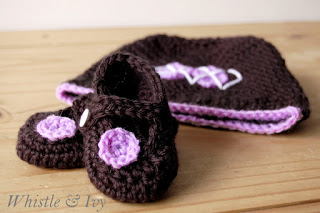
These crochet boat slippers look a bit like crochet Sperrys! You will love making them and love wearing them. They feature a double sole for extra comfort, and the ties are both decorative and to keep the slippers cozy and in place. Be sure to add one of these 7 tried and tested methods and make your slippers non-slip.
This post includes affiliate links, which means I get a small commission if you make a purchase at no extra cost to you. Thank you for your support!
These slippers (along with my Loafer Slippers) are one of my favorite patterns. I had the idea a few years ago to make these little Baby Boat Shoes. They turned out so darling that I decided I really wanted a pair for myself!
However, despite getting the pattern testing and making at least a million pairs (okay, that’s a slight exaggeration), it still had problems and I couldn’t bring myself to get it all fixed up until just this week.
Despite getting a bit burned out initially, these slippers still make me so happy and I hope if you make a pair that they make you happy too. ❤️

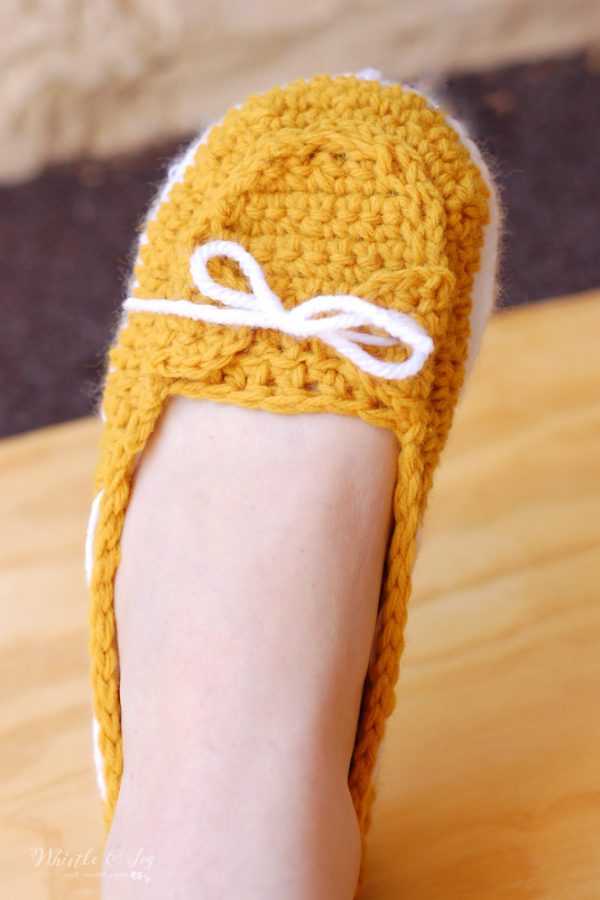
I made almost all of mine with white soles, but I can’t wait to see the colors you decide to use. I bet putting a bit of leather cord for the laces would be cute too!

You’re tired of sifting through complicated tutorials and patterns that leave you feeling overwhelmed.
Let me help.
PICTURE THIS:
Instant access to a library of modern, easy-to-follow patterns
Gifting your handcrafted treasures to your loved ones.
Feeling accomplished by your beautiful makes
It’s time to make your crafting experience as joyful as it should be.
CROCHET BOAT SLIPPERS – FREE CROCHET PATTERN
Please remember: You are free to use this pattern to make and sell, but do not republish or distribute this pattern in any way. DO NOT use my photos in your listings. Please do share my blog links! It’s a quick and FREE way of supporting Whistle and Ivy and more free crochet patterns in the future.
PLEASE read my Disclaimer before working my free patterns!
What you need: (affiliate links)
– Medium Weight Yarn in 2 color
– G hook
– Darning Needle
Abbreviations: US Terms
Ch – chain
Sc – single crochet
Sc2tog – Sc Decrease
Dc – Double Crochet
Dc2tog – Dc decrease
Hdc – Half Double Crochet
Sl st – Slip Stitch
St – stitch
Gauge: 8 sts = 2″ (Gauge Pattern)
⭐️ Want more sizes? US women Sizing 6-9 is available in the downloadable PDF!
Get it in the Whistle and Ivy Shop
Get it on Ravelry
Get it on Etsy
Love this pattern but want MORE? How about more sizes? You will LOVE The Endless Bundle – my membership program full of patterns, videos, courses, community, and much more. See you on the inside!
SIZE 8
Make two sole pieces for each shoe, 4 total.
SOLE: (approx. approx. 9 ½”)
(worked in the round)
Ch 26
1. Work 3 sc in 2nd ch from hook. Sc in next 16 chs. Hdc in next 3 chs. Dc in next 4 chs. Work 7 dc in last ch.Working across opposite side of chain, dc in next 4 chs, hdc in next 3 chs, sc in next 16 chs. Place a marker. Continue to round 2. (56 sts)
2. Work 2 sc in the next 3 sts. Sc in next 24 sts. Work 2 sc in the next 5 sts. Sc in next 24 sts. (64 sts)
3. *Sc in next st, work 2 sc in next st* work 3 times. Sc in next 24 sts. *Sc in next st, work 2 sc in next st* work 5 times. Sc in next 24 sts. (72 st)
4. *Sc in next 2 sts, work 2 sc in next st* work 3 times. Sc in next 24 sts. *Sc in next 2 sts, work 2 sc in next st) 5 times. Sc in next 24 sts. (80 sts)
5. *Hdc in next 3 sts, work 2 hdc in the next st* work 3 times. Hdc in next 24 sts. *Hdc in next 3 sts, work 2 hdc in the next st* work 5 times. Hdc in next 24 sts. (88 sts)
Join with sl st and tie off.
Match up your two sole pieces and using a sl st, stitch the two soles together, (wrong sides together) going through both loops of each sole. See Photos 1 & 2. Use white, or same color as your sole piece. (88 sl sts)
Body:
1. Using white yarn (or same color as your sole) start your round on st 18 from the middle of the toe. Face the toe downwards and count 18 to the right. See Photo 3. Going through the sl st loops, and working from the outside, Ch 1. Sc in same st. Sc 50. Hdc 7. Dc 10. Hdc 7. Sc 13. Join with sl st. Tie off. (88 sts)
2. Start your second color with a sl st in the sc where you made your join. Ch 1. Hdc in same st. Hdc in next 50 sts. Dc in next 24 sts. Hdc in next 13 sts. (88 sts)
Join with sl st.
3. Ch1. Sc in same st. Sc in next 3 sts. Sc2tog twice. *Sc in next 2 sts. Sc2tog* work 4 times . Sc in next 2 sts. Sc2tog twice. Sc in next 18 sts. Hdc in next 4 sts. Dc in next 4 sts. Dc2tog. Dc in next 8 sts. Dc2tog. Dc in next 4 sts. Hdc in next 4 sts. Sc in next 12 sts. (78 sts)
Join with sl st.
4. Ch 1. Sc in same st. Sc in next 29 sts. Sc2tog 3 times. Sc in next 5 sts. Hdc in next 4 sts. Dc in next 4 sts. Dc2tog 5 times. Dc in next 4 sts. Hdc in next 4 sts. Sc in next 5 sts. Sc2tog 3 times. (67 sts)
Join with sl st.
5. This is the start of the small straps on the top of the shoe:
(Starting in next st, not the same st) Sl st 4. *Ch 4 . Sc into 1st ch. Sl st into next st on shoe. Turn.ch 1. Sc in next st. Sc 3 in loop. Sc 1. (it’s into the side of the foundation sc, but it brings you back to the top of the shoe. ) Sk the 1st st, and sl into next st onto shoe. Turn. Ch 1. Sc in next st. sc 2 in each of the next 3 sts. Sc 2 . ( the second sc will be in the side of a st) sl st onto shoe*.
Sl st in next 20 sts.
Next strap: Repeat from * to *. Sl st in next 38 sts. Join with sl st. Tie off.
TOE FLAP:
Ch 6.
1. Sc in 2nd ch from hook. Sc in next 4 chs. Turn. (5 sts)
2. Ch 1. Work 2 sc in first st. Sc in next 3 sts. Work 2 sc in last st. Turn. (7 sts)
3. Ch 1. Work 2 sc in first st. Sc in next 5 sts. Work 2 sc in last st. Turn (9 sts)
4. – 7. Ch 1. Sc in same st. Sc 8 across. Turn. (9 sts)
8. – 10. Ch 1. Sc in same st. Hdc in next 2 sts. Dc in next 3 sts. Hdc in next 2 sts. Sc in last st. Turn. (9 sts)
Tie off, leave a long tail.
Using a yarn needle, attach your toe flap. Make sure to secure where the corner of the flap meets the side of the slipper. Take your yarn needle, and go in and out through the slip stitches (they look a bit like they are on the outside of the slipper). Catch whichever piece of yarn on the flap that corresponds with the slip stitch. Finish by adding the “laces” with your yarn needle.
========================================
PHOTO 1
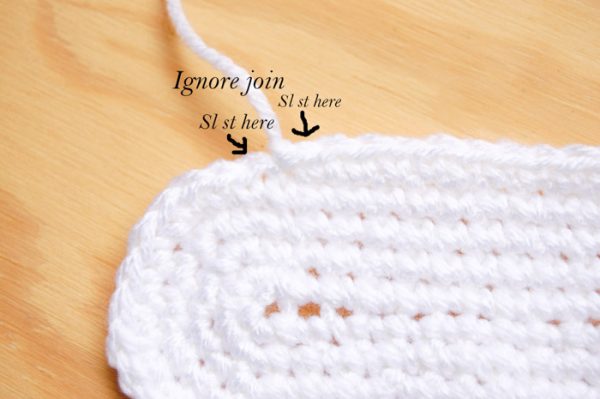
PHOTO 2

PHOTO 3

Love this pattern but want MORE? How about more sizes? You will LOVE The Endless Bundle – my membership program full of patterns, videos, courses, community, and much more. See you on the inside!
xoxo,


Hi Bethany. I’d just like to say I love all of your patterns. HoweverI’m from Australia and the only meidum weight yarn available to me is lions brand. Will this be a good substitute and is it a nice yarn to work with? Otherwise I usually use an 8ply Marvel soft which I believe is a dk weight for America. Could I use the same size hook and a dk weight wool? Would it just make the holes larger?
Thank you! I am not 100% sure, because I have never tried with that yarn. DK is a bit finer I think, than medium. I think Aran is the equivalent. I would try with Lion Brand and see if you can get the right gauge. Make sure you check the length of your sole with the approximate measurements on the pattern.
started working on this and I think I messed up somewhere. I had the right number of slip stitches on the soles, and started 18 from the center of the toe, but then all the DC ended up being on the toe, and that’s wrong. Correct? All the DC are supposed to be on the heel for height?
Yes, it sounds like you are working the wrong way around! Make sure the front (right sides) of your stitches are facing outwards.
Ooooohhhh!!! That makes so much more sense now! Haha, I feel like an idiot. I was working them the other way, like the baby boat shoes! :) Thanks!
No problem :)
So I think I made the same mistake (or some other mistake of not!)…I counted 18 st from the toe like described…from there should I be going back toward the toe or around the heel first?…I went around the heel but now that I’m through round four I think it looks funny!…plus starting apps isn’t working…
You want the right sides of your stitches facing out, not the back sides, so work down to the toe.
Def glad I kept reading the comments before I asked you again! This is the same problem I’m having right now. I didn’t know which way I was supposed to go, towards the toe or towards the heel!
Hello Bethany
I had a problem is this pattern worked in rounds
The sole is worked in the round. The body is joined rows.
Can you please email me to help me better understand this pattern? I am a begiiner but am a quick learner and I would love to create something cozy and warm for myself. Thank you.
Valerie
I can definitely help you! Use my contact page and send me your questions.
I LOVE LOVE LOVE these slippers!! They are so cute and I had no trouble making them! Thank you for releasing the pattern. These are definitely one of my favorite things that I’ve crocheted. I love the mustard yellow ones though…wish I had that yarn. :) Did you use a super soft yarn or worsted weight?
Thank you thank you! I am so glad you like them! I actually found the mustard yarn at yard sale without the label but I am 99% sure it was a vintage ball of red heart worsted. (They make a similar color and it’s much softer than the old stuff I used :) ) but I have made several pairs(and wrote the pattern) using regular red heart worsted.
I’m having a really hard time with the sole of this pattern, when it says
3. ( 1 sc, 2 sc in next st) 3 times. Sc 24. (1 sc, 2 sc in next st) 5 times. Sc 24.
does that mean a total of 4 for the first and 6 for the last? I can’t seem to have it line up ever .
Thanks so much
You repeat what is inside the parenthesis (it is the same sequence for the toe and the heel): Work one sc, followed by 2 sc worked in the next st. A total of 3 stitches worked over 2 stitches. You will repeat the sequence 3 times for the heel, and 5 times for the toe.
I am struggling with the pattern . On the sending to last row I don’t make it back to the marker with just 26 school.
Which size, which step?
Exited about doing this but I am having a lot of treble with the decrease! On step 3 of the body 3 sc sc2tog 2x, (2sc 1sc2tog) 4x by the time I get to the end sc 12 I am only able to get in 8 then I’m back to the starting point of the round I’m short 4 stitches and I’ve counted and counted over and over can’t seem to figure it out cud u please help
Did your step 2 work out perfectly?
Yes. I figured put wat I was doing wrong brain was having a overload I think lol. Thanks.
Hello!! I LOVE these slippers!! I’ve been trying to make them for some time now, but I’m having a LOT of trouble with the sole. EVERY time, no matter what size I try to make when I get to step 4 and 5 of the pattern, it NEVER lines up with my marker, I end up about 3-4 stitches away from the marker. I think my confusion is in the (Sc 2, sc 2 in next st,) 3 times and the (Sc 2, sc 2 in next st,) 5 times. Do I do 2 sc’s in the next stitch, then 2 in the next, and repeat that 3 times for a total of 2 sc’s in 6 stitches? Or do you put 4sc’s in the next 3 stitches? I’ve been doing 2sc, 2 sc in the next 2 stitches, and then repeating that 3 times, but it doesn’t take me all the way around the heel, only about 2/3s of the way around, same with the toe…. I tried looking for a tutorial, but haven’t been able to find one. :) Up until that step it looks like it’s working out PERFECTLY! Any help would be appreciated, I want to make 3 pairs :) one for me, my sister and my mom, they would love these!
Thank you so much! This part is an increase, just as if you were making a hat or doily. You work 2 sc stitches, each in their own stitch, then you do a double, or two sc stitches together in the same stitch. Then you repeat the 4 stitch sequence 3 times for the heel and 5 times for the toe. Does that make sense?
I just tried it and it worked out perfectly! Thank you!! I don’t know why I was having some major brain farts with it! haha Makes complete sense now! How did I not see it? lol Thank you so much!
You’re welcome :)
Thank you for posting this adorable pattern! You are very generous!
I’m having issues with the toe flap. I am making a size 10 because I am a tight crocheter and already had to go up a hook size as well. The toe flap seems to be very narrow and makes the foot opening very tight. Is the original chain the part that stretches across to the other side? The pictures of your finished beauties look like the top of the toe flap has bigger stitches than just sc. Maybe I can just add a couple of chains to my start chain?
Thank you for any advice!
You are welcome! The original chain starts the toe flap, where it meets the tip toe of the shoe. When you are done, the toe flap will look like a dome, so the beginning chain is the top rounded part. To give it a rounded shape, it starts with a short chain, and adds stitches each row to make it wider as you go. Does that make sense? You can absolutely add chains if you need to make yours wider, though!
I think I found my confusion. For sizes 9 and 10 that I was working on, the instructions do not say to Tie off at the end of the rounds (after doing the second strap). I went and looked at the other sizes and it does say Tie off. I was working with the toe flap attached near the first strap which really confined my movement. I think if I tie off and start the toe flap separate, I’ll have better luck figuring out which way it goes!
Thanks again!
Oh no! So sorry for that typo. Yes, that would definitely mess you up! My apologies, and I am glad you got it figured out in spite of my mistake!
I made the baby version for my niece, and decided to try making this one for myself. I have a question. Starting the “body” section, starting from the 18th stitch to the right of the bottom, should I continue working towards the heel direction or towards the toe? I tried the latter but it does not look right. Hope you can fell me.
Work so the right sides of your stitches are facing out, down to the toe. You want the hdc and dc’s to be around the heel.
I made then size but inside a tight stitch and it’s about a size 5 I’m making the size 9 in a more “normal” loose stitch and it’s me. I’m a size 8 so I’m not sure if I did it wrong or if your size chart is off. But either way I love these and am making them for my family as Xmas gifts. Tha is for the pattern
You’re welcome!
Thank you for your advice. Most grateful. Just finished 1, can’t wait to have the other one completed.
You’re welcome!
I made these in baby size for my daughter a while ago and loved them! People were asking me if they came in adult size! Then I saw this post and was sooo excited. I am working on the second slipper. I am using caron simply soft yarn, so I went up to an H size hook. They came out nice and snug in a size 7, but a little narrow. Nothing a little adjusting can’t fix, but I bet if I used Red Heart yarn (even their “soft” line) it would fix my problem.
Thanks SO MUCH for this pattern. It is great and simple to work up once figured out.
You are welcome! Yes, I wrote it using Red heart, so I bet Simply Soft would make it a bit smaller (funny how all “medium weights” are NOT the same!). Thanks for visiting and commenting, and I am so glad you like the pattern :)
I’m working size 7, and I get to #3 and this part and get confused on what exactly I’m doing here and when I count the stitches I’m not getting 74, can you clarify this for me.
(Sc 2, 1 sc2tog) 4 times . Sc 2. Sc2tog twice.
Thanks
Hi Michelle,
So sorry you are confused! For this part, you will work the (sc 2, one sc2tog) 4 times, in that order. So work 2 sc, then one sc2tog; work 2 sc, one sc2tog, and so on. Then follow it with 2 sc, and 2 more sc2tog. Does that make sense?
Love all you do. Thank you for showing a crochet beginer amazing things inthe world of crochet.I have learned so much.
You are very welcome! It makes me so happy to know I have inspired you :) :)
One, thank you for such a cute pattern! Second, can you give a smaller gauge than the finished sole? I used an f hook and finished the sole for size 10 slippers but was 2 inches short! It took me so long to do that section, I’m wondering if you could measure a few rows so I can compare how much I need to adjust or go up in hook sizes to match your pattern.
Thank you! Yes! I am sorry I don’t have one already. I will see what I can do as soon as possible.
Do I use the same pattern for both the left and rigt foot?
yes! These are not shaped for a left or right foot.
Is there any way to make these a little bit wider. I made my first slipper in my size, and it fits perfectly in length but is a tad too narrow for my foot. Maybe double crochet along each side for length of the sole instead of single crochets? Im not sure if making it wider would mess up the length or any other parts of the shoe. Thank you! :)
Yes, DC’s would work! Or you could work the last two rows in hdc instead of sc. It will add length, so maybe you can go a size down, and do a few rows in longer stitches, I think it would compensate.
Thank you so much! I will try that next! I love this pattern so much! I even made the toddler boat shoes for my son!
You’re welcome! Thank you! I am glad :)
Love the pattern thank you! When I get to round 4 of the sole I work the 2 sc in 6 stitches do 22 sc then the 2 sc in 10 stitches and when I start the next 22 stitches I have 6 stitches left to get to my marker. I’ve frogged it 2 now and I’ve got my count right. Any help? Doing size 7 btw :)
Thanks Abbey! Yes, you are not doing the increases correctly. 2 sc (each in their own st), then 2 sc together in the next st. Repeat this whole sequence 3 times for the heel, 5 times for the toe.
I would like to make these as Christmas gifts for my mom and two sisters. I’m living in Mexico right now, so it’s tough for me to get a hold of American products. I have a friend coming in a couple of weeks who could bring me the Red Heart yarn, but I’m wondering how much yarn I should have her bring. It would be for three pairs, all in size 10. Would one skein of each color be enough?
Hm. I am not sure how many skeins are in one roll of Red Heart. It seems that each pair uses less than half of a roll of each color, maybe a quarter of the roll. Are you doing them all in the same color?
I think two rolls of each color would be plenty and on the safe side if you have not access otherwise.
I’m planning to do them in the same colors, so I think two of each color should be perfect. Thanks for replying so quickly!
You’re welcome! Happy crocheting :)
How cute they are!
Thank you so much, Jane!
These are sooo cute and as the weather is changing will be wonderful to spend the evening making them. Thanks so much Bethany for sharing the pattern!
Thank you! You are SO welcome :)
hi! i am confused as how to end the first round and start the second when working in the round on the sole of the shoe. could you elaborate that part of the pattern in grater detail? thank you!!! As of now i followed the directions and there is one back of a stitch left ( where the 3sc was done at the beginning) and i dont get where to join it. :)
Hm. You shouldn’t have a stitch leftover, you should start the first st of Step 2 in the first of the 3 sc from the previous round. Make sure you are using a stitch marker and maybe recount to make sure it was worked correctly.