
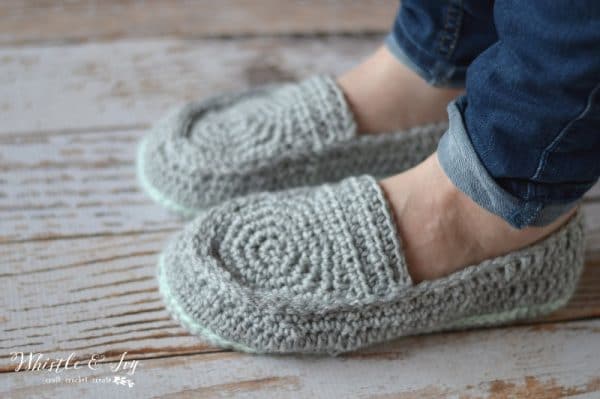
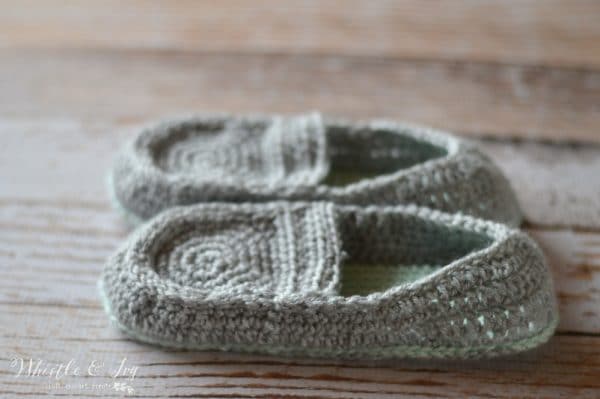
These darling crochet loafer slippers are fun to make and comfortable to wear! They feature a double sole for extra comfort and are made with simple construction. Make a pair for baby too! This post included affiliate links, which means I get small commission if you make a purchase at no extra cost to you. Thank you for your support!

I finally finished a pattern that I have been working on! It felt like these women’s loafer slippers took way longer than they should have, but I am SO glad to be finished (and I might not be making slippers again in the near future, phew!). I really love how they turned out, and they are so comfortable! The double sole is so lovely. It’s pretty fun to mix and match colors for these crochet slippers.

You’re tired of sifting through complicated tutorials and patterns that leave you feeling overwhelmed.
Let me help.
PICTURE THIS:
Instant access to a library of modern, easy-to-follow patterns
Gifting your handcrafted treasures to your loved ones.
Feeling accomplished by your beautiful makes
It’s time to make your crafting experience as joyful as it should be.
WOMEN’S LOAFER SLIPPERS – FREE CROCHET PATTERN
Please remember: You are free to use this pattern to make and sell, but do not republish or distribute this pattern in any way. DO NOT use my photos in your listings. Please do share my blog links! It’s a quick and FREE way of supporting Whistle and Ivy and more free crochet patterns in the future.
What you need:
-Size 4.5mm hook (be sure to check the gauge)
-Medium Weight Yarn (Brava Knit Picks in Dove Heather and Mint)
-Darning Needle
Abbreviations: (American Terms)
Ch – chain
Sc – single crochet
hdc – half double crochet
Dc – double crochet
Dc2tog – Dc decrease
Sc2tog – Sc decrease
Sl st – Slip Stitch
St – stitch
Gauge: 8 sts = 2”
Thank you for working this pattern! The free version includes size 8. You can change the sizes for yourself by going up 2 chains on the foundation for each size up (or eliminate 2 chains on the foundation for a smaller size). You can also buy an ad-free PDF from my Ravelry shop that includes sizes 6, 7, 8 and 9. Thanks for your support!
Size 8 Loafer Slipper Pattern
Ch 26
1. Work 3 sc in 2nd ch. Sc in next 16 chs. Hdc in next 3 chs. Dc in next 4 chs. Work 7 dc in last ch
Working across opposite side of chain: dc in next 4 chs, hdc in next 3 chs, sc in next 16 chs. (56 sts)
Place a marker and move up with each round.
2. Work 2 sc in the next 3 sts. Sc in next 24 sts. Work 2 sc in the next 5 sts. Sc in next 24 sts. (64 sts)
3. *Sc in next st, work 2 sc in next st* work 3 times. Sc in next 24 sts. *Sc in next st, work 2 sc in next st* work 5 times. Sc in next 24 sts. (72 sts)
4. *Sc in next 2 sts. Work 2 sc in next st,* work 3 times. Sc in next 24 sts. *Sc in next 2 sts, work 2 sc in next st* work 5 times. Sc in next 24 sts. (80 sts)
5. *Hdc in next 3 sts, work 2 hdc in the next st* work 3 times. Hdc in next 24 sts. *Hdc in next 3 sts, work 2 hdc in the next st* work 5 times. Hdc in next 24 sts. (88 sts)
Join with sl st and tie off.
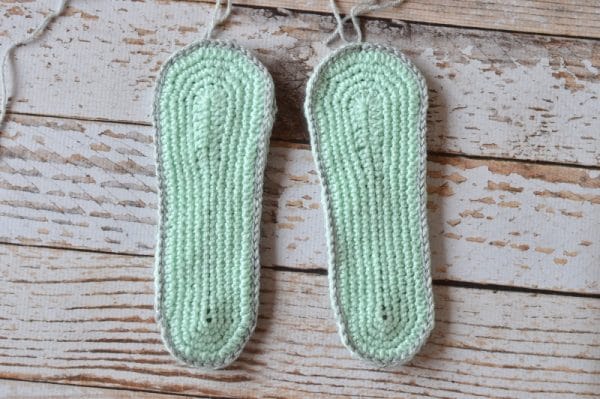
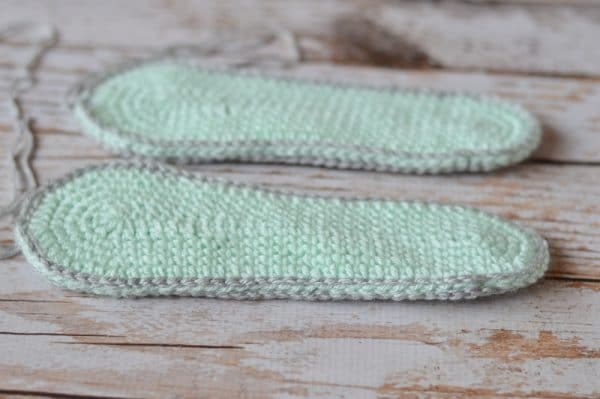
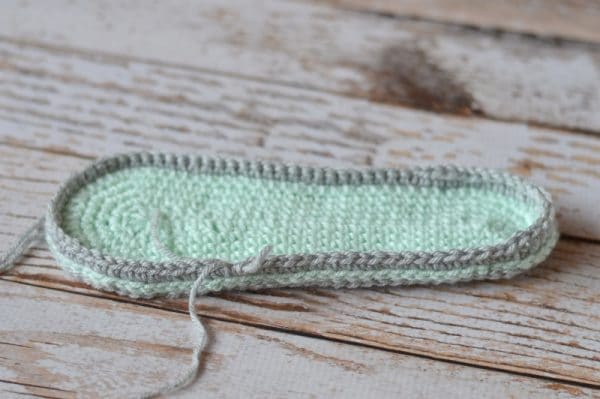
Match up your two sole pieces and using a sl st, stitch the two soles together, going through both loops of each sole. Use the color you want the slipper body to be. (88 sts)
Body:
Start your round on st 18 from the middle of the toe. Face the toe downwards and count 18 to the right. Going through the sl st loops (and going towards the toe): (Ch 1 does not count)
1. Ch 1. Sc in same st. Sc in next 50 sts. Hdc in next 5 sts. Dc in next 14 sts. Hdc in next 5 sts. Sc in next 13 sts. (88 sts) Join with sl st with first st.
2. Ch 1. Hdc in same st. Hdc in next 50 sts. Dc in next 24 sts. Hdc in next 13 sts. (88 sts)
3. Ch 1. Sc in same st. Sc in next 3 sts. Sc2tog twice. *Sc in next 2 sts. Sc2tog* work 5 times. Sc in next 2 sts. Sc2tog twice. Sc in next 15 sts. Hdc in next 4 sts. Dc in next 4 sts. Dc2tog. Dc in next 8 sts. Dc2tog. Dc in next 4 sts. Hdc in next 4 sts. Sc in next 11 sts. (77 sts)
4. Ch 1. Sc in same st. Sc in next 29 sts. Sc2tog 5 times. Sc in next st. Hdc in next 4 sts. Dc in next 4 sts. Dc2tog 5 times. Dc in next 4 sts. Hdc in next 4 sts. Sc2tog 5 times. (62 sts)
5. Sl st all around the top of the shoe. (62 sts)
TOE FLAP: (Ch 1 does not count)
Begin with a magic ring:
1. Ch 1. Sc 8 in the ring. Join with sl st. (8 sts)
2. Ch 1. Work 2 sc in each of the 8 sts. (16 sts) Join with sl st.
3. Ch 1. Sc in same st. Work 2 sc in next st. *Sc in next st, work 2 sc in next st* repeat all around the circle. (24 sts) Join with sl st.
4. Ch 1. Sc in same st. Sc in next st. Work 2 sc in next st. *Sc in next 2 sts, work 2 sc in next st* repeat all around the circle. Join with a sl st. (32 sts)
5. Ch 1. Sc in same st. Sc in next 2 sts. Work 2 sc in next st. *Sc in next 3 sts, work 2 sc in next st* repeat all around the hat (40 sts) Join with a sl st.
(This starts the turning part of the flap. You will work in turning rows instead of going around the circle )
6. Ch 2. Dc in same st. Hdc in next 2 sts. Sc in next 6 sts. Hdc in next 2 sts. Dc in next st. Turn (12 sts)
7. – 11. Ch 1. Hdc in same st. Hdc in next 11 sts. Turn. (12 sts)
Leave a long tail.
Construction:
Attach your toe flap to your shoe using your
darning needle and the long tail on the toe flap, using a simple running stitch.
Note: You can adjust the tightness of your slipper by making your toe flap circle smaller or bigger. Adjust the sts in step 6 accordingly
*I have had a few people who have comments and concerns about the sole. If it appears to be too small for your foot, you are doing it right!! Don’t be tempted to go up a size, your finished slipper will be too big*
xoxo,


nothing happens when I click to get pattern
It’s working on my end. Try clearing your cache and cookies and see if it comes up then.
HELLO PLEASE i want to ask about sizes these is candian size or european i want size 36 which one i choose
I am not familiar with European sizing, but I am sure you can google a conversion chart. The sizing is US women shoe sizing.
Try size 6 or 7
It’s size 6
Is there a men’s version? Thanks!
There isn’t, I’m sorry!
I like this pattern but I’m needing this same style with a boot top. My 93-year-old mother-in-law worn out a pair she’s had for years and I want to make her some more. Would it be easy to convert these to a boot type shoe. I have the ones she wore out if you’d like to see them.
Thanks! It wouldn’t be super easy, but definitely doable.
Hi Bethany!! Just love the looks of these slippers and am in the process of making them. One question, when you are working the toe flap 4 to 7, after the (Ch1 Sc1 Sc twice in next stitch e.g. in #4) do you continue around the circle with two sc in each of the next stitches until it is time to sl st. Looking forward to hearing from you and thank you so much for this lovely pattern.
Yes, sorry. This is one of my first patterns, and it could use some tweaking and cleaning up! You will be working 2 sc in each st, all around the circle, and then joining with a sl st. Thanks for your patience!
I posted this on Ravelry too, because I don’t know which one will get to you more easily and I really would like to get started.
I really want to try my hand at making these, but when I go to the pattern page on your site, it says to use size f hook, or what gives you gauge. There’s no gauge listed anywhere on the pattern, and even the main page about the pattern doesn’t have a gauge listed. The only thing I can find is where you respond to a comment, but still don’t give a gauge. Please tell me what I should be aiming for with my gauge because I would love to make these!
I am terribly sorry, I don’t have a gauge! This pattern I wrote a few years ago, and I am hoping to revisit it and make it easier to follow and read. I only have approximate lengths for the soles in inches.
Evening Bethany
I like your patterns and the easy to understand explanations, but unfortunately here in South Africa we work with 3 ply, 4 ply, double knit and chunky and also the sizing of the crochet hooks are not the same. If you are able to give me the equivalent size for the crochet hooks, I will be able to work out which ply to use and make the necessary adjustments.
Thanks
Hi Jeni,
My hook is a 3.50mm. Here is a conversion chart:
http://www.crochet-knit.com/crochet/hook-chart.html
the pattern says to use a 4.5mm
I’m new to crocheting and also have taught myself through youtube. I love the look of these slippers. I sure hope I can do these. I’m not good at reading patterns. I just did a pair of slippers with a heart and had to end up doing my own thing for the second half of the pattern, but it worked out for me. Thank you for the free post. Where can I find you on youtube?
Thanks Ruth! You can find me here:
https://www.youtube.com/channel/UCojB0sjCdvnEpH0yaFLLWWQ
I am having a hard time with the toe piece. In step 1. Magic Ring (is this something I do first or is it explained in the next steps. It doesn’t tell you how many chains to make? Just starts with sc. or is the Magic ring described somewhere else?
Sorry, a magic ring is a way to start out a circular shape. You basically make a loop with the tail behind and yarn over and pull through. It’s nice because the ring is adjustable after you finish the first round, you can pull it tight so their is no hole. You can find a tutorial on youtube, or you can chain 3 and sl st into the first chain to make a small circle to work with, then move onto the rest of the pattern.
To Sandra
Their are plenty of magic circles to make depending on how big you want the center to be.
chain 2 and slip stitch in 2nd chain from the hook
chain 1 and do 3 single crochet
chain plus 3 single crochet is 4 single crochet total
chain 1 and do 5 single crochet
chain plus 5 single crochet is 6 single crochet total
chain 1 and do 7 single crochet
chain 1 do 9 single crochet
chain 1 and do 11 single crochet
remember the chain counts as a 1 single crochet
Chain 3 and slip stitch in 3rd chain from hook
chain 1 and do either 3, 5, 7, 9 or 11 single crochet
Chain 4 and slip stitch in the 4th chain from the hook
Chain 1 and do either 3, 5, 7, 9 or 11 single crochet
Or you can
Chain 4 and do all the single crochet’s that the pattern tells you to do before the slip stitch.
Example
some patterns say to chain 4 and do 4 single crochet in the 4th chain from the hook
Or chain 4 and do 6 single crochet in the 4th chain from the hook
Or chain 4 and do 8 since crochet in the 4th chain from the hook
Or chain 4 and do 10 single crochet in the 4th chain from the hook
Or chain 4 and do 12 single crochet in the 4th chain from the hook
After doing one of these which ever one you choose depending on how dig the center circle of the entire circle to be
1 inch, 2 inches, 3 inches, 4 inches, 5 inches, 6 inches.
I hope this helps you out.
This is not a magic circle. A magic circle is a way of starting a circle, also called an “adjustable ring. “
Hi,
I taught myself to crochet about a year ago now. Love this pattern. My only problem is that both slippers are looking the same when I am crocheting them I haven’t put the toe flap on because both of the slippers look identical. Did I do something wrong to the left one to make it look exactly like the right one?? Thanks!!
No they are ambidextrous (is that the right word? Lol) There is no left or right.
Thank you!
I found what I was doing wrong now I just had a a problem in the 3rd row of the body where I had 5 extra stitches so I just worked them in with double crochets to make it match the other side. I love this pattern and will be making many pairs of them!!
Glad you figured it out! :)
Ambidextrous means
1. either shoe or sock or mitten or glove can be used on either side.
2. The item is a 2 sided item that can be used on both sides and does not have a specific side that u can use the item on. So the item is interchangeable from left to right and right to left.
Socks are ambidextrous
Hi Bethany!
I am new at crocheting, I also learned from the internet ( YouTube!). These slippers look really cute and comfortable. I hope to make them in the near future. Thanks for sharing your patterns!
You’re welcome! Youtube is awesome, isn’t it!?
Hi Bethany,
I love this pattern! I downloaded it to try today but I was unable to read the file because every page has a large black Whistle and Ivy logo covering the print. Am I doing something wrong?
Thanks!
Hi Jodie!
The pattern has a very light gray watermark. If you are viewing on a tablet or phone, try using a different reading app, like adobe reader. Some apps don’t show gray for some reason!
Hi Bethany,
Just a note to say thank you for allowing me to subscribe to your site I traveled here via my search for instructions on loafer slippers. I also added you to my favorite crocheter’s teachers list. I’m a late bloomer self taught watching youtube, I am here to learn from you and your followers since my mom, and grandma long passed both were avid crocheter’s. I have read and understand your sites copyright rules. Sincerely Jojo
Thank you for being a subscriber! You make this blog possible :) I am self taught as well! The internet can be such a wonderful place to learn new things, thanks so much for your comment!
do you use two strands of yarn to gather for these slippers I LIKE THIS PATTERN VERY MUCH
Thank you JoAnn! And no, I just used one strand.
Question on the body part of the shoe. I notice after row 1 there is a slip stitch to finish off, but no slip stitch on the others. Is there supposed to be a slip stitch or do you treat it as a continuous round?
Sorry! You should be joining.
Hi there!
I absolutely love this pattern and I’m planning to use it for Christmas gifts for my family this year! However, I’m struggling a bit with the sole… When I do step 4. { Sc 1, 2 sc in next st } 3 times. Sc 20.( Sc 1, 2 sc in next st ) 5 times . Sc 20. I end up with extra stitches and row 5 doesn’t work appropriately. I’ve tried several times with the same result. Is the “2sc in next stitch” part meant to be a sc2tog?
I’m sorry if I sound a bit silly, as I am a beginner at crocheting. Thank you to anyone who can help me.
Heather
hello! No it doesn’t mean sc2tog (which is a decrease), it means 2 sc worked together in the same stitch, or an increase.
Thank you so much for the reply!
That is absolutely what I thought, but when I work it I end up with the next turns ( {Sc 2, sc 2 in next st} 3 times and {Sc 2, sc 2 in next st} 5 times) on the side instead of at the heel and toe since I’ve created 64 stitches on step 4 and use only 56 to create row 5. Am I doing this correctly? Is there something I should be skipping?
Thank you again. Your help means so much to me.
Heather
Are you working the first 2 sc in separate stitches? You will work 1 sc, 1 sc, then 2 together in the next st.
Oh my goodness! That’s exactly my problem! Thank you so so much! I’m so grateful!
And thank you for these patterns at all. You’re an excellent blogger and crafter and just an all around excellent person! I’m so thankful that you care about your readers and are willing to help us.
Oh thank you so much! You are so sweet!! I am so glad I could help :)
Hello! Love this pattern and am crocheting it RIGHT NOW. I’ve read the comments and noticed a tiny boo boo in the pattern. I’m not sure if you noticed. In the step you write “sc 2, sc 2 in next space”. What it should say is “sc 2, 2sc in next space”. Am I correct? This also reads this way for the next step
Thank you! I don’t see a difference. Your version and mine both indicate to work 2 sc in the same stitch , right?
I think for the avid crocheter it works itself out. Other patterns I’ve seen for various things make a distinction. I thought maybe this was why the previous poster was having some trouble. Anywho, I think it is not a significant distinction. Forgive the nit picky of my comment!!! It’s very awesome of you to share your patterns freely. I’ve already made a pair of baby shoes using your pattern. Love them.
No problem and thank you!! I genuinely don’t see a distinction though, haha! I am a self taught crocheter, so I am always open to suggestions. I am sure my pattern writing style is probably unorthodox. Can you explain the difference so we are on the same page?
Hi, I have been crocheting for awhile I have done your pattern four times.
for some reason every time the body seems weird and the heel is way to short. I read it carefully followed video’s, used a counter etc. I’ve been crocheting for years and I am so confused to what I am doing wrong.
Thought maybe I read it wrong, but nope kept reading it the same, and no nothing on the pattern confuses me (2sctog) I know what they mean. (seen other comments)
Wondering if maybe a step is missing from the downloaded version? Is that the only pattern for this you have? …………….
I’ll try your other loafer and see if I am just reading wrong or skipping a st and not knowing.
Hello,
Can you be more specific about which step and size you are working on and where you are getting confused? Make sure you are working with the RIGHT side of your stitches facing out, so you will work down towards the toe, and the hdc/dc sts will be around the heel. Let me know, and I will try to help in any way I can.
I am very confused. I have crocheted a size 10 and I had to go up two hook sizes for the sole. The finished slipper is about 3/4 of an inch tall in the back and cannot stay in place. I believe I used the wrong hook for the body (I had forgotten that two different hooks are the same color) so that isn’t too much of an issue. However, I have noticed that the right side of the slipper is a LOT taller than the left due to the double and half double crochet.
Because there are no instructions that specify otherwise, are both slippers supposed to be crocheted using the exact same stitches? If they are, the finished shape makes whichever slipper is on the left foot not fit correctly. Or did I do something wrong?
A crocheter’s gauge is as unique as his/her handwriting. The hook size is a guide and a mere suggestion, so you should use the hook that allows you to achieve the gauge (please check the indicated inches for each size). The hdc and dc stitches go on the back of the heel (making it taller), so it sounds like you worked the pattern the wrong way around the sole. Make sure to work so the right side of your sts are facing out and you are working from the outside. The slippers are not meant to work for a specific foot, so yes, if your shoe appears to be a “right” slipper, you didn’t work it correctly.
Thanks for sharing! I can’t wait to make this pattern. I’ve been trying to find a quick and simple slipper pattern for myself and this looks like it will be just right. Love it.
You’re welcome! I hope you like them :)
will you please make videos on how to do the adult sole and bitty bow sandals and the gladiator
I also wanted to say your videos are so helpful and your patterns are amazing thank you so much I have postpartum depression and crocheting has been so therapeutic for me. and it always feels nice finishing a new pattern your time is greatly appreciated
Thank you! I am so glad it has helped you. Crochet and blogging helped me :)
I can! I am trying to get videos up of all my patterns, so stay tuned :)