
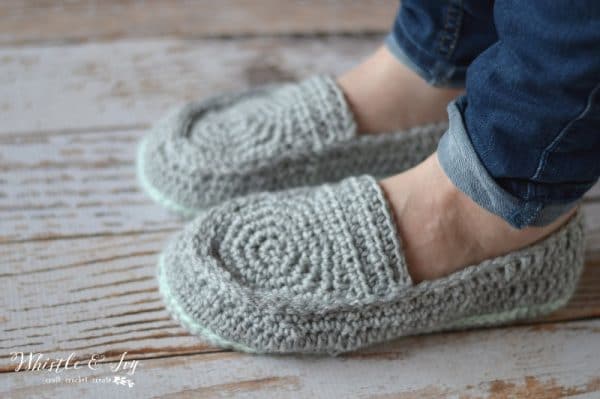
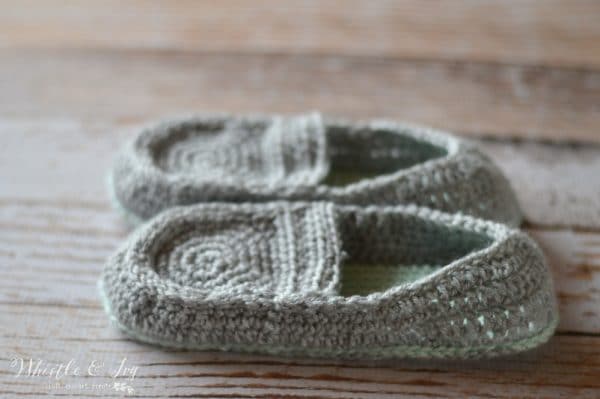
These darling crochet loafer slippers are fun to make and comfortable to wear! They feature a double sole for extra comfort and are made with simple construction. Make a pair for baby too! This post included affiliate links, which means I get small commission if you make a purchase at no extra cost to you. Thank you for your support!

I finally finished a pattern that I have been working on! It felt like these women’s loafer slippers took way longer than they should have, but I am SO glad to be finished (and I might not be making slippers again in the near future, phew!). I really love how they turned out, and they are so comfortable! The double sole is so lovely. It’s pretty fun to mix and match colors for these crochet slippers.

You’re tired of sifting through complicated tutorials and patterns that leave you feeling overwhelmed.
Let me help.
PICTURE THIS:
Instant access to a library of modern, easy-to-follow patterns
Gifting your handcrafted treasures to your loved ones.
Feeling accomplished by your beautiful makes
It’s time to make your crafting experience as joyful as it should be.
WOMEN’S LOAFER SLIPPERS – FREE CROCHET PATTERN
Please remember: You are free to use this pattern to make and sell, but do not republish or distribute this pattern in any way. DO NOT use my photos in your listings. Please do share my blog links! It’s a quick and FREE way of supporting Whistle and Ivy and more free crochet patterns in the future.
What you need:
-Size 4.5mm hook (be sure to check the gauge)
-Medium Weight Yarn (Brava Knit Picks in Dove Heather and Mint)
-Darning Needle
Abbreviations: (American Terms)
Ch – chain
Sc – single crochet
hdc – half double crochet
Dc – double crochet
Dc2tog – Dc decrease
Sc2tog – Sc decrease
Sl st – Slip Stitch
St – stitch
Gauge: 8 sts = 2”
Thank you for working this pattern! The free version includes size 8. You can change the sizes for yourself by going up 2 chains on the foundation for each size up (or eliminate 2 chains on the foundation for a smaller size). You can also buy an ad-free PDF from my Ravelry shop that includes sizes 6, 7, 8 and 9. Thanks for your support!
Size 8 Loafer Slipper Pattern
Ch 26
1. Work 3 sc in 2nd ch. Sc in next 16 chs. Hdc in next 3 chs. Dc in next 4 chs. Work 7 dc in last ch
Working across opposite side of chain: dc in next 4 chs, hdc in next 3 chs, sc in next 16 chs. (56 sts)
Place a marker and move up with each round.
2. Work 2 sc in the next 3 sts. Sc in next 24 sts. Work 2 sc in the next 5 sts. Sc in next 24 sts. (64 sts)
3. *Sc in next st, work 2 sc in next st* work 3 times. Sc in next 24 sts. *Sc in next st, work 2 sc in next st* work 5 times. Sc in next 24 sts. (72 sts)
4. *Sc in next 2 sts. Work 2 sc in next st,* work 3 times. Sc in next 24 sts. *Sc in next 2 sts, work 2 sc in next st* work 5 times. Sc in next 24 sts. (80 sts)
5. *Hdc in next 3 sts, work 2 hdc in the next st* work 3 times. Hdc in next 24 sts. *Hdc in next 3 sts, work 2 hdc in the next st* work 5 times. Hdc in next 24 sts. (88 sts)
Join with sl st and tie off.
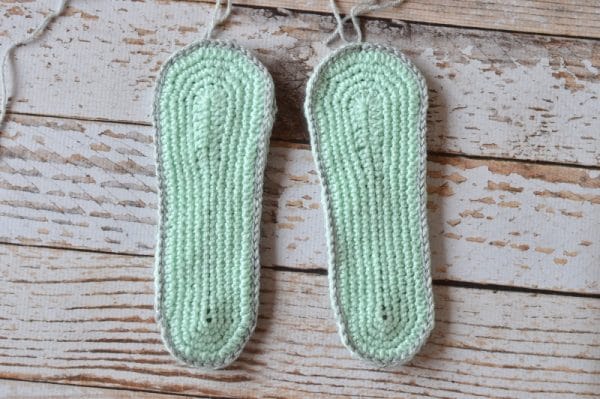
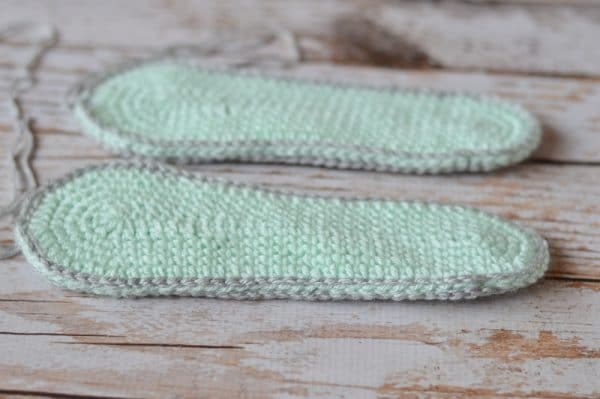
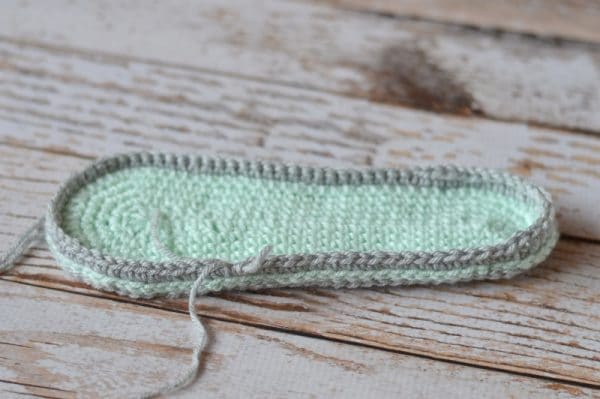
Match up your two sole pieces and using a sl st, stitch the two soles together, going through both loops of each sole. Use the color you want the slipper body to be. (88 sts)
Body:
Start your round on st 18 from the middle of the toe. Face the toe downwards and count 18 to the right. Going through the sl st loops (and going towards the toe): (Ch 1 does not count)
1. Ch 1. Sc in same st. Sc in next 50 sts. Hdc in next 5 sts. Dc in next 14 sts. Hdc in next 5 sts. Sc in next 13 sts. (88 sts) Join with sl st with first st.
2. Ch 1. Hdc in same st. Hdc in next 50 sts. Dc in next 24 sts. Hdc in next 13 sts. (88 sts)
3. Ch 1. Sc in same st. Sc in next 3 sts. Sc2tog twice. *Sc in next 2 sts. Sc2tog* work 5 times. Sc in next 2 sts. Sc2tog twice. Sc in next 15 sts. Hdc in next 4 sts. Dc in next 4 sts. Dc2tog. Dc in next 8 sts. Dc2tog. Dc in next 4 sts. Hdc in next 4 sts. Sc in next 11 sts. (77 sts)
4. Ch 1. Sc in same st. Sc in next 29 sts. Sc2tog 5 times. Sc in next st. Hdc in next 4 sts. Dc in next 4 sts. Dc2tog 5 times. Dc in next 4 sts. Hdc in next 4 sts. Sc2tog 5 times. (62 sts)
5. Sl st all around the top of the shoe. (62 sts)
TOE FLAP: (Ch 1 does not count)
Begin with a magic ring:
1. Ch 1. Sc 8 in the ring. Join with sl st. (8 sts)
2. Ch 1. Work 2 sc in each of the 8 sts. (16 sts) Join with sl st.
3. Ch 1. Sc in same st. Work 2 sc in next st. *Sc in next st, work 2 sc in next st* repeat all around the circle. (24 sts) Join with sl st.
4. Ch 1. Sc in same st. Sc in next st. Work 2 sc in next st. *Sc in next 2 sts, work 2 sc in next st* repeat all around the circle. Join with a sl st. (32 sts)
5. Ch 1. Sc in same st. Sc in next 2 sts. Work 2 sc in next st. *Sc in next 3 sts, work 2 sc in next st* repeat all around the hat (40 sts) Join with a sl st.
(This starts the turning part of the flap. You will work in turning rows instead of going around the circle )
6. Ch 2. Dc in same st. Hdc in next 2 sts. Sc in next 6 sts. Hdc in next 2 sts. Dc in next st. Turn (12 sts)
7. – 11. Ch 1. Hdc in same st. Hdc in next 11 sts. Turn. (12 sts)
Leave a long tail.
Construction:
Attach your toe flap to your shoe using your
darning needle and the long tail on the toe flap, using a simple running stitch.
Note: You can adjust the tightness of your slipper by making your toe flap circle smaller or bigger. Adjust the sts in step 6 accordingly
*I have had a few people who have comments and concerns about the sole. If it appears to be too small for your foot, you are doing it right!! Don’t be tempted to go up a size, your finished slipper will be too big*
xoxo,


I love this pattern “loafer slipper, would like the patter for n size 7, thank you.
Hi ther, love the loafer slippers, would like to have the pattern.
Thanks! Click on the link and it will take you to the pattern PDF.
I would love to make these to wear outside. Do you have a method for attaching some sort of sole to this pattern?
Thanks,
Becki
Personally, I don’t! Sorry! But I have had a few people comment with their own methods, so feel free to look through them and see if one works for you.
I’m so excited by your pattern!! It’s adorable! Could you please tell me how to increase the pattern to a 6 1/2 or 7?
Thank you so much for the pattern and your time,
Andrea
jusstame@gmail.com
Hi Andrea! The pattern includes women’s sizes 5-11, so size 7 is already in there. Happy crocheting!
I have a question about this pattern, would it be possible for you to email me, so I can find out what I’m doing wrong? Thanks!
Sure, I can help you! Why don’t you shoot me an email first. Make sure to explain your problem in detail, which step and which size. bethany@whistleandivy.com
I have a few questions about this pattern as it didn’t really work out for me when I tried it, and I had a little confusion with some of the instructions. If you can personally email me it would be much appreciated, thank you.
-Nicole
I assumed that since I had to give my email here to comment I wouldn’t have to reveal it for you here publicly to email me , so if you could let me know if I need to post it or something to receive an email or if you get it by me just posting can you respond. I wanna make some slippers for a friend before she moves away thanks again, I really like this pattern :)
Sent you an email
I need a size 6 1/2 I did the sole from pattern omg to big way to big I love these and want to make some for my girls please help dme101@aol .com and happy easter
debbie
I sent you a message on FB
Thank you for sharing this pattern! :) I am making them for a friend of mine! I am so excited to have finally found a decent pattern to work from! :)
You are welcome! I hope she enjoys them :)
Thank you for the lovely pattern. May the yarn goddess bestow her woolly, (non-itchy of course) blessings on you for taking the time to write out all the sizes. There is a yarn goddess, I’m sure of it…there must be… isn’t there? :-D
Haha! I love it :) And you are SO welcome!
I love these and am starting them tonight. Im on size 10, row 5. can you please explain the (1 sc, 2 sc in next st) …is that different than 3 sc in next st? i have the same question with row 6.
Thanks for your pattern and help! gigi0907@sbcglobal.net
(sc, 2sc in next stitch) 3 times=
sc,2sc,sc,2sc,sc,2sc (over six stitches)
i love love love this! would you please send me the pattern for a size 9 and a size 5? thank you
jmslogo at hotmail.com
Hi, my biggest problem is finding a pattern that fits my wide feet :( any suggestions as to how to tweak the pattern in a way that won’t totally change the look?
You can work hdc in the side part and switch to sc when you are working the toe part (on the sole). Then, you can make the circle toe flap larger by doing more rounds.
Hello I’ve downloaded you pdf file and am trying to make the size 9. I have tried 3 times to make the sole, but when I get to the 4th row or so, I find I’m crocheting the increases onto the side of the sole instead of at the ends. I don’t see what I’m overlooking, I was hoping you might be able to help me, please. I usually crochet baby booties, hats, blankets, things like that. This is the first pair of crocheted slippers that I’ve actually really liked the look of….. Thank you for creating and providing the pattern :) I just don’t know what I’m doing wrong, but I would dearly love to make a pair. My email address is Jewelies3911@gmail.com. They really are great looking slippers!
Are you crocheting clockwise with the toe pointing down or in a ccw direction? The right side of the project will be on the back of your work so think about how to join based on that (The bottom of the sole is the right side in this case-the wrong side is the side facing you-the inside of the shoe.
I think this is what is screwing alot of people up…
I love this pattern and found the link to the pattern. I wear a size 8 1/2 shoe so decided to make a size 8. I used a size F (3.75mm) hook so it would be even smaller and give it plenty of room to stretch. The sole turn out to be more like a size 9 1/2. I decided to continue to see how it turned out. I get to row three of the body and the pattern started getting complicated. Then continued on to row 4 and it got worse. I’ve been crocheting for many years and know how to read a pattern but this one just isn’t written right
3. Ch1. Sc in same st. sc3. Sc2tog twice. {Sc2. 1 sc2tog} 4 times . Sc 2. sc2tog twice. Sc 16. Hdc 4.dc 4. Dc2tog. Dc 8. Dc2tog. Dc 4. Hdc 4, sc 13.
(Sc2. 1 sc2tog) <—- it says, sc in next 2 sts, 1 sc2tog in next sts … this is how I read it but what is the “1” in there for? It says to sc2, and then do you do another sc?? If so why not say “sc3”?
———————————————-
4. Ch 1. Sc in same st. Sc 27. Sc2tog 5 times. Sc 1. Hdc 4. Dc 4. Dctog 5 times. Dc 4. Hdc 4. Sc 1. Sctog 5. Sc 2.
On this row, it says, “Dctog 5 times” I just couldn’t figure out how many dc’s it wants together.
Then things just don’t line up on row 4. It’s decreasing around the heel and the sides and just doesn’t look right. Guess your not suppse to dec around the toe.
I have pulled the body out 4 times and have worked on this one shoe all day! Pretty frustrated!! I really would love to make these slippers but don’t want the stress it’s causing me.
Faye, have you figured out what the problem is yet? I am having the same issues. I posted on her facebook page, hopefully she will answer.
The 1sc2tog is just a sc2tog.
sctog – I think she just left out the 2 = sc2tog 5x
I haven’t had any problems and if you just read it literally using your knowledge of standard crochet, there’s nothing too out of the ordinary in the pattern. I always like to have a diagram to look at if I can’t understand – but not everyone has the capability to create one…
Thanks Carole :) :)
I love it:-D thks for the pattern :-) best regards
You are welcome :)
This pattern is awesome! Can’t wait to try it! Do you think you could help me make these in a size 12? My godmother is extremely tall and she wears a size 12. Please & Thanks!
Sure! You can take the size 11 and add 2 extra sts on the foundation ch. Then, when you work up the body, add 4 extra sts to each round. Keep the toe and heel the same, just make them a bit longer. Hope that helps!
Thanks so much! =)
Hi!! I am so grateful for your very clear and easily understood patterns! I had one little question about the body of the shoe, am I only suppose to go through the 2 little slip stitch loops or all the loops in which the soles are connected and the slip stitch loops. Sorry if this seems like a stupid question. I just started crocheting in aug, and I’m hooked! :-) thank you!!
Through the sl sts you made when you sewed them together. That way the stitches go up, forming the body of the slipper. Let me know if you have other questions!
Thank you so much Bethany…these are adorable and I am starting to put them together. I am a fairly advanced crocheter and not new to reading patterns. I found the HARDEST part was starting the single crochet stitches on the slip stitches of the sole!!! The slip stitches are so flat that I had to use a smaller F hook in order to get the yarn underneath them. WHEW……I think it took me almost 90 minutes to get one row!!! Any tips about that??? Thank you dear. I do love that double sole…..extra cush where you need it!
Thanks, Gerri! You definitely need to sl st loosely. Give yourself slack every time you make the next st and it will work out much easier. This gives you room to get under them. I hope you get them finished, let me know if you have other questions!
I made some using a sc instead of a slst. It’s easier to get into a sc and it doesn’t add that much height…
Thank you dear….they are coming along nicely. Another tip is to make sure when doing the first row of single crochet around the sole that you work clockwise with the toe pointing down…otherwise you will get to the HDC and DC stitches and they will be in the wrong place. Boy what a dumdum I am….I did it the wrong way cause I wasn’t paying attention and had to frog the whole first row :(.
Shoot! Sorry you had to frog it. I guess I didn’t specifically put which way to work, but wouldn’t the right side of the stitch be on the inside of the slipper if you worked from the inside? Anyway, I hope you get it to work for you!
Susan again. Oops. Might help if u had my email eh? Lol.
susanm1967@gmail.com
Again thank you Bethany! ;-)
These are adorable. Id luv them in a size 8 for myself ans a 7 for my daughter. Please. And thx for all ur patterns and ideas.