
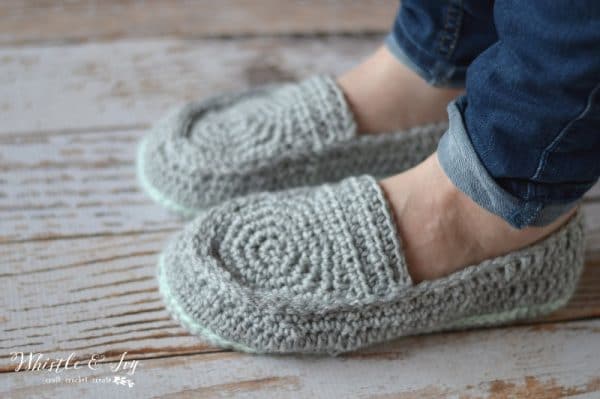
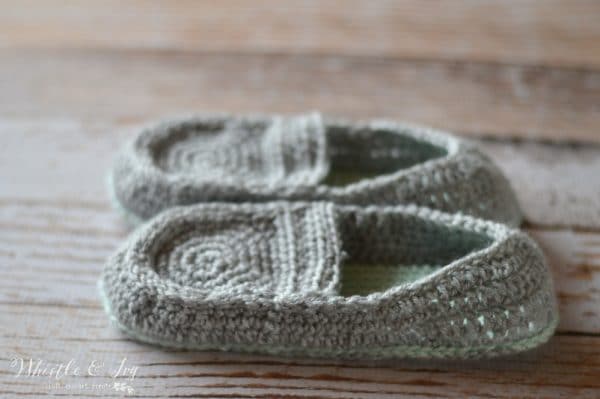
These darling crochet loafer slippers are fun to make and comfortable to wear! They feature a double sole for extra comfort and are made with simple construction. Make a pair for baby too! This post included affiliate links, which means I get small commission if you make a purchase at no extra cost to you. Thank you for your support!

I finally finished a pattern that I have been working on! It felt like these women’s loafer slippers took way longer than they should have, but I am SO glad to be finished (and I might not be making slippers again in the near future, phew!). I really love how they turned out, and they are so comfortable! The double sole is so lovely. It’s pretty fun to mix and match colors for these crochet slippers.

You’re tired of sifting through complicated tutorials and patterns that leave you feeling overwhelmed.
Let me help.
PICTURE THIS:
Instant access to a library of modern, easy-to-follow patterns
Gifting your handcrafted treasures to your loved ones.
Feeling accomplished by your beautiful makes
It’s time to make your crafting experience as joyful as it should be.
WOMEN’S LOAFER SLIPPERS – FREE CROCHET PATTERN
Please remember: You are free to use this pattern to make and sell, but do not republish or distribute this pattern in any way. DO NOT use my photos in your listings. Please do share my blog links! It’s a quick and FREE way of supporting Whistle and Ivy and more free crochet patterns in the future.
What you need:
-Size 4.5mm hook (be sure to check the gauge)
-Medium Weight Yarn (Brava Knit Picks in Dove Heather and Mint)
-Darning Needle
Abbreviations: (American Terms)
Ch – chain
Sc – single crochet
hdc – half double crochet
Dc – double crochet
Dc2tog – Dc decrease
Sc2tog – Sc decrease
Sl st – Slip Stitch
St – stitch
Gauge: 8 sts = 2”
Thank you for working this pattern! The free version includes size 8. You can change the sizes for yourself by going up 2 chains on the foundation for each size up (or eliminate 2 chains on the foundation for a smaller size). You can also buy an ad-free PDF from my Ravelry shop that includes sizes 6, 7, 8 and 9. Thanks for your support!
Size 8 Loafer Slipper Pattern
Ch 26
1. Work 3 sc in 2nd ch. Sc in next 16 chs. Hdc in next 3 chs. Dc in next 4 chs. Work 7 dc in last ch
Working across opposite side of chain: dc in next 4 chs, hdc in next 3 chs, sc in next 16 chs. (56 sts)
Place a marker and move up with each round.
2. Work 2 sc in the next 3 sts. Sc in next 24 sts. Work 2 sc in the next 5 sts. Sc in next 24 sts. (64 sts)
3. *Sc in next st, work 2 sc in next st* work 3 times. Sc in next 24 sts. *Sc in next st, work 2 sc in next st* work 5 times. Sc in next 24 sts. (72 sts)
4. *Sc in next 2 sts. Work 2 sc in next st,* work 3 times. Sc in next 24 sts. *Sc in next 2 sts, work 2 sc in next st* work 5 times. Sc in next 24 sts. (80 sts)
5. *Hdc in next 3 sts, work 2 hdc in the next st* work 3 times. Hdc in next 24 sts. *Hdc in next 3 sts, work 2 hdc in the next st* work 5 times. Hdc in next 24 sts. (88 sts)
Join with sl st and tie off.
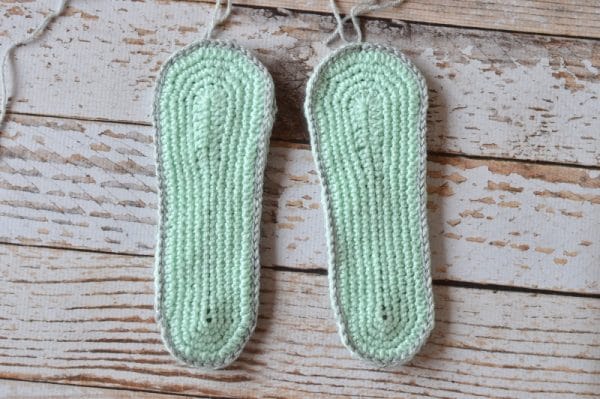
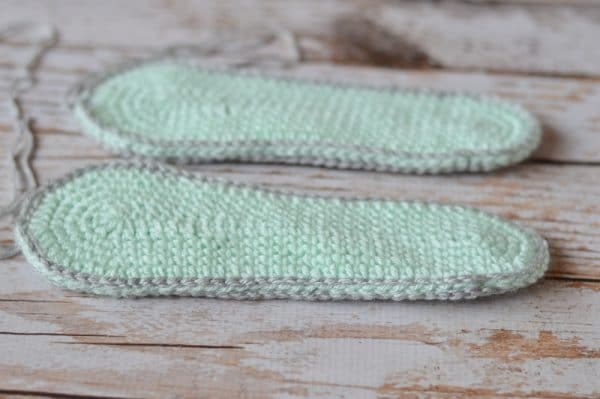
Match up your two sole pieces and using a sl st, stitch the two soles together, going through both loops of each sole. Use the color you want the slipper body to be. (88 sts)
Body:
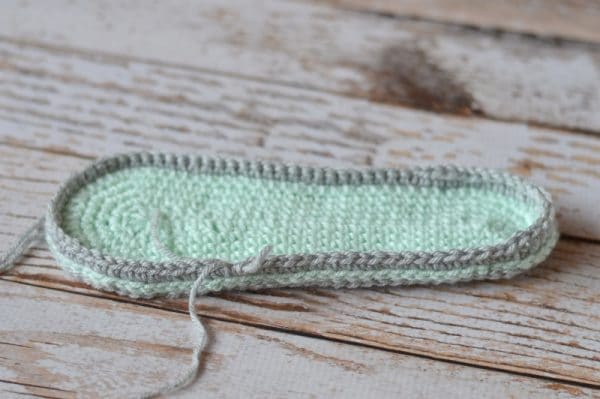
Start your round on st 18 from the middle of the toe. Face the toe downwards and count 18 to the right. Going through the sl st loops (and going towards the toe): (Ch 1 does not count)
1. Ch 1. Sc in same st. Sc in next 50 sts. Hdc in next 5 sts. Dc in next 14 sts. Hdc in next 5 sts. Sc in next 13 sts. (88 sts) Join with sl st with first st.
2. Ch 1. Hdc in same st. Hdc in next 50 sts. Dc in next 24 sts. Hdc in next 13 sts. (88 sts)
3. Ch 1. Sc in same st. Sc in next 3 sts. Sc2tog twice. *Sc in next 2 sts. Sc2tog* work 5 times. Sc in next 2 sts. Sc2tog twice. Sc in next 15 sts. Hdc in next 4 sts. Dc in next 4 sts. Dc2tog. Dc in next 8 sts. Dc2tog. Dc in next 4 sts. Hdc in next 4 sts. Sc in next 11 sts. (77 sts)
4. Ch 1. Sc in same st. Sc in next 29 sts. Sc2tog 5 times. Sc in next st. Hdc in next 4 sts. Dc in next 4 sts. Dc2tog 5 times. Dc in next 4 sts. Hdc in next 4 sts. Sc2tog 5 times. (62 sts)
5. Sl st all around the top of the shoe. (62 sts)
TOE FLAP: (Ch 1 does not count)
Begin with a magic ring:
1. Ch 1. Sc 8 in the ring. Join with sl st. (8 sts)
2. Ch 1. Work 2 sc in each of the 8 sts. (16 sts) Join with sl st.
3. Ch 1. Sc in same st. Work 2 sc in next st. *Sc in next st, work 2 sc in next st* repeat all around the circle. (24 sts) Join with sl st.
4. Ch 1. Sc in same st. Sc in next st. Work 2 sc in next st. *Sc in next 2 sts, work 2 sc in next st* repeat all around the circle. Join with a sl st. (32 sts)
5. Ch 1. Sc in same st. Sc in next 2 sts. Work 2 sc in next st. *Sc in next 3 sts, work 2 sc in next st* repeat all around the hat (40 sts) Join with a sl st.
(This starts the turning part of the flap. You will work in turning rows instead of going around the circle )
6. Ch 2. Dc in same st. Hdc in next 2 sts. Sc in next 6 sts. Hdc in next 2 sts. Dc in next st. Turn (12 sts)
7. – 11. Ch 1. Hdc in same st. Hdc in next 11 sts. Turn. (12 sts)
Leave a long tail.
Construction:
Attach your toe flap to your shoe using your
darning needle and the long tail on the toe flap, using a simple running stitch.
Note: You can adjust the tightness of your slipper by making your toe flap circle smaller or bigger. Adjust the sts in step 6 accordingly
*I have had a few people who have comments and concerns about the sole. If it appears to be too small for your foot, you are doing it right!! Don’t be tempted to go up a size, your finished slipper will be too big*
xoxo,


Hey Bettany,
I am making a size 9, I found the pattern for the size 9 sole but not for the body tho… are you able to help me with that ?
The body instructions are right under the sole instructions.
My daughter is a freshman at LSU in Baton Rouge so these slippers are already under the Christmas tree created in purple and gold– and you’re right, I might not be making another pair of these for awhile! Not an easy pattern to follow but definitely worth the struggle! I loved the way they turned out! Thanks for your ideas!
Oh dear! What parts of the pattern were hard to follow?
I liked that you tried!
I’m having some trouble understanding row four on the sole. Where it says ” 2 SC, 2 SC 3 (and five) times “, is that basically just saying SC around or two sc in each stitch? I’m a fairly intermediate crocheter, but for some reason that wording just has my brain all frazzled…… thank you!
Step 4 is 2 singles, followed by an increase, repeated 3 times for the heel and 5 times for the toe. ex: sc. sc. increase. Sc. Sc. increase. Sc. Sc. increase. Does that make sense? You are repeating the entire sequence inside the asterisks.
What size do these generally make? I’m hoping for about an 11 in womens….. But I am imagining these are more average sized? like 7-9?
The pattern includes 4 US women sizes- 6-9
Hi! Thanks for this lovely pattern. Quick question: do you join the soles together back to back?
Thank you!
Yes! You want both your right sides facing out.
How much yarn is needed to complete these slippers?
I find it no where in the online pattern and I need to purchase it.
Thank you.
Less than one skein per color.
Hi what a lovely pattern
I don’t understand the instructions for the body..I have the sole done ..I don’t understand that part:
Start your round on st 18 from the middle of the toe. Face the toe downwards and count 18 to the right. See photo 2. Going through the sl st loops (and going towards the toe): (Ch 1 does not count).. totally confused.
This is explaining where to start the body. You are starting new yarn to work the body.
Confused with the pattern. Sc, 2sc in next st. Is that 3sc in one stitch or sc in one st and 2sc in next st? New to reading patterns, tried to google with no luck.
Thanks,
Leah
Hi Leah,
It’s an increase. You will work a sc alone, and then 2 sc in the next. Three stitches, worked over 2 stitches. This gives you more stitches for the next round, so your piece will get larger.
Scratch my last comment! I got it lol. Love these!! Thanks so much!!
You’re welcome!
After you chain 1 for the toe flap and begin the magic circle, is the magic circle connected off of the chain 1 or separate and then added?? A little confused on that part. Thanks so much!
There is no chain before the magic circle, I am indicated that all the Ch 1 for the instructions on the Toe Flap do not count.
These are wonderful! I found you with your baby sandals and they were so fun to make. Of all things my hubby has asked for is a pair of mens slippers!! Never expected him to want anything crocheted. These would work great but he’s a size 13!! Where would you suggest I increase them to make them longer and wider? Any suggestions? I’m going to give it a try since he’s supportive of my new addiction and actually asked for them! ;) Thanks in advance and thanks for making the pattern available!
That’s awesome!!! For ease of use, I would use a larger hook and bulkier yarn. This would cut down on design time and work time on your part.
Good luck and you’re welcome!
HI, I’ve tried to download the pattern, been through paypal payment but then nothing happens
Can you send me a private message? We will get this sorted out!
Please help, I love the slippers, I have finished the soles and sl st them together. I tried starting round 1 and begin at the center of the toe counting 18 like you instruct. However if I put 46 stitches going in the direction of the toe, the slipper looks lopsided. Should I go toward the heal on my first round of the body?
Are you beginning at the center, or 18 sts to the right of the center? You should be going toward the toe, and the hdc and dc should be around the heel.
Yes, I am starting at the center and counting 18 to the right of the center of the toe. I will try it again. I want them to look like yours, they are very pretty. Thank you for your quick response, I’ll let you know how they turn out.
Thanks for all of your help.They turned out beautifully. They have a sharp contrast with the grey sole and light brown upper. I’m very happy with them.
So glad they turned out! I would love to see a photo!
Oops! I just saw the photo you shared! Love them!
So I made the slipper a size nine and when I finished the slipper it didn’t fit size 9 it fit a size six. I used an size f hook and didn’t miss a stitch what is going on?
It sounds like you crochet much tighter than I do. You will need to go up a hook size or two. Did you make a gauge swatch and achieve the indicated gauge ?
Did you have a pattern for a size 10? I know I was born with big feet lol! Thanks a bunch!! These are soo cute!
I don’t, I am sorry! But you could use a larger hook and work the size 9, it should work for you.
Thank you so much for sharing this pattern! I pinned it, I’m totally going to make a pair
Thank you!
These are super cute! Totally pinning this to try later! :)
Thanks so much! <3
These look super comfy! Thanks for sharing the pattern and tips at Merry Monday.
These look so pretty and comfortable! Thanks for sharing!
Thank you! They really are :)
So confused where it says how many stitches i.e. (56) my count is always off .. Why is that?
Which step, which size?
The first row for size 8.. You stated it would come out to 56 stitches i counted 52…
Then you are miscounting somewhere.
3 + 16 + 3 + 4 + 7 + 4 + 3 + 16, that makes 56 sts.