
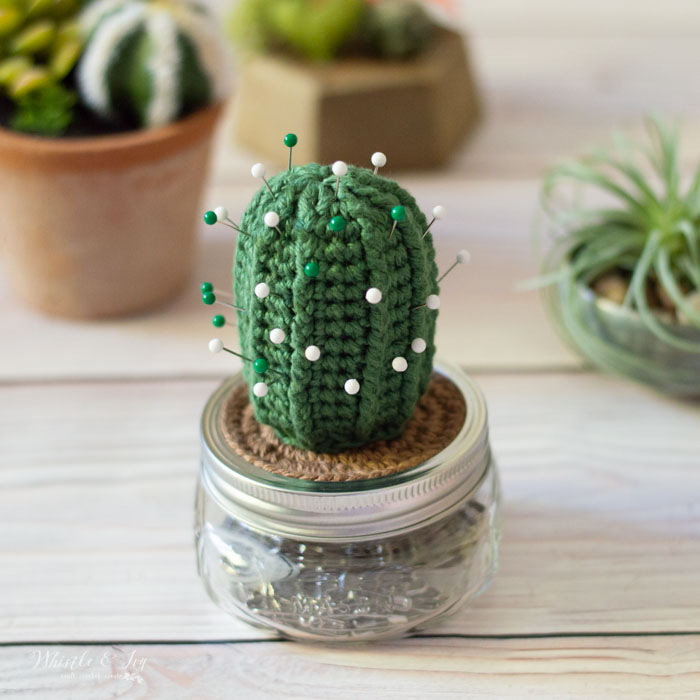
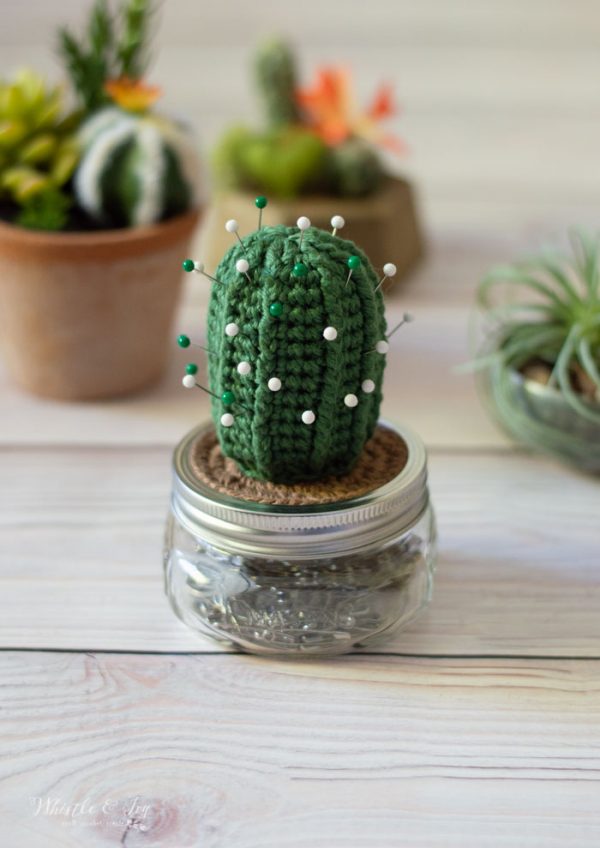
This cute and easy crochet cactus pincushion is a delightful addition to your craft room! Make this project easily in just an afternoon. Your finished crochet cactus pincushion will be a fun and whimsical place to store your pins for all your future crochet, sewing and crafting needs. This post contains affiliate links which means I get a small commission at no extra cost to you. Thanks for your support!
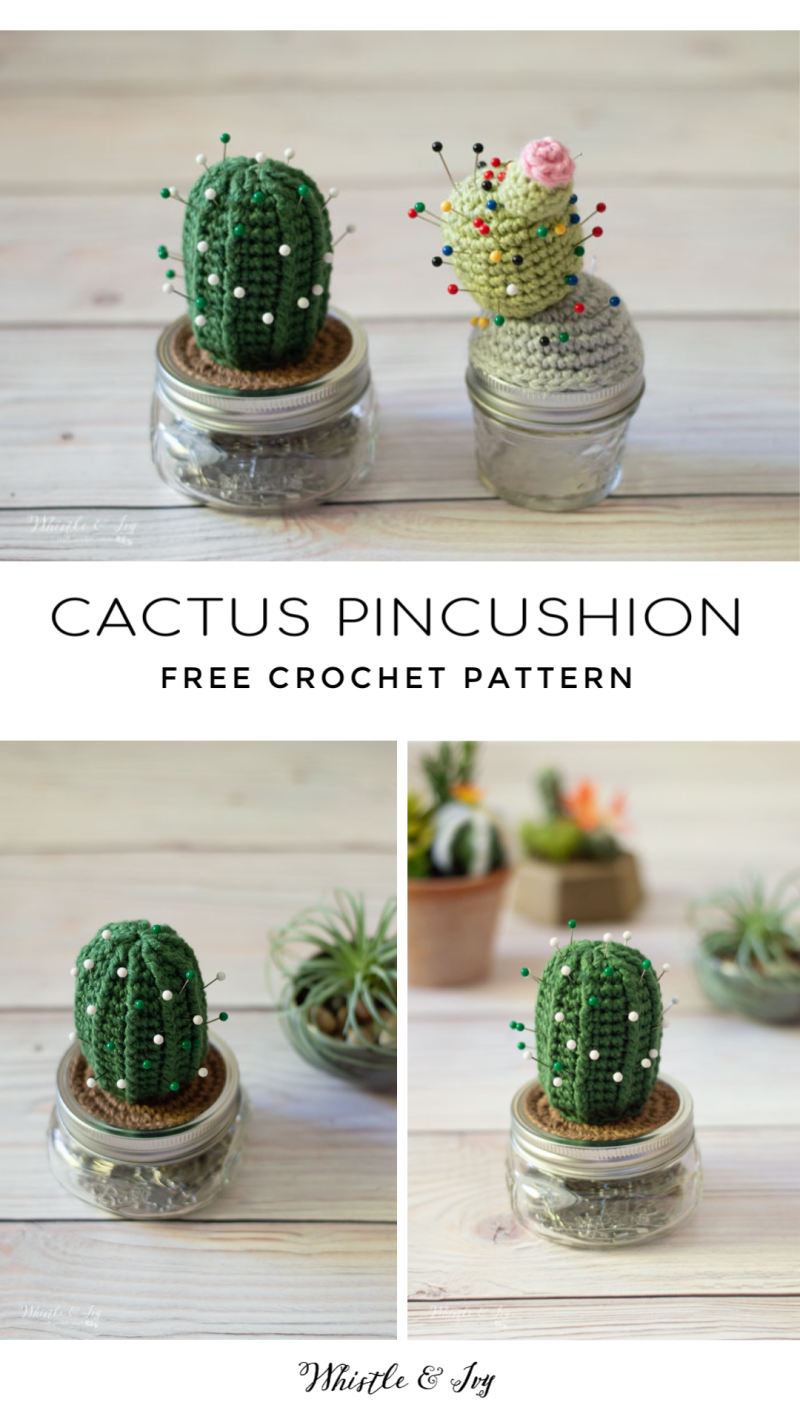
A few years ago I designed this crochet cactus pincushion as a guest post for Stitch and Unwind. I always (almost always) republish my guest posts on my own site several months later. However, I never go around to sharing this one, and when I looked at it a few weeks ago, I decided it needed a bit of a makeover. I really wanted to make it with a widemouth so it could have a bit more stable base. I really love how it turned out, but it’s quite a bit different!
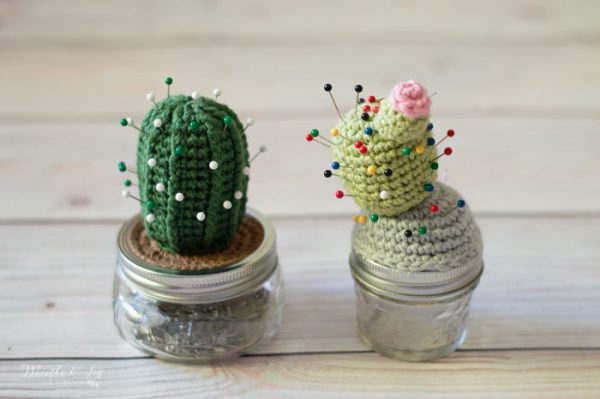
So this crochet pattern now has two versions!
You can get the old one here, and the PDF version includes both patterns. The PDF will have an updated version of the older crochet cactus pincushion. ( The pattern will be the same, it will just be updated for easier reading and workability.)
Ready for an easy afternoon project? Gather your supplies and lets get started!


You’re tired of sifting through complicated tutorials and patterns that leave you feeling overwhelmed.
Let me help.
PICTURE THIS:
Instant access to a library of modern, easy-to-follow patterns
Gifting your handcrafted treasures to your loved ones.
Feeling accomplished by your beautiful makes
It’s time to make your crafting experience as joyful as it should be.
CROCHET CACTUS PINCUSHION – FREE CROCHET PATTERN
Please remember: You are free to use this pattern to make and sell, but do not republish or distribute this pattern in any way. DO NOT use my photos in your listings. Please do share my blog links! It’s a quick and FREE way of supporting Whistle and Ivy and more free crochet patterns in the future.
PLEASE read my Disclaimer before working my free patterns!
What you need: (affiliate links)
– 4mm Hook
– Comfy Worsted in Doe and Jalapeno
– Hot Glue
– Wide Mouth Mason Jar + Lid
– Polyfil
– Darning Needle
Abbreviations: US Terms
Ch – chain
Sc – single crochet
Dc – Double Crochet
Hdc – Half Double Crochet
Sl st – Slip Stitch
St – stitch
BLO – Back Loops Only
Notes:
1. Ch 1 does not count as a stitch, always work the first st of each round in the same st as the ch.
2. For best results, work a “cross stitch” sc.
Special Stitch: fphdc – This is a hdc working around the stitch, not through the two loops on top. Insert your hook under the right side of the stitch, and out the left side when working this stitch. It will give the ribbed look of the cactus.
LOVE THIS PATTERN BUT HATE THE ADS?
Grab your ad-free printable PDF in my shops!
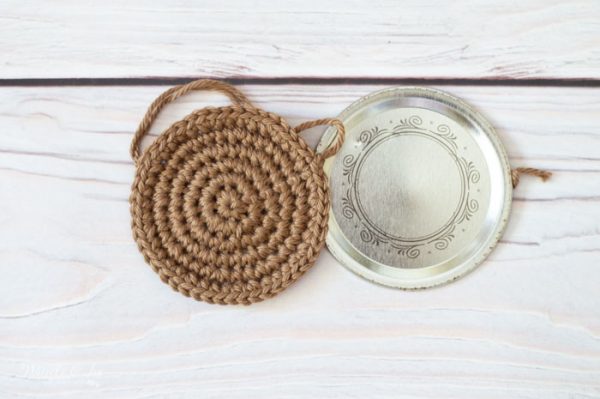
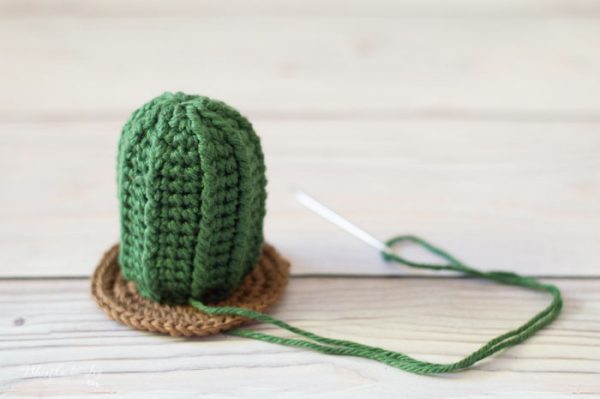
BASE:
(Use Doe)
Start with magic ring
1. Work 8 sc in ring (8 sts)
2. Ch 1. Work 2 sc in each st around. Join with a sl st. (16 sts)
3. Ch 1. *Sc in next st. Work 2 sc in next st.* work all around the circle. Join with the first st. (24 sts)
4. Ch 1. *Sc in next 2 sts. Work 2 sc in next st* work all around the circle. Join with the first st. (32 sts)
5. Ch 1. Sc in next st. Work 2 sc in next st. *Sc in next 3 sts. Work 2 sc in next st* work 7 times. Sc in last 2 sts. Join with first st. (40 sts)
6. Ch 1. *Sc in next 4 sts*. Work 2 sc in next st* work all around the circle. Join with the first st. (48 sts)
Tie off.
Your piece should be approx. the size of a wide-mouth mason jar lid.
CACTUS:
Start with a magic ring
1.Ch 2. Dc 10 into the ring. Join with a sl st. (10 sts)
2.Ch 1. Sc in first dc. Fphdc around same st. *Sc in next st. Fphdc around same st.* work 9 times. Join with a sl st. (20 sts)
3. Ch 1. Sc in first st. Sc in next st. Fphdc around same st. *Sc in next 2 sts. Fphdc around same st.* work 9 times. Join with a sl st. (30 sts)
4. – 14. Ch 1. Sc in first st. Sc in next st. Fphdc around next st. *Sc in next 2 sts. Fphdc around next st.* work 9 times. Join with a sl st. (30 sts)
15. Ch 1. *Sc2tog. Fphdc around next st.* work 10 times. Join with a sl st. (20 sts)
Leave a long tail.
CONSTRUCTION:
Begin by firmly stuffing the cactus with polyfil.
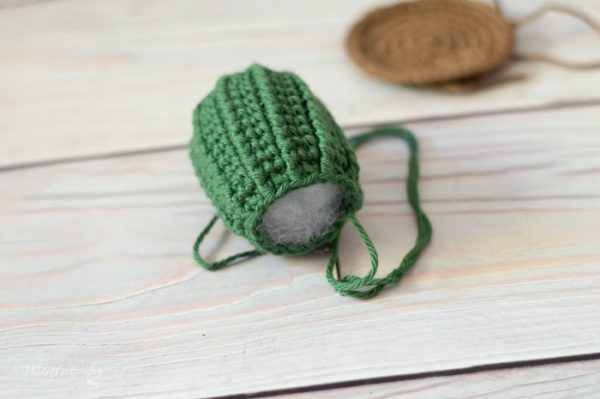
Then, using your tail and a darning needle, sew the cactus to the base.
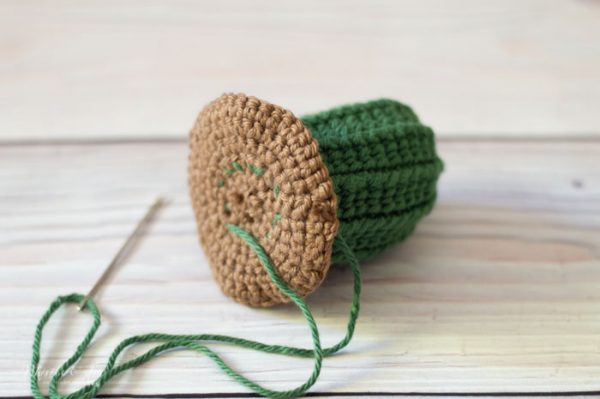
From here, you will glue the base and cactus to the mason jar lid (do not attach the ring at time). Cover the back of the cactus base liberally with hot glue and hold in place on the lid until it’s glued firmly.
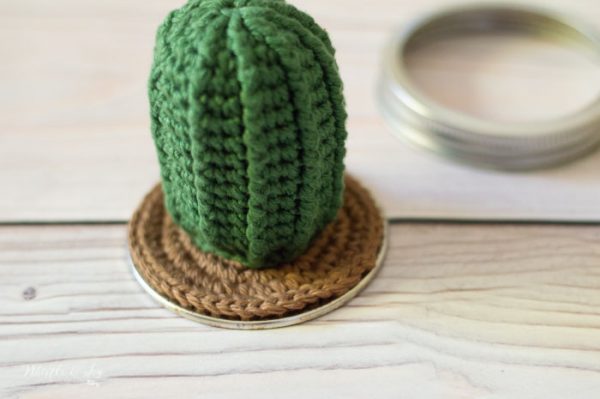
Next, attach the ring to the lid permanently by running a large bead of glue around the outside of the ring. Press the lid firmly in place and hold until the glue cools.

To finish, add your pins! I like to keep safety pins in my jar and sewing pins in the cactus. Sis really loves this cute thing :)
Remember, you can still get the tutorial for my older version of the cactus pincushion here, or you can get a printable PDF with both patterns (the older version has been updated in the PDF) in my Etsy and Ravelry shops.
xoxo,


Thank you! So cute! I love mine added a little cactus flower
Yay! So glad you love it! If you have social media, I would love to see a photo! You can tag me: @whistleandivy
Thank you so much. My grandaughter wanted a cactus for christmas for her collection of pins. This is just the thing.
Yay! You are welcome!
Hi! Such a cute pattern, only, I can’t get my lid to fit. Any suggestions? The brown “dirt” I crocheted fits the lid perfectly but I can’t get the lid to attach. Any advice is greatly appreciated.
Tracy
Do you mean it’s too thick to go into the mason jar lid ring?
Hi, what size mason jar did you use? Is it a 4oz jelly jar? I would be so grateful if you could let me know. Thank you. Andrea
Hi Andrea! It’s actually a wide mouth 8 oz jar.
Thank you. It’s a lovely pattern and perfect gift for an upholstery friend I have. Thanks again. Andrea
You are very welcome!
Thank you for sharing this pattern! I’m making one for my mom… she has way too much pins.
You are welcome!
What is the difference between doing the front post half double crochet in the same stitch versus the next stitch? Is the same stitch the one you just made with the single crochet, the one just behind the V you went through, or the post between the V you just went through and the next V? Since the posts are between the stitches it’s hard to tell which one belongs to which.
Working in the same stitch gives you the increase. The two loops will be slightly to the right (if you are right handed).
Hi there! This is so cute and I’m so excited to make one!
I am having a weird problem… my ribbing is ending up on the inside. The way that my project is naturally curling means at the end I’ll have to flip it inside out. Not an issue, but was wondering if you had any advice on what might be going wrong.
Thanks!
This is a common problem with projects like these, the crochet will naturally try to be inside-out when it starts getting a shape. You will need to flip it once it starts doing that. This is something to look for in your other shaped projects, make sure the right side of your stitches is always facing outward. The ribbing is the right side of your work so it needs to be on the outside.
Hi Beth! I’m excited to be making this cute project. Your instructions are well written and understood but somehow my cactus is coming out with a spiral pattern. It’s gotta be something I’ve overlooked. This is my second attempt.
Glad you like it! Hm, are you joining each row and working post stitches?
Yes, I’m joining each row and working post stitches. It turned out cute, just with spiral ribs.
Absolutely love this pattern! I’m making one for my grandma, but I have a question about the fourth step of the cactus. How do I do the special stitch? Every time I do it it adds a stitch so I end up with 40 or so instead of 30?
Thanks Karoline! You would work around the st, and not work in the 2 loops at the top, this will keep the count consistent. When you are working the rounds with increases, that is when you work around the st to make the post st and again in the two loops, which gives you the extra stitch for the increase.
Ok, I have a question on the base, step 3, am I suppose to sc 2 in every stitch or only in the first stitch?
You are repeating the instructions inside the asterisks: *Sc in next st. Work 2 sc in next st* – repeat those instructions all around the circle.
I am going to make this tonight and enter it into the fair! It is just too stinkin’ cute!
That is awesome, you will do great! So glad you love it!
This is my new favorite thing is the cactus stuff. I was looking for a pin cushion that would go with my western theme. Thank you so much for all the beautiful patterns you publish. Your site is my number one go to when I’m looking for something to crochet!
Thank you Tammy
Cute and astute!
Thank you!
Love it. Such a great idea. No more losing pins. Love cacti too. Awesome!!! Definitely going to make at least one, maybe more. Thanks for sharing this pattern.
SO glad you like it Melissa!
These are so cute! I made a small cactus to put in a little clay pot and I love it! I can’t wait to make some of these! Thank you!
Oh how fun! You are very welcome :)
This is adorable!!! I may try making one except instead of just making the flat base, making it to go around like an emptied tuna can. I’d put rocks for weight, IF I do it that way. Just not sure yet. Thank you for sharing!!! 💖
I see that I can’t type my own name!
Haha! :)
Oh I like that idea! I hope you share your finished project! Thank you Cindy :)
This is just the cutest little thing ever! I would totally buy one at a farmers market. Thanks for sharing. Can’t wait to make one. :)
Thank you!! You are welcome :) :)