
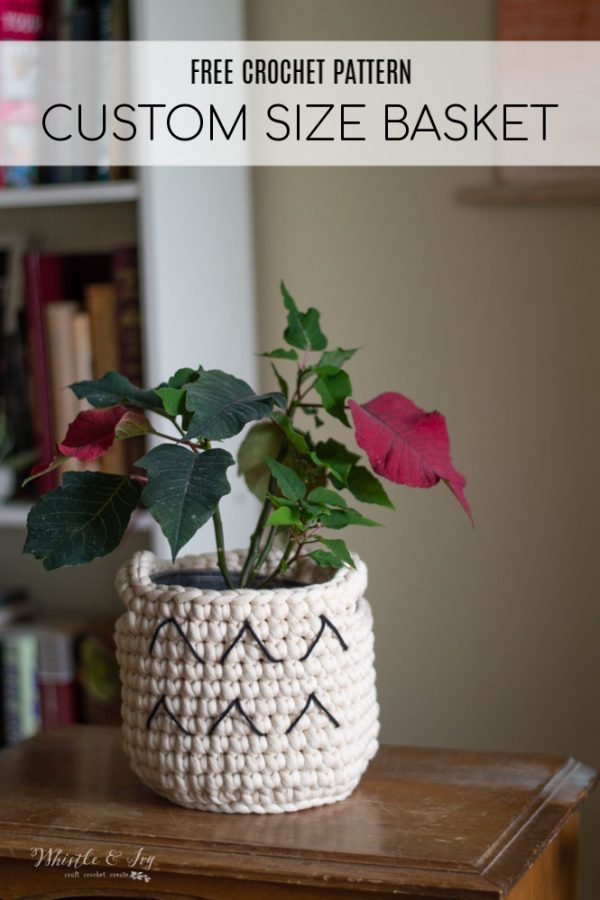
This cute crochet basket pattern helps you make a round crochet basket sized to suit your needs. With just a few easy tips, you can make a basket that is just the right size and has the integrity to do its job. Use any yarn to make the perfect crochet basket for you! This post includes affiliate links, which means I get a small commission at no extra cost to you. Thanks for your support!
HOW TO CROCHET A BASKET – CROCHET BASKET PATTERN
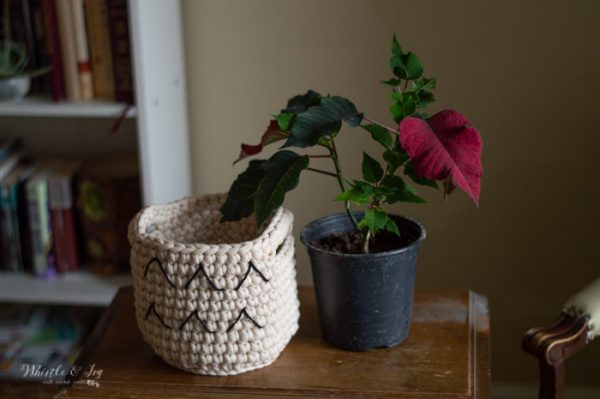
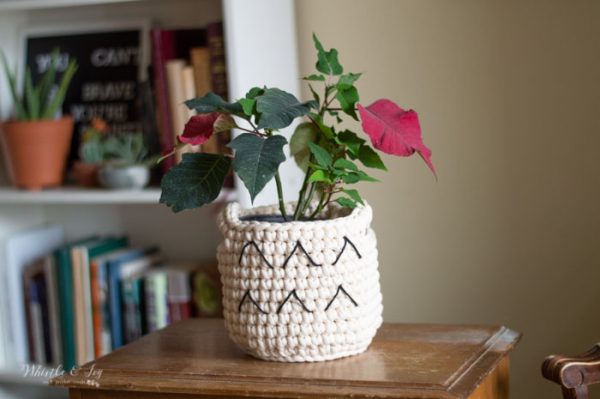
This past Christmas season, my mother-in-law gave me a beautifully (healthy) poinsettia. I didn’t have high hopes for myself, as I have not had a great track record with potted plants (except for my cactuses!). I took it, thinking I could possibly keep it alive for a few weeks, or even a month if I was lucky.
It started out rough, and my little poinsettia lost almost all it’s leaves. But my tendency to neglect plants kicked into high gear, and as luck would have it, letting the soil dry out completely in between waterings is exactly what a poinsettia needs to thrive! It recovered from my overwatering and fussing, and is looking great!
I can now proudly say that I can effectively care for cactuses and one sweet little poinsettia. Now that it’s a permeant resident in my desert room, it needs a fun pot, as it’s been sitting in the sad-looking green foil that it came in.

After experiencing a failed crochet basket project a few month ago, I decided to give it another go this week. I learned a couple things that I found most helpful:

You’re tired of sifting through complicated tutorials and patterns that leave you feeling overwhelmed.
Let me help.
PICTURE THIS:
Instant access to a library of modern, easy-to-follow patterns
Gifting your handcrafted treasures to your loved ones.
Feeling accomplished by your beautiful makes
It’s time to make your crafting experience as joyful as it should be.
Tips on how to make a crochet basket:
1. You can use any yarn, but choose a hook that will give you a tight fabric (I mean tight. Start way smaller than you think, then try larger hook sizes until you can keep the yarn on the hook effectively. That’s the right hook!)
2. Work in sc – this makes the fabric as stiff and tight as possible so the basket will have integrity.
Please remember: You are free to use this pattern to make and sell, but do not republish or distribute this pattern in any way. DO NOT use my photos in your listings. Please do share my blog links! It’s a quick and FREE way of supporting Whistle and Ivy and more free crochet patterns in the future.
PLEASE read my Disclaimer before working my free patterns!
What you need: (affiliate links)
– Bernat Maker BIG (use any yarn you have, though)
– 10mm Hook (use a hook that allows your stitches to be very tight)
Abbreviations: US Terms
Ch – chain
Sc – single crochet
Sl st – Slip Stitch
St – stitch
BLO – Back Loops Only

READY TO MAKE YOUR CROCHET BASKETS?
This crochet pattern can be purchased in my shops! Where would you like to shop today?
Customizing your crochet basket:
Begin by determining what size of basket you would like. I am putting my poinsettia pot in this basket, so I measured widest part of the existing pot it’s in (about 6″ diameter)
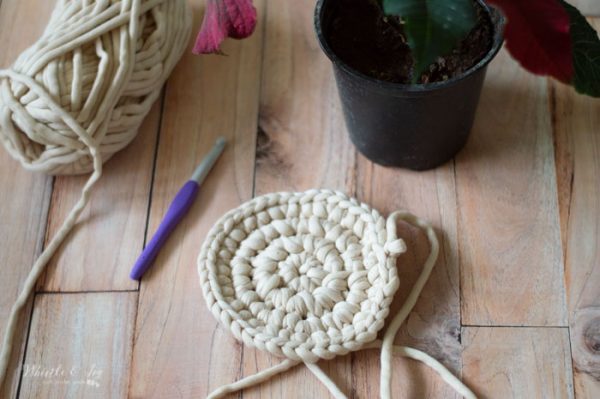
Start with a magic ring or a ch 2.
Why magic ring?
This eliminates any remaining hole you may have because you can pull it tight
Why a ch 2?
This is a good way to start if you aren’t sure how to start with a magic ring, or you are worried you might lose the tail if you work a magic ring.
Crochet Round Basket Pattern:
1. Working either into the magic ring or in your first chain, work 10 sc. Join with the first st. (10 sts)
2. Ch 1. Work an increase in each st around by working 2 sc in each st. Join with the first st (20 sts)
3. Ch 1. *Sc in next st. Work 2 sc in next st* repeat all around. (30 sts)
4. Ch 1. *Sc in next 2 sts. Work 2 st in next st* repeat all around (40 sts).
This gave me a foundation circle of about 6″ across which is perfect for what I need. You want the foundation to be just slightly larger than what yo need it to be. To make your basket larger, continue the pattern of working an extra stitch in-between the increases. You should only have an extra 10 sts in each round. So for round 5, you would work a sc in next THREE sts, followed by the increase, and you will repeat that all around. Finish by joining.
When the foundation circle is as large as you need it to be, you can begin working the sides.
Crochet Round Basket Sides:
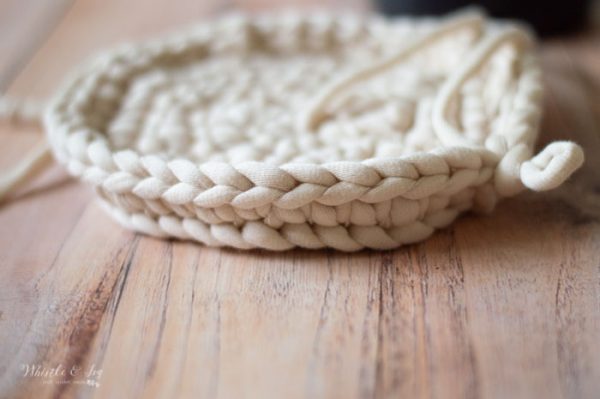
To make the sides go upwards, you will work the next round in the Back Loops Only:
(to make the basket sides even more straight, you can work this round in the “third loop” which is the horizontal loop that is on the BACK of each sc.)
1. Ch 1. Working in BLO or in the third loop, sc in each st around. Join with a sl st. (your stitch count should be the same as your last row on the bottom)
2. Ch 1. Work a sc in each st around. Join with a sl st.
Repeat row 2 until you reach the height you are happy with.
You can also add little handles around the top or a decorative stitch.
To add handles, you will need to do a bit of math.
If your final row count is 40 sts, and you want 2 handles that are 7 sts wide, you will take your total and minus 14 (the total of the two handles). This gives you 26 sts. From here, you will divide the remainder in half, which is 13 sts. This is the total number of stitches that should be worked on either side of the handles.
For example: Sc in next 13 sts. Ch 7. Sk 7 sts. Sc in next 13 sts. Ch 7. Sk 7 sts. Join with first st.
If you would like the seam on the back, you can split ONE side in half.
For example:
Sc in next 6 sts (split the 13 nearly in half). Ch 7. Sk 7 sts. Ch 7. Sc in next 13 sts. Ch 7. Sk 7 sts. Sc in next 7 sts (the other half of the 13 sts).
Finish with a round of sc in each st around.
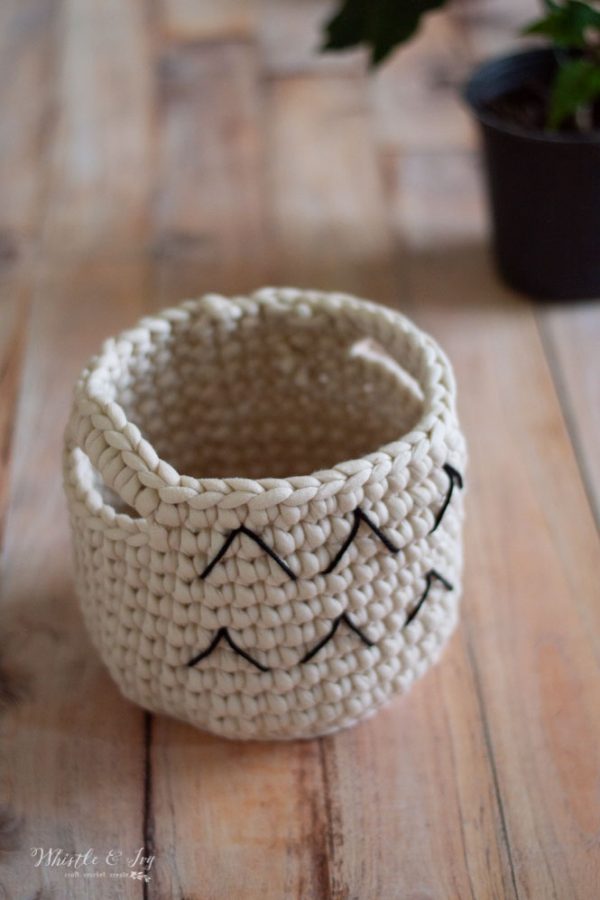
I wanted to add an extra bit of flair to my crochet basket, so I did a bit of very simply embroidery. This basket will not be exposed to heavy use, so I did not worry too much about weaving in the ends of the yarn on the inside. I made these chevrons with a darning needle and black yarn, and eyeballed the simple design. I highly recommend using a dull or plastic yarn needle if you used Bernat Big or any other t-shirt yarn. The sharp needles will try to go in anywhere, but the t-shirt yarn does not allow it to pass through easily, so it can be frustrating with a sharp needle!
Weave in any remaining ends and put your basket to use!
Much better, don’t you think?
xoxo,


Thank you for this pattern. I was experimenting with making this shape and was failing miserably. I am putting several Damp-Rid tubs in my crochet “pots” to hide the containers they come in. So glad I found this pattern, 😊
Yay! So glad it worked for you!
Do you have a tutorial for a rectangle basket? I’ve got cabinet where drawers used to be but aren’t any more so I was just gonna make them in the shelves and put baskets on them. But I need baskets that pretty much fill the space. Thanks!
Not currently, I am sorry!
In making the handles, you say: Sc in next 13 sts. Ch 7. Sk 7 sts. Sc in next 13 sts. Ch 7. Sk 7 sts. Join with first st.
What does the Sk 7 sts mean?
Thanks for the pattern and the great step-outs!
Hi Casey! Sorry for the confusion, it means SKIP.
Do you take the plant pot out of the crochet basket each time you water? Otherwise the dirt and water would run through the pot holes and soil your basket??
You could put a plastic container in it, then put the plant in it.
Good idea!
My poinsettia actually needs very little water! I don’t soak it to where it drains out the bottom. But yes, you would want some kind of dish at the bottom for more wet plants.
Hi, is your blog in UK/US terms?
Hi! it’s in US terms
An error code came up for video tutorial.
Why are there so many ads? I can’t save the pattern without printing out ads I have no interest in and such a waste of paper – trees.
Have a wonderful day
Because ads allow me to give the pattern for free! You can buy an ad-free pattern for $2 in my shop :)
https://www.ravelry.com/patterns/library/custom-size-basket
You can simply delete the ads if you first make a document, then paste this tutorial into the document. I make the images small too, so I can keep paper to a minimum.