
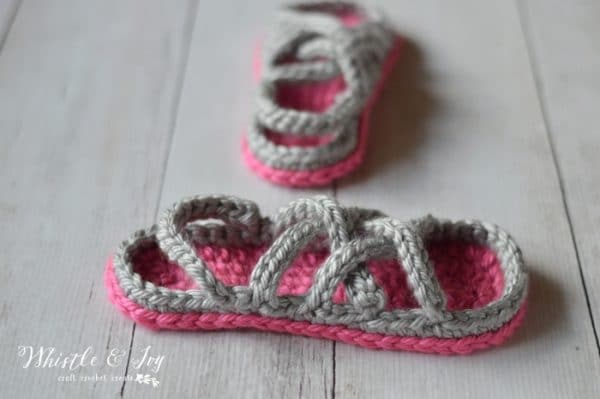
The warm weather has been wonderful here. Not too hot during the day with lovely warm evenings and nights. I am excited to get my kids up to the mountains for a camping trip. Since we have been spending so much time outside, I feel like I have been working less (which is good), but I had to work like a madwoman to get these Crochet Women’s Gladiator Sandals done this week.
Luckily, they don’t take too long to make. I have decided to split a fair booth with a friend this year, and I have considered making a few pairs for my table. We will see if I can find the time!
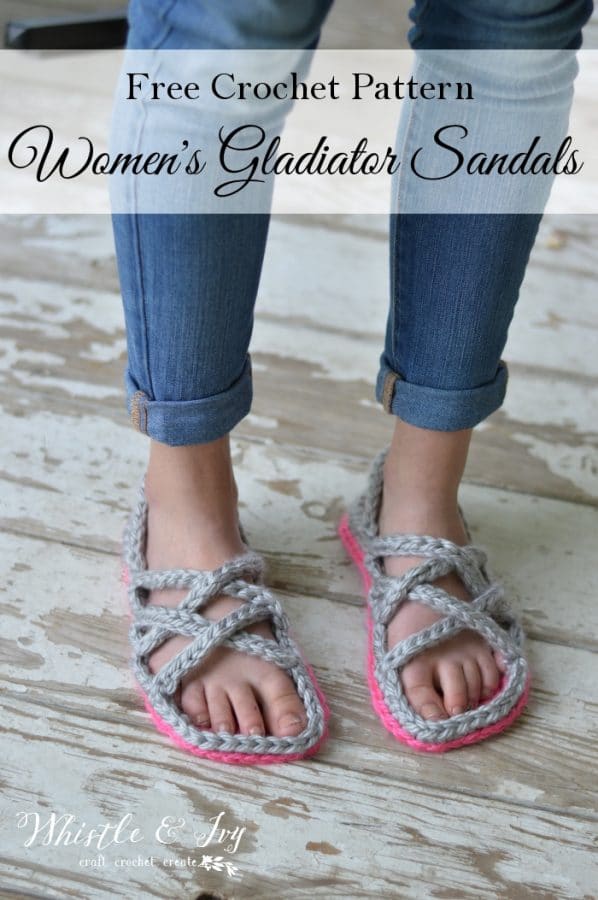

Crochet Women’s Gladiator Sandals
Please remember: You are free to use this pattern to make and sell, but do not republish or distribute this pattern in any way. DO NOT use my photos in your listings. Please do share my blog links! It’s a quick and FREE way of supporting Whistle and Ivy and more free crochet patterns in the future.
What you need:
Size K (6.5 mm) and J (6 mm) Hooks
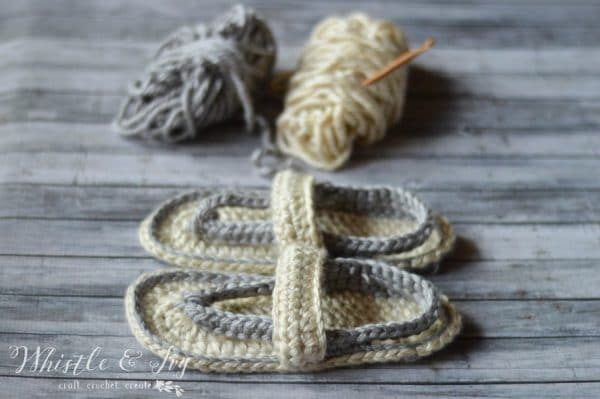
2 balls of Super Chunky Yarn (hometown USA)
Smaller hook for weaving in ends
Abbreviations: American Terms
Ch – Chain
Sl st – Slip Stitch
Sc – Single Crochet
Hdc – Half Double Crochet
Dc – Double Crochet
Gauge-
Sizes 6 and 8: 9 sts = 3″
Sizes 7 and 9: 8 sts = 3″

You’re tired of sifting through complicated tutorials and patterns that leave you feeling overwhelmed.
Let me help.
PICTURE THIS:
Instant access to a library of modern, easy-to-follow patterns
Gifting your handcrafted treasures to your loved ones.
Feeling accomplished by your beautiful makes
It’s time to make your crafting experience as joyful as it should be.
Size 6 and 7 (Use J for 6, K for 7)
Sole:
Left:
Ch 17
1. Sc 3 in 2nd ch from hook. Sc 8. Hdc 2. Dc 4. 7 dc in last st. Working across the other side: Dc 4. Hdc 2. Sc 8. (38 sts)
2 . 2 sc in next 3 sts. Sc 15. 2 dc in next 2 sts. 2 sc in next 3 sts. Sc 15.(46 sts)
3. *Hdc, 2 hdc in next st* work 3 times. Hdc 16. 2 hdc in next st. Dc. 2 dc in next st. Dc. 2 sc in next st. *Sc, 2 sc in next st* work twice. Sc 15. (54 sts)
Sl st and tie off.
Right:
Ch 17
1. Sc 3 in 2nd ch from hook. Sc 8. Hdc 2. Dc 4. 7 dc in last st. Working across the other side: Dc 4. Hdc 2. Sc 8. (38 sts)
2. 2 sc in next 3 sts. Sc 15. 2 sc in the next 3 sts. 2 dc in next 2 sts. Sc 15. (46 sts)
3. *Hdc, 2 hdc in next st* work 3 times. Sc 16. *2 sc in next st, sc in next st* work twice. 2 sc in next st. Dc. 2 dc in next st. Dc. 2 hdc in next st. Hdc 15. (54 sts)
Sl st and tie off.
Using 2nd color, loosely slip stitch all around the sole. (54 sts)
Body:
Find the middle of the heel (with the toe oriented at the top), count 9 sts to the right. Join yarn.
Ch 1. Sc in same st. Sc 17. Ch 14. Sl st in 2nd ch from hook. Sl st in each chain. Sc in next sl st on the sole. Sc 2. Ch 13. Sl st in 2nd ch from hook. Sl st in each chain. Sc in next st one sole. Sc 28. Ch 13. Sl st in 2nd ch from hook. Sl st in each chain. Sc in next st one sole. Sc 2. Ch 14. Sl st in 2nd ch from hook. Sl st in each chain. Sc in last st. Join with a sl st. Don’t tie off.
Heel:
Continuing high where you left off: Ch 15. Leaving ch loop on your hook, insert your hook in the st behind the bottom of the first strap, on the other side of the heel. Grab yarn and pull through making a slip st, and attaching the heel strap to the other side. Sl st in each ch, working back to the beginning. Sl st into first st. Tie off.
Size 8 and 9 (Use J for 8, K for 9)
Left:
Ch 19
1. Sc 3 in 2nd ch from hook. Sc 9. Hdc 2. Dc 5. 7 dc in last st. Working across the other side: Dc 5. Hdc 2. Sc 9. (42 sts)
2. 2 hdc in next 3 sts. Hdc 17. 2 dc in next 2 sts. 2 sc in next 3 sts. Hdc 17. (50 sts)
3. *Hdc, 2 hdc in next st* work 3 times. Hdc 18. 2 hdc in next st. Dc. 2 dc in next st. Dc. 2 sc in next st. *Sc, 2 sc in next st* work twice. Sc 17. (58 sts)
Sl st and tie off.
Right:
Ch 19
1. Sc 3 in 2nd ch from hook. Sc 9. Hdc 2. Dc 5. 7 dc in last st. Working across the other side: Dc 5. Hdc 2. Sc 9. (42 sts)
2. 2 hdc in next 3 sts. Hdc 17. 2 sc in the next 3 sts. 2 dc in next 2 sts. Hdc 17. (50 sts)
3. *Hdc, 2 hdc in next st* work 3 times. Sc 18. *2 sc in next st, sc in next st* work twice. 2 sc in next st. Dc. 2 dc in next st. Dc. 2 hdc in next st. Hdc 17. (58 sts) Tie off.
Using 2nd color, loosely slip stitch all around the sole. (58 sts)
Body:
Find the middle of the heel (with the toe oriented at the top), count 10 sts to the right. Join yarn.
Ch 1. Sc in same st. Sc 19. Ch 15. Sl st in 2nd ch from hook. Sl st in each chain. Sc in next sl st on the sole. Sc 2. Ch 14. Sl st in 2nd ch from hook. Sl st in each chain. Sc in next st one sole. Sc 30. Ch 14. Sl st in 2nd ch from hook. Sl st in each chain. Sc in next st one sole. Sc 2. Ch 15. Sl st in 2nd ch from hook. Sl st in each chain. Sc in last st. Join with a sl st. Don’t tie off.
Heel:
Continuing high where you left off: Ch 17. Leaving ch loop on your hook, insert your hook in the st behind the bottom of the first strap, on the other side of the heel. Grab yarn and pull through making a slip st, and attaching the heel strap to the other side. Sl st in each ch, working back to the beginning. Sl st into first st. Tie off.
Construction:
Finish the sandals by sewing the tips of the strap in place on the sole. Their placement does not need to be exact, but you can use this photo as a guide:
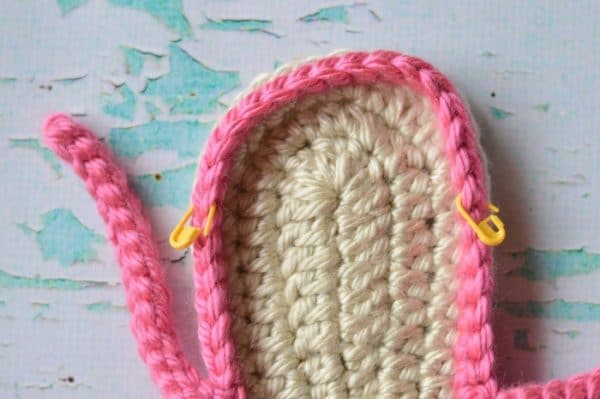
Using your hook and a length of yarn, bring it in and out through the stitch on the shoe and the end of the strap until you have a secure hold. Tie a firm knot on the inside, hiding the knot and securing your ends.
Sew the bottom straps in the middle stitch, between where the top straps begin on the shoe, and where they are sewn(about 3 stitched up from the top strap). Interweave them so they go over and under (or under and over).
Using your hook and a length of yarn, bring it in and out through the stitch on the shoe and the end of the strap until you have a secure hold. Tie a firm knot in the inside, hiding the knot and securing your ends.
Weave in all other ends.
So here is the chunky version. However, I am curious, would you be interested in a medium-weight version as well?
You might like these FREE patterns:

Happy crocheting!

Just wondering if you think you could use flip flops as the soles? Just start at the step of slip stitching around the sole then go on from there? I have made a pair of more conventional slippers with flip flops for the soles and these would look really cool with rubber bottoms!
Yeah, definitely!
I am just start to crochet. I simply don’t understand that your instruction of sole of 1, 2 and 3rd , sc 3 in 2nd ch , and what do you mean by working across the other side? If you have avideo of this instruction, would be so grateful
Many Thanks
Can you help me understand your crochet level? Have you worked across a chain before?
very basic. Like I have stated in previous email, I can read the instructions but struggling with some techniques.
Thank you
I hope the video helps you!
I have a video of use the sole here:
https://www.youtube.com/watch?v=7pp-06F-XpE
I was wondering if you had a video. I did something wrong. I have 2 straps on the top on both sides but in the pic it shows they are more on the side. Please help if you can.
It sounds like you are working the wrong way around. The right sides of your stitches should be on the outside. Is that possibly the issue?
I am making them and following the instructions the first strap end up on top of the big toe. I think we need less sc, it says 17 but I think in the pic I can count 12 sc.
Are you working the correct way around the sole? The right sides of your stitches should be on the outside of the shoe, not the inside.