
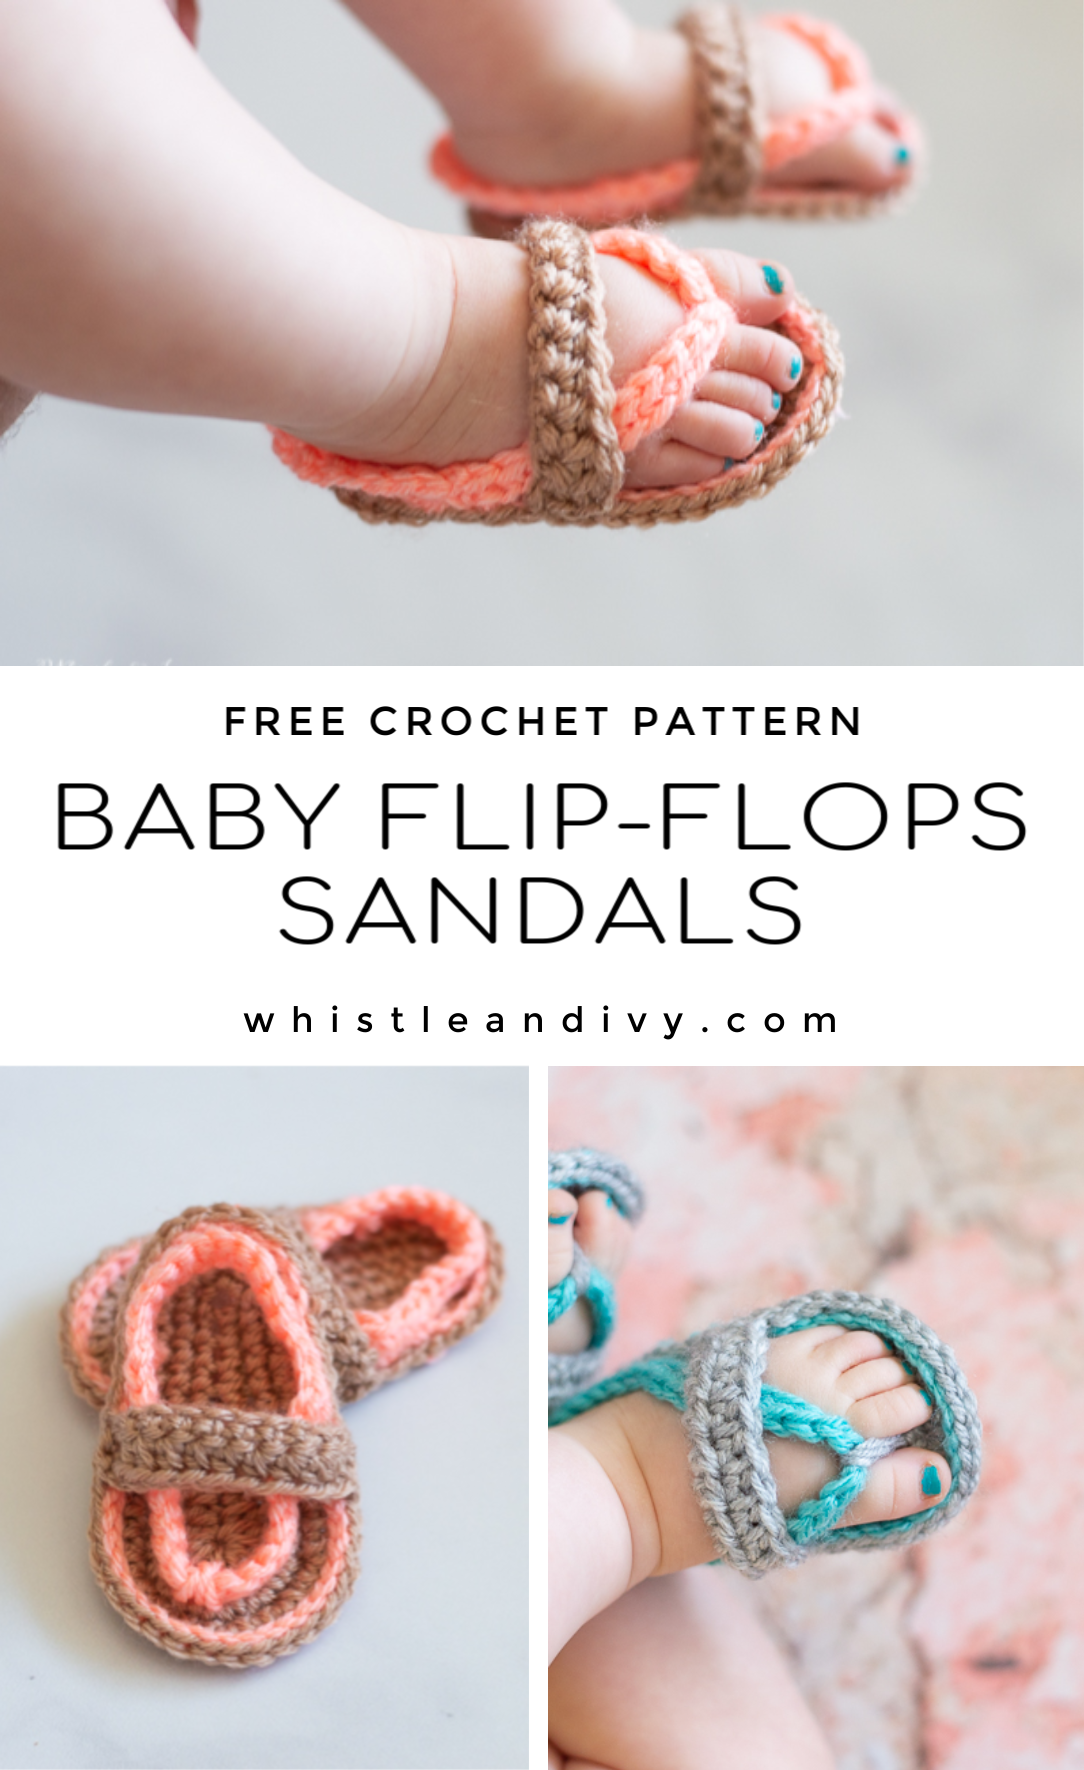
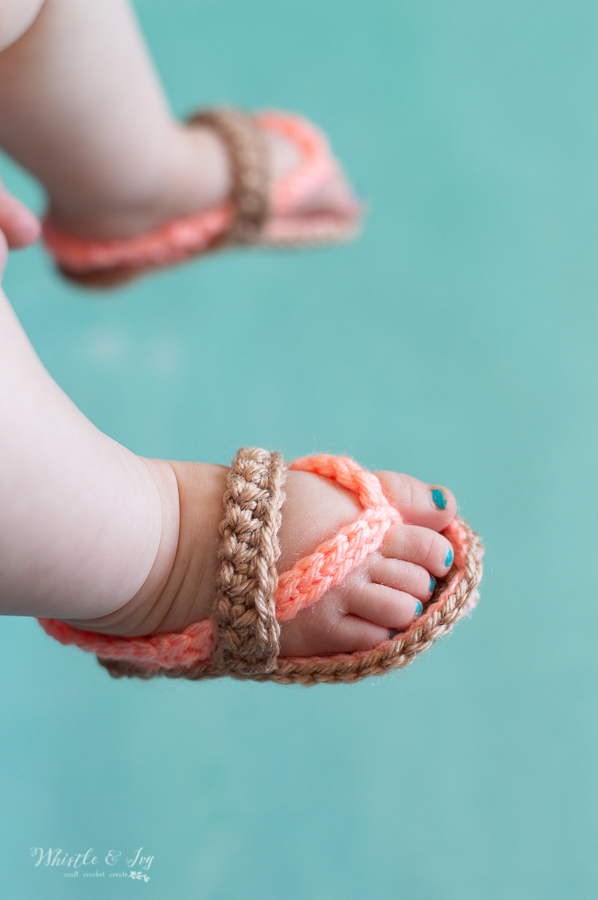
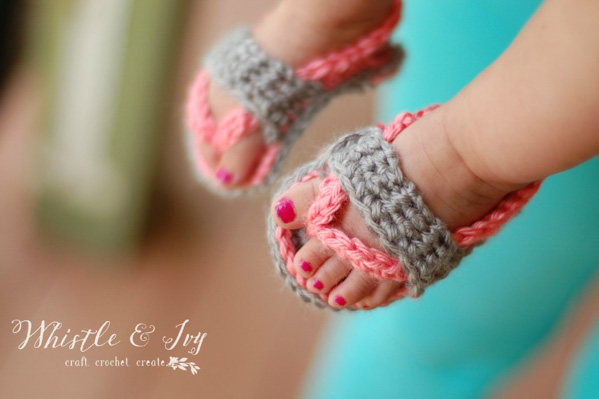
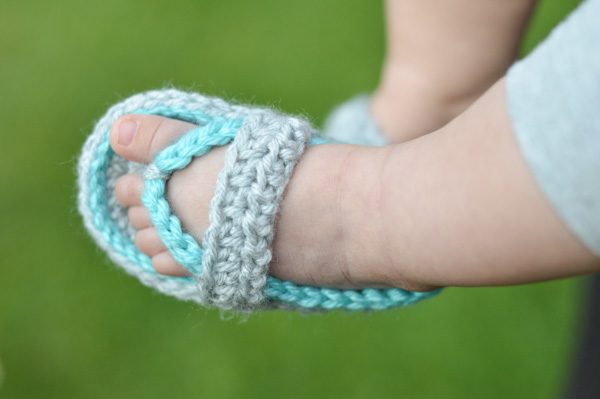
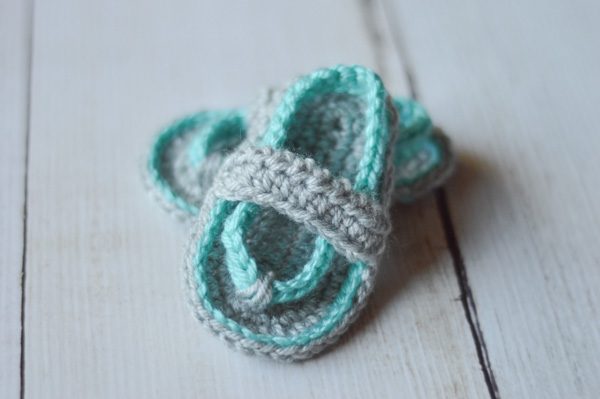
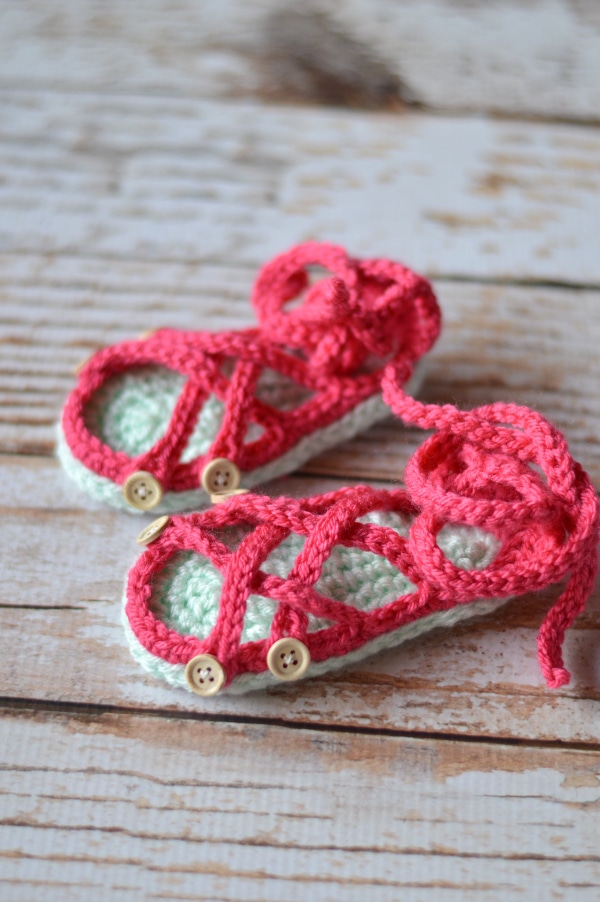
These darling crochet baby flip flops are the perfect summer shoes/booties for baby! They are soft and comfy, but add a bit of classic style to any outfit. The toe strap and heel strap help keep these crochet flip flops in place on Baby’s soft feet! This post contains affiliate links, which means I get a small commission at no extra cost to you. Thanks for your support! For more information, click here.
Crochet in the summertime can get a bit tricky. It’s hard to work under a cozy blanket in the heat of the summer, but there seems to be few summer crochet patterns.
Enter Baby crochet flip flops!
These sweet little baby shoes only take about an hour to make and they are classically adorable.
Oh my goodness! Aren’t baby feet the cutest!? THOSE TOES.
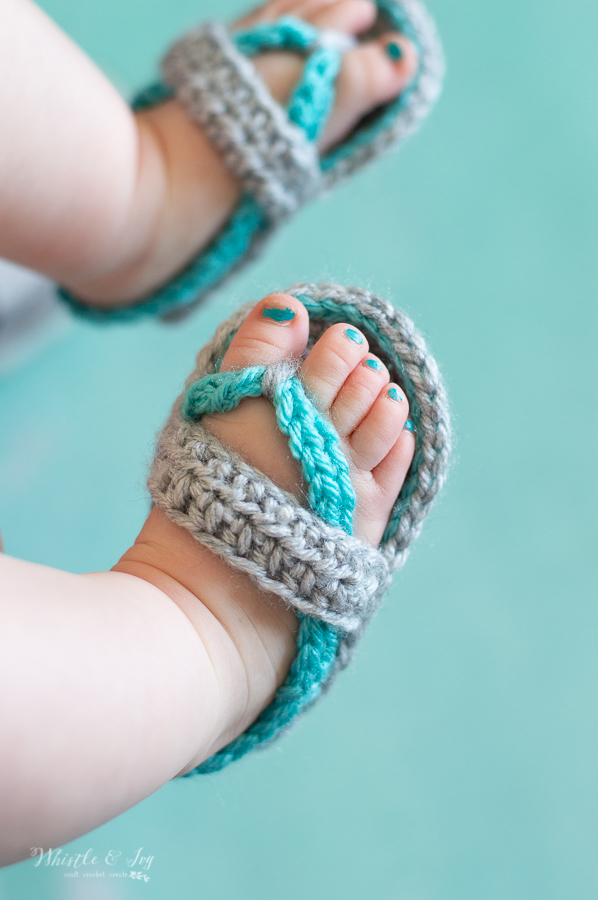
Even though these crochet baby flip flops are adorable and pink, they would definitely work for a baby boy as well. And, these actually stay on quite well; my niece had them on her feet for several hours. This is so important when designing baby shoes. I have actually had to scrap several adorable patterns because they just didn’t stay on little baby feet. If they don’t stay on, what’s the point!?

You’re tired of sifting through complicated tutorials and patterns that leave you feeling overwhelmed.
Let me help.
PICTURE THIS:
Instant access to a library of modern, easy-to-follow patterns
Gifting your handcrafted treasures to your loved ones.
Feeling accomplished by your beautiful makes
It’s time to make your crafting experience as joyful as it should be.
CROCHET BABY FLIP FLOPS – FREE CROCHET PATTERN
Please remember: You are free to use this pattern to make and sell, but do not republish or distribute this pattern in any way. DO NOT use my photos in your listings. Please do share my blog links! It’s a quick and FREE way of supporting Whistle and Ivy and more free crochet patterns in the future.
PLEASE read my Disclaimer before working my free patterns!
What you need: (affiliate links)
– F Hook
– Medium Weight Yarn in 2
(I suggest Knit Picks Brava, Caron Simply Soft or Mighty Stitch)
– Darning Needle
Abbreviations: US Terms
Ch – chain
Sc – single crochet
Dc – Double Crochet
Hdc – Half Double Crochet
Sl st – Slip Stitch
St – stitch
Gauge: 9 sc = 2″ (alternately, you can use the small sole as the gauge, and adjust your hook accordingly to get the correct length.)

READY TO MAKE YOUR CROCHET BABY FLIP FLOPS?
The written pattern below is FREE and sized for 3-6 months. You can find a PDF that includes NINE sizes from Newborn – Toddler size 9 in my shops. The PDF is formatted for easy crocheting on-the-go or for easy printing, it doesn’t include ads or comments. Thanks for your support! Where would you like to shop today?

3-6 MONTHS SIZE (approx. 4″)
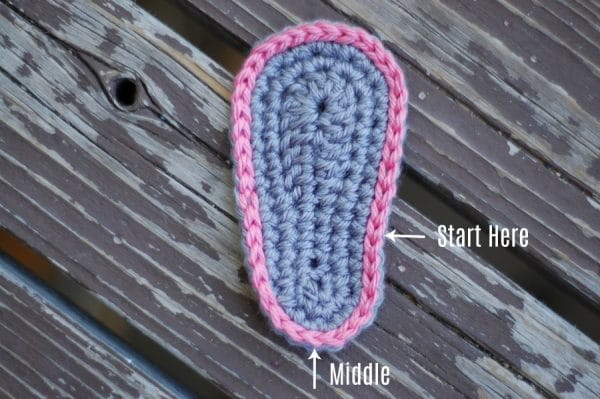
Sole: Make 2 (Worked in the round)
NEED HELP? VIEW THE VIDEO FOR THE 3-6 MONTH SIZE HERE.
1. Ch 11.
Work 3 sc in 2nd ch from hook, sc in next 4 ch, hdc in next ch, dc in next 3 ch, 7 dc in last ch. Working across the opposite side: dc in next 3 ch, hdc in next ch, sc in next 4 chs. Join with first sc. (26 sts)
2. Ch 1. 2 sc in next 3 sts. Sc in next 9 sts. Work 2 sc in next 5 sts. Sc in next 9 sts. Join. (34 sts)
3. Ch 1. *Sc in next st, work 2 sc in next st* work 3 times. Sc in next 9 sts. *Sc in next st, 2 sc in next st* work 5 times. Sc in next 9 sts. Join and tie off. (42 sts)
With second color use a loose tension and sl st all around your sole piece. (See Photo).
Tie off. Find the middle of the heel.
Body:
1. Counting the sl sts, count 8 to the right. Join your second color. Ch 1. Sc in same st. Sc in next 2 sts. Ch 8. Sk 9 sts, sc in next st. Sc in next 2 sts. Ch 16. Join with a sl st with the very first st of the round. (Make sure your chain isn’t twisted.)
2. Ch 1. Sc in same st. Sc in next 29 its (across the heel, up the side and all across your toe piece chain.). Join with sl st. Tie off.
Weave in all ends.
Toe Strap (Make 2):
Start with an 8” tail. This is a separate piece.
Ch 11
1. Sc in the 2nd ch from hook. Sc in next 9 chs. Turn. (10 sts)
2. Ch 1. Hdc in same st. Hdc in next 9 sts. (10 sts)
Leave a long tail.
BABY FLIP-FLOPS CONSTRUCTION:
Using either tail of your toe strap and a yarn needle, sew the strap in place, going in and out through both loops in the end of the strap and both loops on the side of the sole. You can place the strap up or down the shoe to suit yourself, but I placed mine directly in front of where the connector toe piece connects with the sole.
To attached the toe piece, put about 8” of yarn on your needle. For the right shoe, find 1 st to the left of the middle dc in the sole (for the left shoe, find 1 st to the right). Wrap the yarn over and under that dc st to give it a firm hold, (but keeping the yarn loose) going around that stitch with your needle and around the toe piece. I do it about 3 times so there are only 3 pieces of yarn between the toe. Tie firmly on the bottom to secure it in place. (you can even secure with a dab of hot glue)
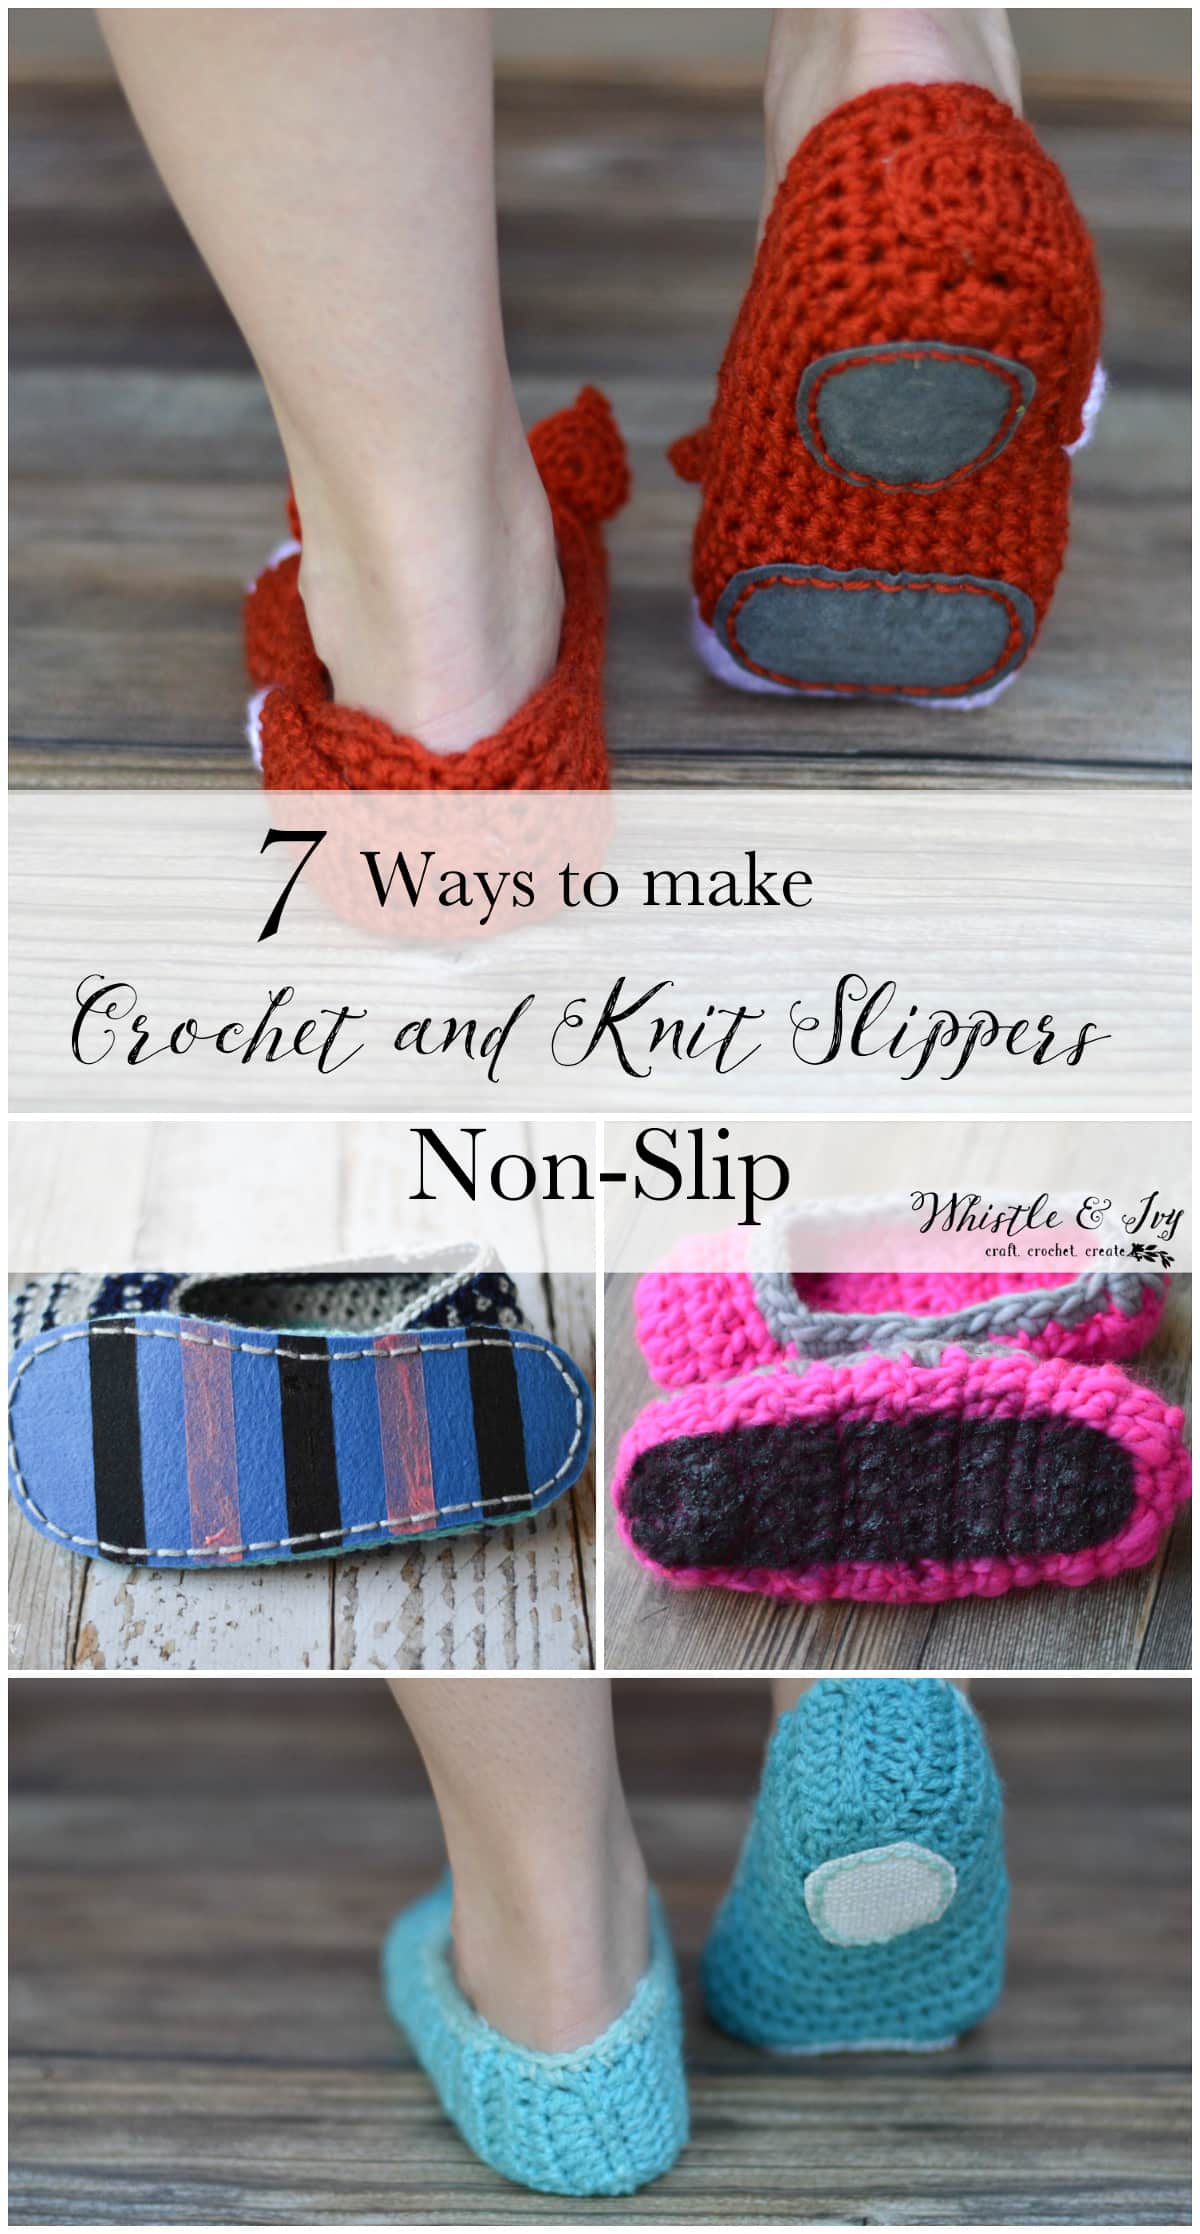
Are you making flip-flops for a little walker? You might want to think about making them non-slip!
Here are 7 tried and tested methods!

You work through both loops, and they will look like they are on top.
Cuteness!!! I just made these and they turned out so cute!! And I consider myself a beginner…good job Bethany!!! And Thank YOU!!!
Thank you!! You are welcome, I am so glad you liked the pattern!
I am soo a visual learner… I noticed that you had videos of the Mary Janes is there any plan to do a video on these?
Yes! I do have plans. Hopefully I can make them a reality :)
I made these flip flops. They are so easy to make! They are so cute I have made them for friends. I can make two to three pairs a day!
Thank you Jessie :) I appreciate your sweet comment!
Well, they are adorable. But I have a hard time looking at the sandals because my eyes keep going to the cute little toes! Thank you for sharing these!!!
Thank you Carolyn :)
Each size has strap pattern instructions after step 6.
You will work them through both loops of your last row. Feel free to email or FB message me a photo and I can take a look.
You are very welcome! I am glad they worked well for you!
Thank you! I am sure that I will be able to finish it now.
You’re welcome :)
It falls out? You are working in the st from the previous round.
Hi Bethany, I am trying to make this adorable flip flop —I always seem to have issues with shoes!!! my shoe looks narrow and kinda curvy lol not as wide and flat bottom as yours but i’m also working on the 0-3 size not sure if i am doing this right ughhh was given this challenge and really want to complete it I also noticed that you have a two different colors on the bottom–but i dont remember you mentioning changing colors. or did you add another row in the different color after the main bottom was done…lol i hope i dont sound too confusing thanks for any tip you can give
Hello,
The second color is the sl st around the edge ( you work the body of the shoe through these sl sts). Are you using the suggested hook and yarn? the gauge will not be correct if you are using a different yarn, even if it stay it’s the same weight. Feel free to email me (or on Facebook) a picture of your sole, I might be able to pinpoint what is going on! It’s probably something very simple :)
I would trace the child’s foot size and then use those measurements with the sizes provided to determine a gauge.
Then adjust the largest pattern to fit.
That’s what I have done in the past for slipper patterns that my older daughter has liked and I could only find in kids and had to adjust to adults.
Usually it takes a few extra rounds (depending on how the pattern is written.). I will tell you this. To keep the shape and not have it get too round in shape I try to not shape until the end
Hahaha! That is awesome :) You are welcome!
Thanks so much Danielle!
It would take a bit of trial and error but I bet you could do it! You can use this pattern as a guide:
http://www.whistleandivy.com/2013/06/monk-strap-crochet-shoes.html
I add 2 chains on the foundation for each size up for length, but you might want to make it one row wider, so take that into account for your length.
Hahahaha! Thanks! Did you pick up on the hint ;)?
yes i did, waiting on her to find something to measure the baby’s foot with. (I couldn’t believe she doesn’t have a tape measure, guess that will be a purchase I will make for her) She lives away from me, so can’t measure it myself Can’t wait to get started.
Thank you so much, Kathryn! You are welcome, congrats to your friend :)
Thank you Annie! I know! I am a bit terrified for some reason, maybe it’s having to do two kids at once, or that I felt quite comfortable with my little boy and this will be different, but I am still excited of course :)
yep! You are doing it right :)
It is an increase. Just like a hat, you have to work more than one stitch together so that your piece gets bigger and doesn’t turn into a tube. So for step 2, you will work 2 sts together in the next 3 sts; 7 up the side, one st in each, then for the toe, you work 2 sts together in the next 5 sts. The step after that is an increase as well, but you are working a single sc in between the doubles.