
Ever wondered how to make your knit or crochet slippers non-slip? I wondered as well and I decided to put 7 non-slip methods to the test to see which ways were the most effective. Read each item on the list for details about my experiment and see which non-slip method was my favorite!
This post contains affiliate links. Click here for more information. Thank you!
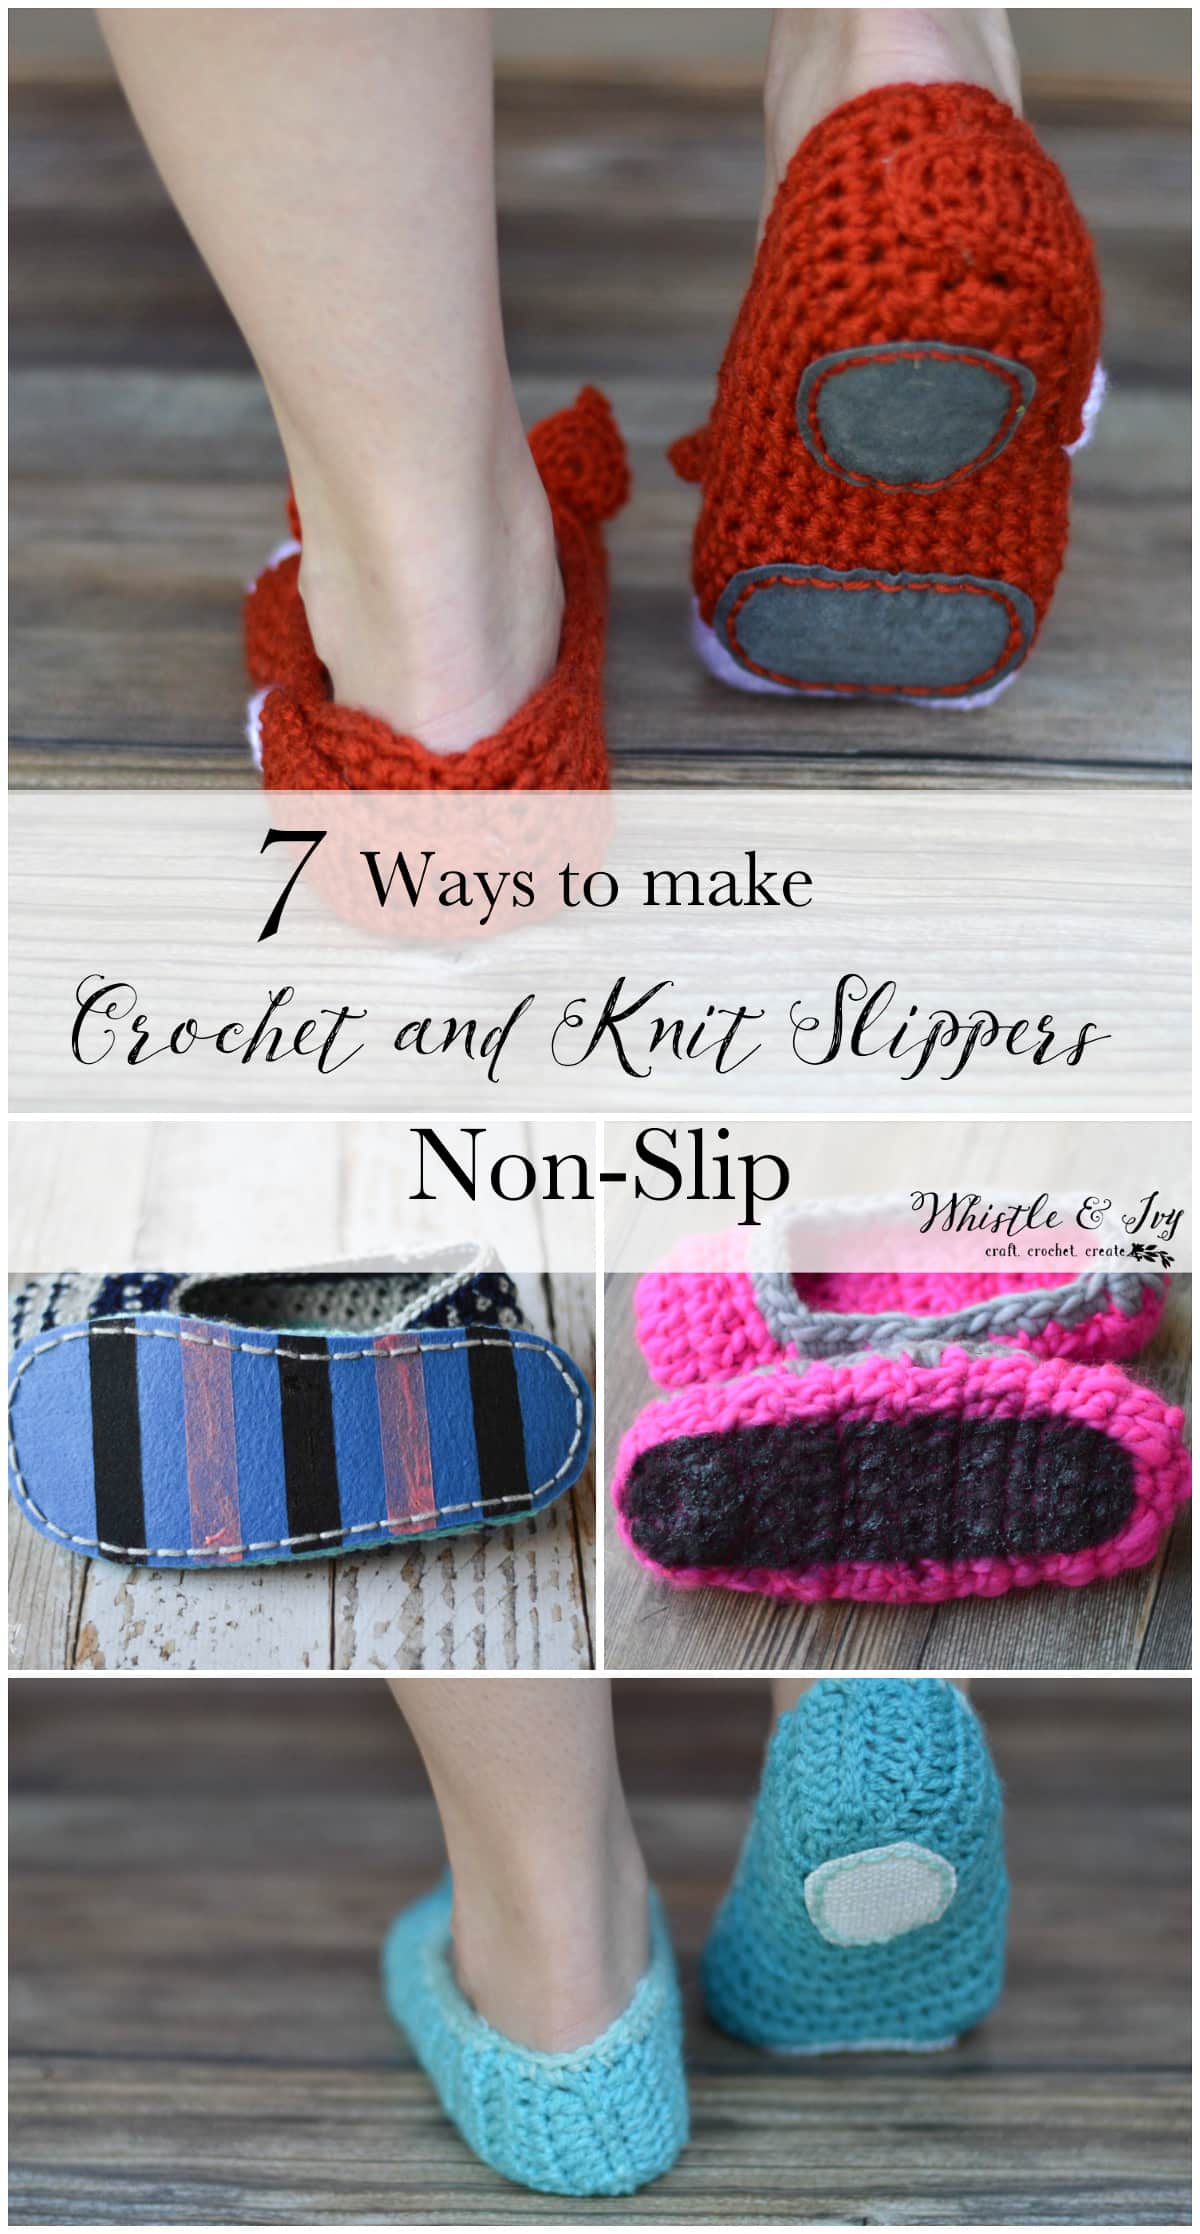
HOW TO MAKE CROCHET SLIPPERS NON-SLIP – 7 TESTED METHODS
I get asked a certain question quite often. Crocheters reach out wondering how to make their freshly finished crochet slippers non-slip. This is especially important if your slippers are for a seasoned individual or a very young individual. We want to avoid any slips and falls! Unfortunately, until writing this post, I wasn’t really sure. And since I really should know, I decided to figure it out! I had heard of a few methods in Facebook comments and while searching on Google, but I hadn’t tried any of them personally, so I felt uncomfortable suggesting something I didn’t have first-hand experience with. I decided it’s time to gather up all the non-slip methods I could find and put them to the test.

You’re tired of sifting through complicated tutorials and patterns that leave you feeling overwhelmed.
Let me help.
PICTURE THIS:
Instant access to a library of modern, easy-to-follow patterns
Gifting your handcrafted treasures to your loved ones.
Feeling accomplished by your beautiful makes
It’s time to make your crafting experience as joyful as it should be.
1. Non-Slip Method #1 – Hot Glue
What you need:
–Hot Glue Gun
–Hot Glue Sticks
This method actually works surprisingly well. Hot glue is something most people have on-hand so it is an easy go-to method. It’s has more gripping power that I expected, as it doesn’t feel super grippy to the touch. I tried this method on my Quick and Cozy Slippers and was pleasantly surprised. It’s grippy without being SO grippy that you trip when you walk. However, it dries very hard, and might be uncomfortable to walk on if your slipper soles are only one layer. Also, because it’s a soft plastic, I would guess that it would harden and crack over time and need to be reapplied.
Pros:
– Inexpensive
– Most will have it on-hand
– Grips without tripping
– No drying time
Cons:
– May be uncomfortable to walk on
– May need to be reapplied over time
– Be careful washing/drying your item, one user has said the dryer will melt the glue.
2. Non-Slip Method #2 = Puffy Paint
What you need:
–Puffy Paint
Puffy paint is another good option that is easy and inexpensive. I put lines of puffy paint on the bottom of my Summer Flip-Flop Slippers. It has a bit more gripping power than hot glue, but it dries softer, so you wouldn’t have the possible discomfort of walking on hard beads of plastic. The only complaint I have is that you need a day to let the paint dry before you can use your slippers.
I have only been using mine for a few days, so I can’t say for sure, but I have heard people complain that it peels off and needs to be reapplied frequently. I will update this post as I find out more!
Pros:
-Inexpensive
– Grips without tripping
– Soft to walk on
Cons:
– Takes several hours to dry
– May need frequent reapplication
3. Non-Slip Method #3 – Silicone Caulk
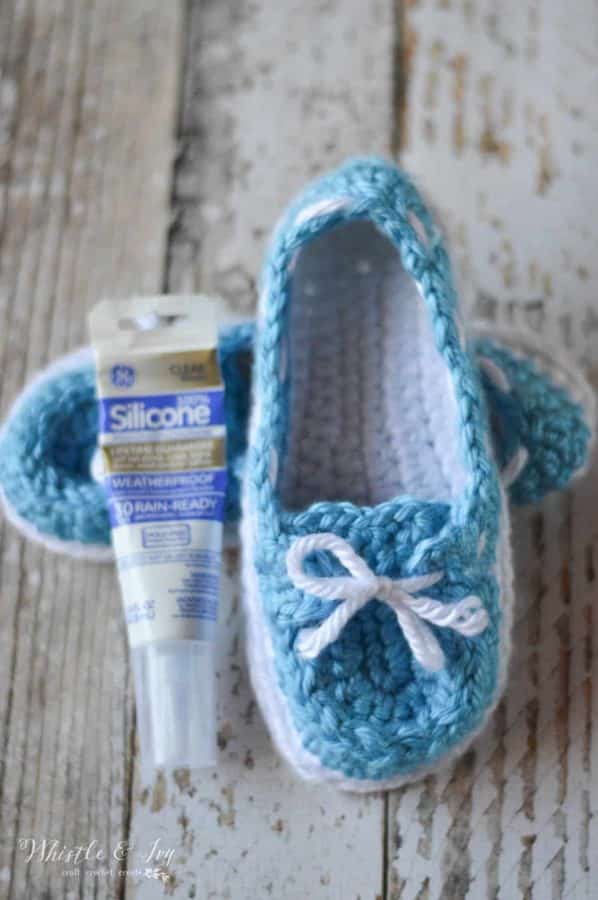
What you need:
– Rubber Gloves
– GE Silicone Caulk
I knew this one would work well! One could say that it works “too well” because the gripping power on these babies is intense. I tried out silicone on my Chunky Boat Shoe Slippers. You might be able to tone down the grippiness by applying the silicone much lighter than I did. However, if you apply it thick, it forms almost like a shoe-sole, so you can wear them outside and give them a bit of light wear.
You do need to let the silicone dry for 24 hours before using them.
To apply the silicone, I simply squirted out a generous amount on the bottom of my slippers, and using a gloved hand, spread it around the sole evenly.
Get this silicone on amazon.
Pros:
-Forms a waterproof sole to your slippers
– Very grippy
Cons:
– Can be messy to apply
– Can be too grippy and be a tripping hazard
4. Non-Slip Method #4 – Felt Sole


What you need:
– 3mm Felt
– Leather Punch
– Puffy Paint
– Darning Needle
When I began making this, I didn’t realized the felt, in and of itself, did not make the slippers non-slip. That being said, I still decided to include it because you can use any of the methods here, and make them work better. For instance, using hot glue on a thick, felt sole would alleviate the con of walking on uncomfortable plastic. I made the Crochet Galilee Slippers to test out this method and used a tutorial found at Red Handled Scissors. I really enjoyed making this slippers and will be using this felt method in the future.
Get the thick felt on Amazon here. I opted to use her exact method so I used Puffy Paint.
Pros:
-professional finishing touch to your crochet slippers
– Comfortable to wear
Cons:
-isn’t non-slip itself and must combine with another method
– takes more working time that other methods
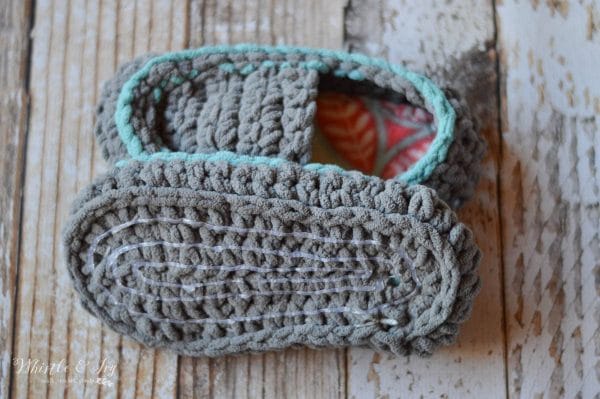
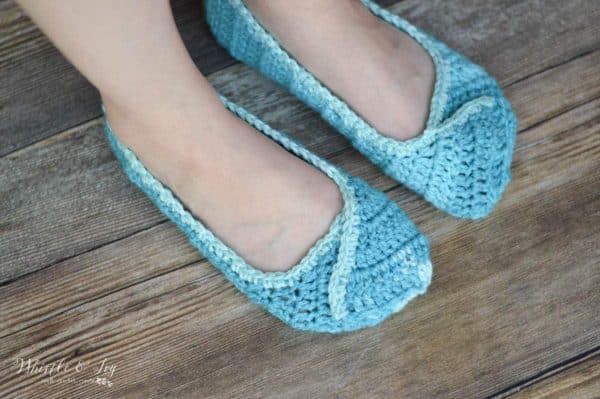
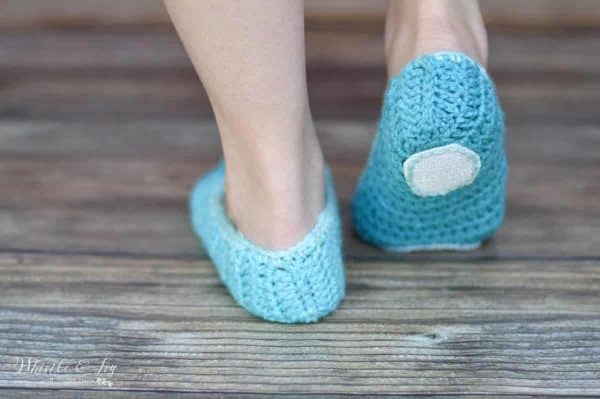
5. Non-Slip Method #5 – Shelf Liner
What you need:
–Leather Hole Punch
–Shelf Liner
–Darning Needle
This was another method that was surprising! I tested this method using a FREE crochet pattern by Good Knits. The shelf liner is the perfect gripping, and is sewn onto the bottom of the slippers. It’s made to line shelfs on the kitchen, so it’s got a bit of softness to it, which provides added comfort to your finished slippers, especially if they are thin.
To add shelf liner to your slippers, simply eyeball two ovals (or use the suede template from #7), one for your heel and one for the ball of your foot. Using this leather punch, punch out holes around the pieces. Pin the pieces of shelf liner in place on the slipper and hand-sew them in place with yarn and a darning needle.
Pros:
– added comfort to thin slippers
– Can be easily removed
Cons:
– Need special supplies
– Extra sewing required
6. Non-Slip Method #6 – Plasti-Dip
What you need:
Plasti-Dip
Plasti-Dip is a specialty air-dry rubber compound that is specifically made to coat objects and make them non-slip. It was an obvious choice to try as a non-slip solution to crochet slippers. I tried this method on my 30 Minute Slippers, and used a tutorial by Tails to Tell Studio. I applied three coats and because my yarn was very fuzzy, I used a popsicle stick to flatten the fuzzy fly-aways. It worked wonderfully! It has THE PERFECT amount of grip, not so much that you trip, but enough that you don’t slip.
Pros:
-Perfect amount of grip
– Easy to apply
– remains flexible after drying
Cons:
– Specialty Purchase
– May not be able to find the right color
– Need a few hours to apply 3 coats and let them dry.
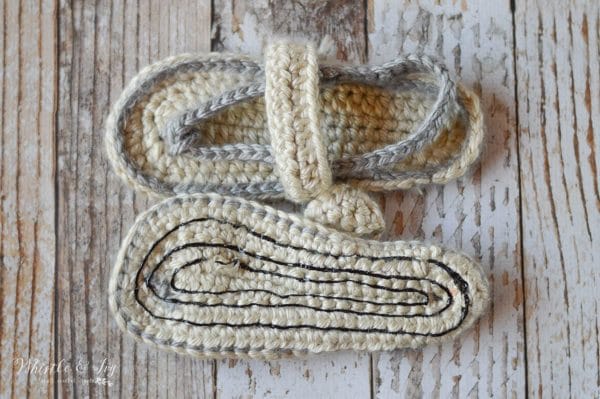
7. Non-Slip Method #7 – Suede
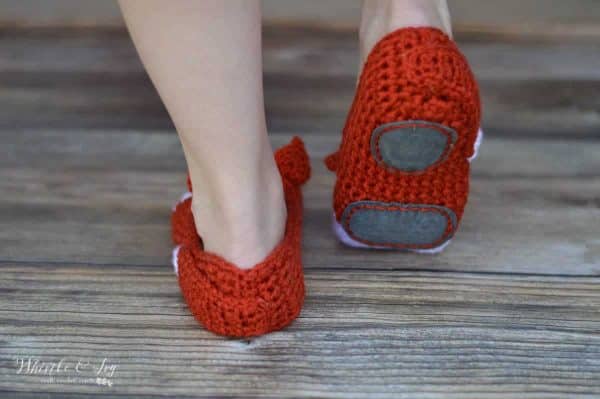
What you need:
–1 Suede Sheet
–Leather Hole Punch
–Darning Needle
I loved the idea of putting suede on the soles of slippers ever since I saw this slipper tutorial by Make and Do Crew. And similarly, I have been meaning to try these cute Fox Slippers by Mamachee for a long time. It was a match made in heaven.
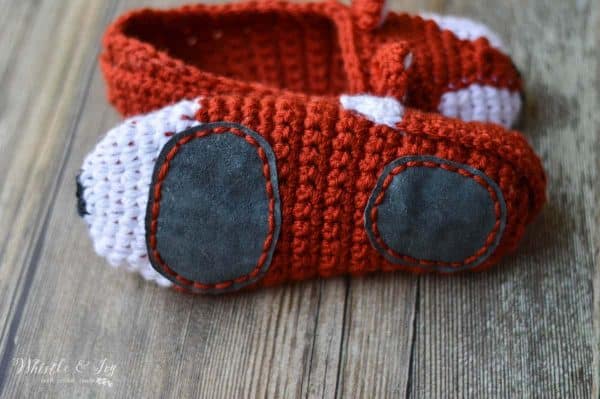
I think this leather method ended up being my most favorite method. It’s the perfect amount of grip, it provides a bit a cushioning on the bottom, and it’s the most durable of all the methods. PLUS, the smell of leather reminds me of my dad (that might be a bonus for just for me, though).
I made up this simply template for you to try. Since leather can be a bit pricy, using two separate pieces lets the leather go farther and you can use one sheet for a few pairs of slippers.
Download the template here.
Then, punch holes around the outsides of the pieces. Pin in place and sew with yarn and a darning needle.
CONCLUSION:( MY FAVORITE NON-SLIP METHOD)
I can honestly say that all these methods work. My least favorites would have to be the silicone. It was quite messy, and it’s grip power was too intense. That beings said, it could definitely be used if it’s all you have on hand. I think a fix could be to use small dots instead of coating the entire bottom as I did.
Puffy Paint and hot glue were the easiest to apply, but I worry about their longevity. I can’t say from experience, but I have heard in groups that both Puffy Paid and Hot Glue need to be reapplied consistently, so keep that in mind!
Suede, Plasti-Dip and Felt were my top three.
xoxo,


Having trouble with the silicone not completely drying.it is sticking to other slippers.
It is tacky to the touch? How long have you let it dry?
I loved this post! The non-slip methods you shared are so practical and useful. I can’t wait to try the puff paint technique on my next pair of slippers. Thanks for the detailed explanations!
You are very welcome!
Thank you so much for all of this experimentation on non-slippy yarn shoes. I was going to try last-dip but I changed my mind after reading your article. I’m all into up-cycling so the suede idea is my ticket to try first. One can find suede pleather and other purse at thrift stores. I probably have one in a closet somewhere. Thanks for you help on my project. Joanne – Georgia Rustic Wool. 🧶🐑
You are so welcome, I would love to hear how it goes for you!
I love these crochet slippers! They are so comfortable and non-slip. I’m going to have to try one of the methods listed to make them non-slip.
I wonder if the silicone applied in dots would be less grippy than coating the whole sole.
Yes I think so! I would definitely do dots instead, it was SUPER grippy.
what brand of puff paint do you use? Thanks
I believe I used Tulip brand
Thank you for testing all these methods! I’ve been curious about PlastiDip and silicone caulking. My tried and true method is puff paint. I’ve used it on all my kids’ slippers. Just little dots or hearts for extra grip. They do well in the washer and dryer and have never needed reapplying even after being worn for years!
Glad you found this helpful! I am glad the puff paint is working well for you!
What kind of paint did you use? I used Tulip on both pairs of felted slippers I made for my grandchildren, hearts on one, wavy lines on the other, and about half peeled off within the first 6 wears,
I made the mistake of using hot glue on some house slippers I made. They went through the washer fine, but the glue melted inside the dryer and stuck to the drum. Big mess!!! Even turning them inside out the next time was horrible. They stuck together. I don’t recommend doing this.
Oh wow! Thanks for your feedback, I appreciate it!
I use the pattern Fuzzy Feet, which has you felt the slipper once it has been knit. I will give the suede a try, it seems like the most complimentary option for a felted slipper.
Lovely! Suede is definitely my favorite. Very nice finished look.
Hello Bethany. First thank you for all of the great videos and patterns. Very helpful indeed. I purchased your Chunky Boat Slipper pattern a few weeks ago and came to a complete stop. I do not understand what you mean to turn so you are now facing the toe. This is around or at the point you finish the sole and start on the sides. Am I supposed to turn around the piece and crochet the way I just came? I would greatly appreciate your help here as I am making these for a sick friend. The pattern is adorable. I hope I can do it justice.
Thank you, Susan
Hello!
Do you mean the part where I say “Turn your piece around so you are working from the outside of the shoe (towards the toe).”? A common mistake is that people will join at the right spot, but then work towards the heel, putting the right side of the stitches on the inside of the shoe. You want to join and work down towards the toe, so you are going clockwise around the sole. The right sides of the stitches(the side that faces you) should be on the outside of the shoe.
That is what made sense to me. Thank you for taking the time to clarify.
Stay safe.
Thanks,
Susan
Thanks for a really thorough write up – very useful. :) I was originally going to go for puffy paint but after seeing silicone sealant as an option, knowing I already had some in the house, I went for the impatient option, haha. I’ve done blobs flattened down into little circles, which I think looks the closest to what they do on shop-bought slipper socks. They seem very firmly on and reasonably grippy but we’ll see in time. :)
Wonderful!! I like the dot idea, but as you read, a thick coat is almost TOO grippy. Let me know how it works out!
I too, have been searching for a coating for m y slippers as I make them for my elderly neighbors here in my apartment complex. Thank you for all the comments and answers. Your Blog is great.
Thank you! I hope you find a favorite method here :)