
This post contains affiliate links(click here for more info), which means I earn a small commission if you make a purchase. Thank you for supporting Whistle and Ivy!
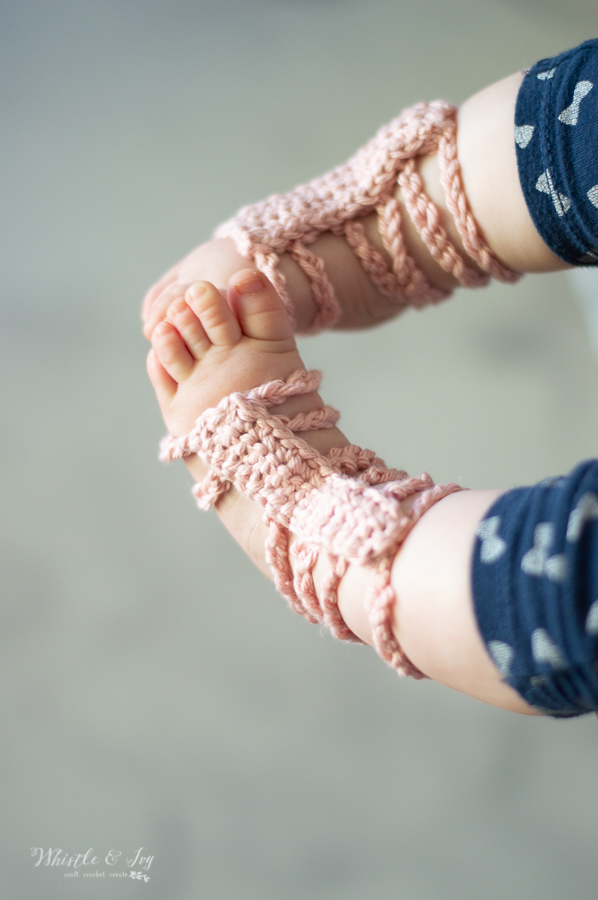
I am pretty excited to share this pattern with you guys, today. I have been working on tons of girl stuff lately (even though I only have my baby boy). There are tons of adorable baby girl bootie patterns, but not so many cute boy’s patterns. I knew I needed to help change that! So these monk strap booties are for moms (and grandmas, aunties, sisters, and friends) of baby boys!

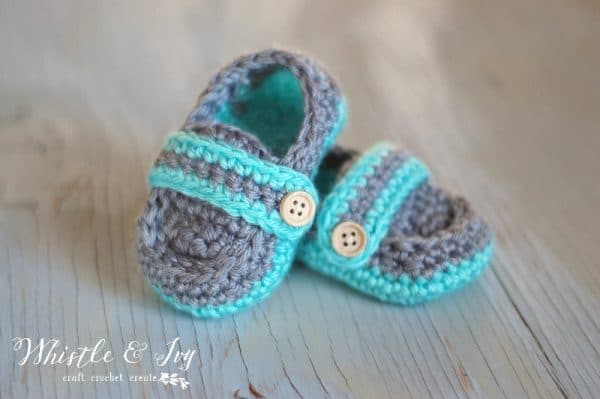
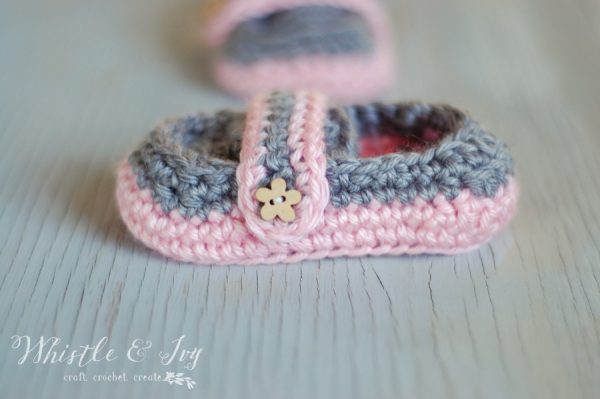
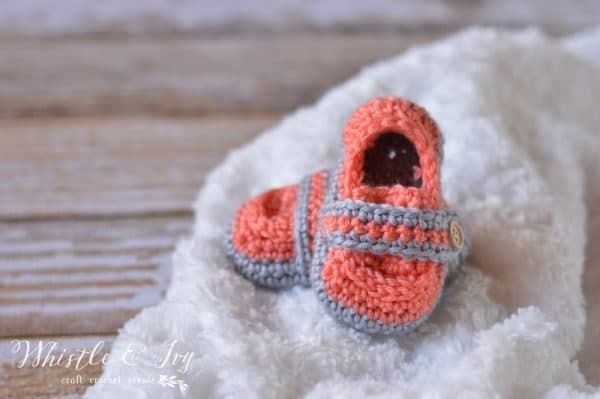
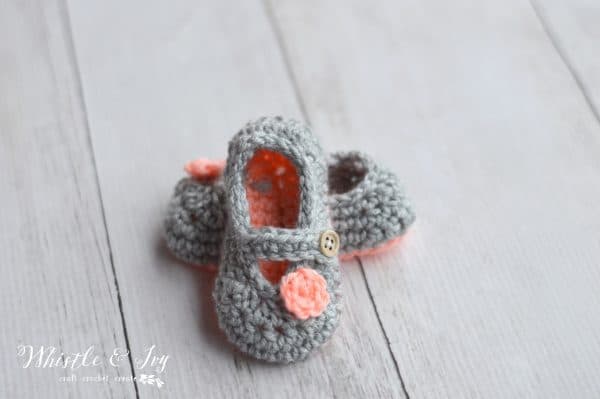
I definitely wrote this pattern for boys to begin with, but once I starting playing with color combinations, I soon realized they are pretty darn cute for girls as well. Change the colors and add a girly button, and they are sweet and feminine! These Monk Strap Booties are crocheted in the round, so they work up pretty quickly.

You’re tired of sifting through complicated tutorials and patterns that leave you feeling overwhelmed.
Let me help.
PICTURE THIS:
Instant access to a library of modern, easy-to-follow patterns
Gifting your handcrafted treasures to your loved ones.
Feeling accomplished by your beautiful makes
It’s time to make your crafting experience as joyful as it should be.
Monk Strap Baby Booties Crochet Pattern
Please remember: You are free to use this pattern to make and sell, but do not republish or distribute this pattern in any way. DO NOT use my photos in your listings. Please do share my blog links! It’s a quick and FREE way of supporting Whistle and Ivy and more free crochet patterns in the future.
What you need:
-Medium Weight Yarn in 2 colors (Knit Picks Mighty Stitch)
-Size F Hook (3.75 mm)
-Darning Needle
Abbreviations: (American Terms)
St – Stitch
Ch – Chain
Sc – Single crochet
Dc – Double Crochet
Hdc – Half Double Crochet
Sc decrease – Sc2tog
Hdc decrease – Hdc2og
Dc decrease – Dc2tog
Sl st – Slip Stitch
Gauge: 9 sts = 2” long
Get the video tutorial for 3-6 Months HERE.
3-6 months (Approx. 4”)
Start with 1st color (worked in the round)
Ch 11
1.Work 3 sc in 2nd ch from hook, sc in next 4 chs, hdc in next ch, dc in next 3 chs, 7 dc in last ch. Working across opposite side: dc in next 3 ch, hdc in next ch, sc in next 4 ch. (26 sts)
2. Beginning in the first sc: 2 sc in each of the next 3 st. Sc in next 9 sts. 2 sc in each of the next 5 sts. Sc in next 9 sts.(34 sts)
3.*Sc. Sc 2 in next st* work 3 times. Sc in next 9 sts. *Sc. Sc 2 in next st* work 5 times. Sc in next 9 sts. (42 sts)
4.Work this round through back loops only. Sc in each st. (42 sts.)
5. Hdc. Dc 8. Hdc. Sc 32. (42 sts) Move up your stitch marker. Sl st and Tie off.
6. Join your second color at your stitch marker. Ch 1. Sc in same st. Hdc. Dc2tog. Dc 4. Dc2tog. Hdc. Sc 9. Sc2tog twice. Sc 6. Sc2tog twice. Sc 8. (36 sts) Join with a sl st.
7. Ch 1.Sc in same st. Hdc2tog 4 times. Sc 9. Sc2tog. Sc 6. Sc2tog. Sc 8. (30 sts) Join with sl st.
8. Sl st in each st around. Tie off.
Toe Flap:
Ch 5.
1. Sc in 2nd ch from hook. Hdc 2. Sc 1. Turn. (4 sts)
2. Ch 1. Sc 2 in same st. hdc 2. Sc 2 in last st. Turn. (6 sts)
3. – 7. Ch 1. Sc in same st. hdc 4. Sc 1. Turn. (6 sts) Leave a long tail.
Strap: Start with 2nd color.
Ch 15
1. Sc in 4th ch from hook. Sc 11 across the ch. Tie off. (12 sts)
2. Turn the piece so that wrong side and is facing you, and join 1st color. where you left off. Ch 1. Sc in same st. Sc 11 across the strap. Work 3 sc in the loop at the end. Sc 12 across the other side. (27 sts) Tie off.
Toe Flap:
Ch 6.
1. Sc 2nd ch from hook. Hdc 3. Sc 1. Turn. (5 sts)
2. Ch 1. Sc 2 in same st. hdc 3. Sc 2 in last st. Turn. (7 sts)
3. – 7. Ch 1. Sc in same st. hdc 5. Sc 1. Turn. (7 sts) Leave a long tail.
2. Ch 1. Sc 2 in same st. hdc 3. Sc 2 in last st. Turn. (7 sts)
3. – 8. Ch 1. Sc in same st. hdc 5. Sc 1. Turn. (7 sts) Leave a long tail.
Strap: Start with 2nd color.
Ch 16
1. Sc in 4th ch from hook. Sc 12 across the ch. Tie off. (13 sts)
2. Turn the piece so that wrong side and is facing you, and join 1st color.
Ch 1. Sc in same st. Sc 12 across the strap. Work 3 sc in the loop at the end. Sc 13 across the other side. (29 sts) Tie off.
Construction:
To attach the flap, lay in on the shoe so it sits on top of the edge of the toe. Using a yarn needle and your long tail, attach it by sewing in and out of the slip stitches around the edge, and catching the corresponding piece of yarn on the toe flap.
To attach the strap, an easy method is to take the four tails at the end of the strap and using your hook, fish them through the bottom side of the shoe. Attach them at the 2nd row of your second color. Make sure your tails are fished through along the same row, so it sits even. Then, reach inside the shoe and tie the tails together with a knot.
Show off your projects and make some crochet friends in the Whistle and Ivy Facebook Group.
You might like these too:


Happy crocheting!


Wondering about a toddler pattern for this. I just made a 9-12m and tried it in my 11mo and it’s not gonna work. :-( I was planning on just adjusting the boat shoe pattern to eliminate the tabs, so even just suggestion for the starting chain length for the strap for a size 5 would be super helpful. Thanks!
I don’t have a toddler pattern for this shoe I am sorry! The easiest thing to do would probably be to use a larger hook and a slightly thicker yarn and work the 9-12 month pattern.
Hello, what a precious pattern! I made a couple pairs of the 0-3 month and I love them! I have a question though. I strughle on all of them when adding the second color. Especially around the heel area, the stitches curve in on the decease. I notice in the video that your shoe stays vertical instead of curving inwards. I’ve tried loosening my stitches, but then the stitches seem too loose and I still am curving inwards. Do you have any advice?
Thank you so much!! Maybe the video doesn’t show very well, but the heel is supposed to turn inward! The decreases keep the heel on the baby. I noticed this problem with my very first shoe design several years ago. I had the heel going perfectly vertical, and my niece kicked them off in 1 second flat. Even though they can still be kicked off, curving the heel helps keep the shoes on the baby a bit better. You are doing great!
That’s good to hear! Now I notice in your pictures that the orange and pink pairs are curved as well. Thank you!
You’re welcome!
I had the same issue. I went back and on 2nd round of the 2nd color, I reduced the 4 dc2tog to 2 dc, 2 dc2tog, 2 dc. And still, the heel curves in so much that I don’t think you would even be able to get shoe on a baby. Not wanting to take apart and redo a 3rd time.
You are welcome to reduce the heel curve, but these were tested on real babies! The cupped heel makes them stay on baby’s feet. I am afraid if you reduce it, the will come off extremely easily.
Bethany, thank you for such wonderful patterns! I do have a quick question. I have a client who wants a pair in only one color yarn. I would like to continue from round 5 to round 6 without tiring off and rejoining. Wondering if you had a suggestion. If I need to tie off and rejoin I will. Thanks for your help!
Well it gets a bit tricky because when you join the new color, you change from continuous rows to joined row. The easiest way might be to work the sole in joined rows, so instead of continuing around, you should join with a sl st (with the beginning stitch) and ch 1 at the beginning of the sole rounds. Does that make sense?
Makes perfect sense, thank you!
Great! You are welcome!
Hi I love these but have a quick question
At the toe flap step 3 what does the -7 mean? Thanks
It means you repeat the same instructions for rows 3 through 7
Question! I am at the point to do the toe FLP, is it attached to the shoe or is it added after?
It’s a separate piece sewn on after.
These are so adorable! Thank you for sharing at #HomeMattersParty
Thanks so much Michelle!! <3
What does this mean? I can’t figure out the asterisks.
3.*Sc. Sc 2 in next st* work 3 times. Sc in next 7 sts. *Sc. Sc 2 in next st* work 5 times. Sc in next 7 sts. (38 sts)
The asterisk is separating the instructions that need to be repeated. So you will repeat the entire instructions between then 3 times for the toe and 5 times for the heel.
Oh these are to cute! I love making booties of all kinds! I am gonna start on a pair right now,thanks so much for sharing! I would love it if you would share your posts at my Monday of Many Blessings Link Up!! http://ourhomeofmanyblessings.com/
Thank you very much!! So glad you like them. Thanks for hosting!