
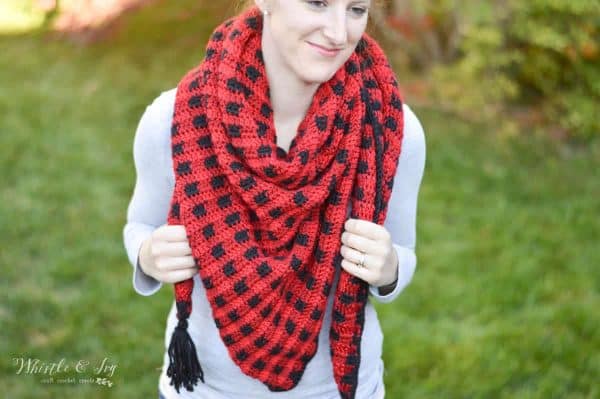
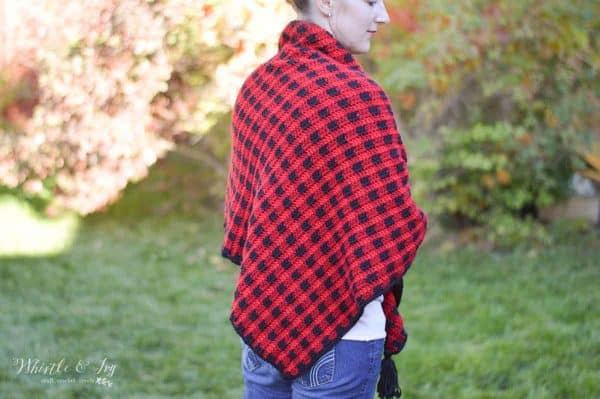
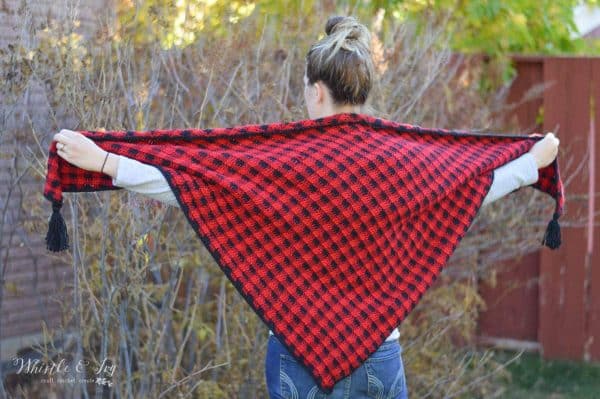
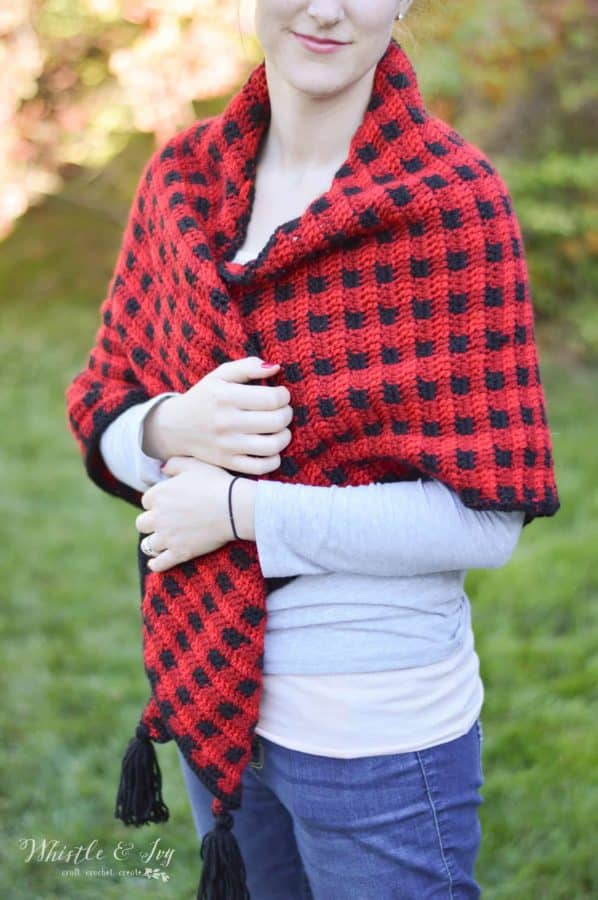
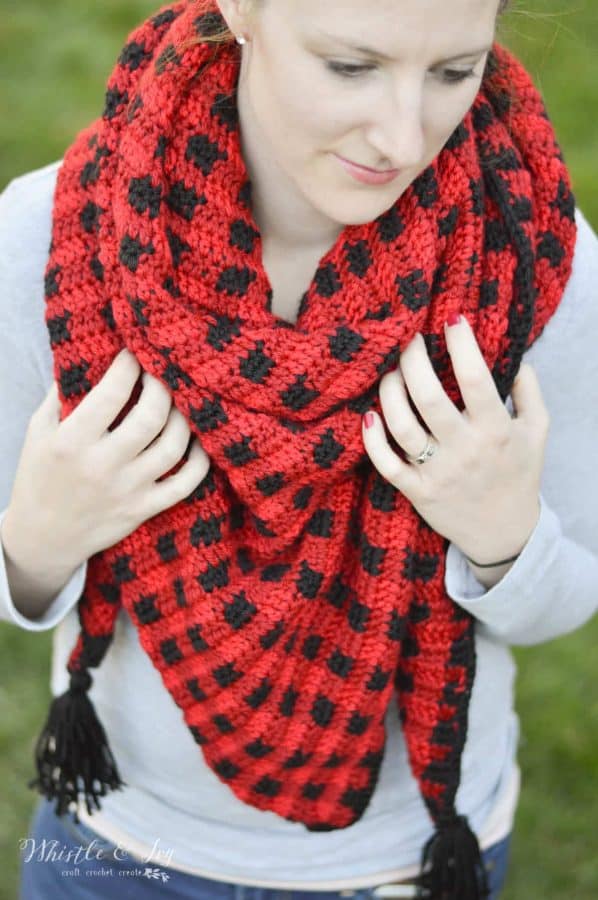
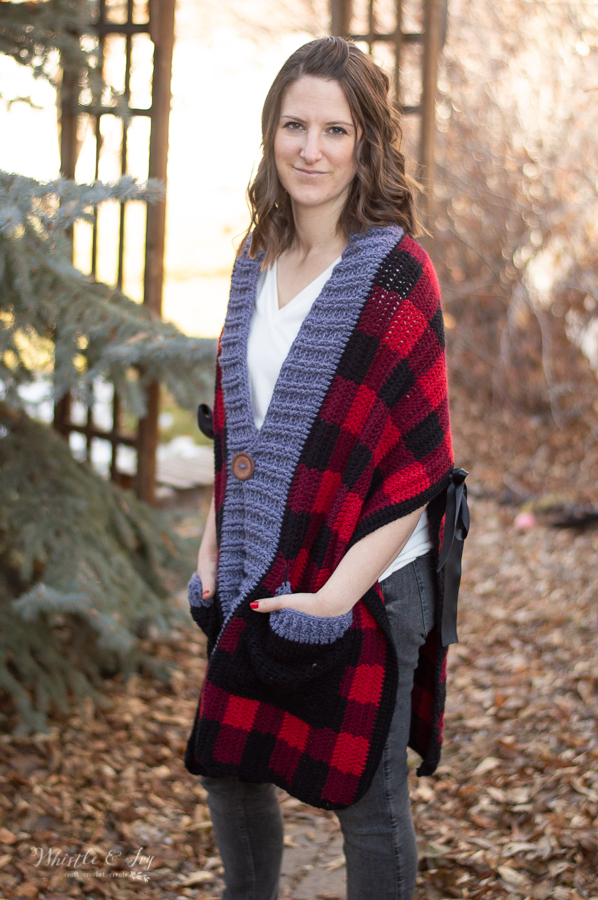
This crochet plaid triangle scarf doubles as a shawl! It’s a lovely and cozy addition to your fall wardrobe or would make a perfect gift for your bestie. Enjoy workin this free crochet pattern! The post includes affiliate links, which means a get a small commission if you make a purchase (at no extra cost to you). Thanks for your support!
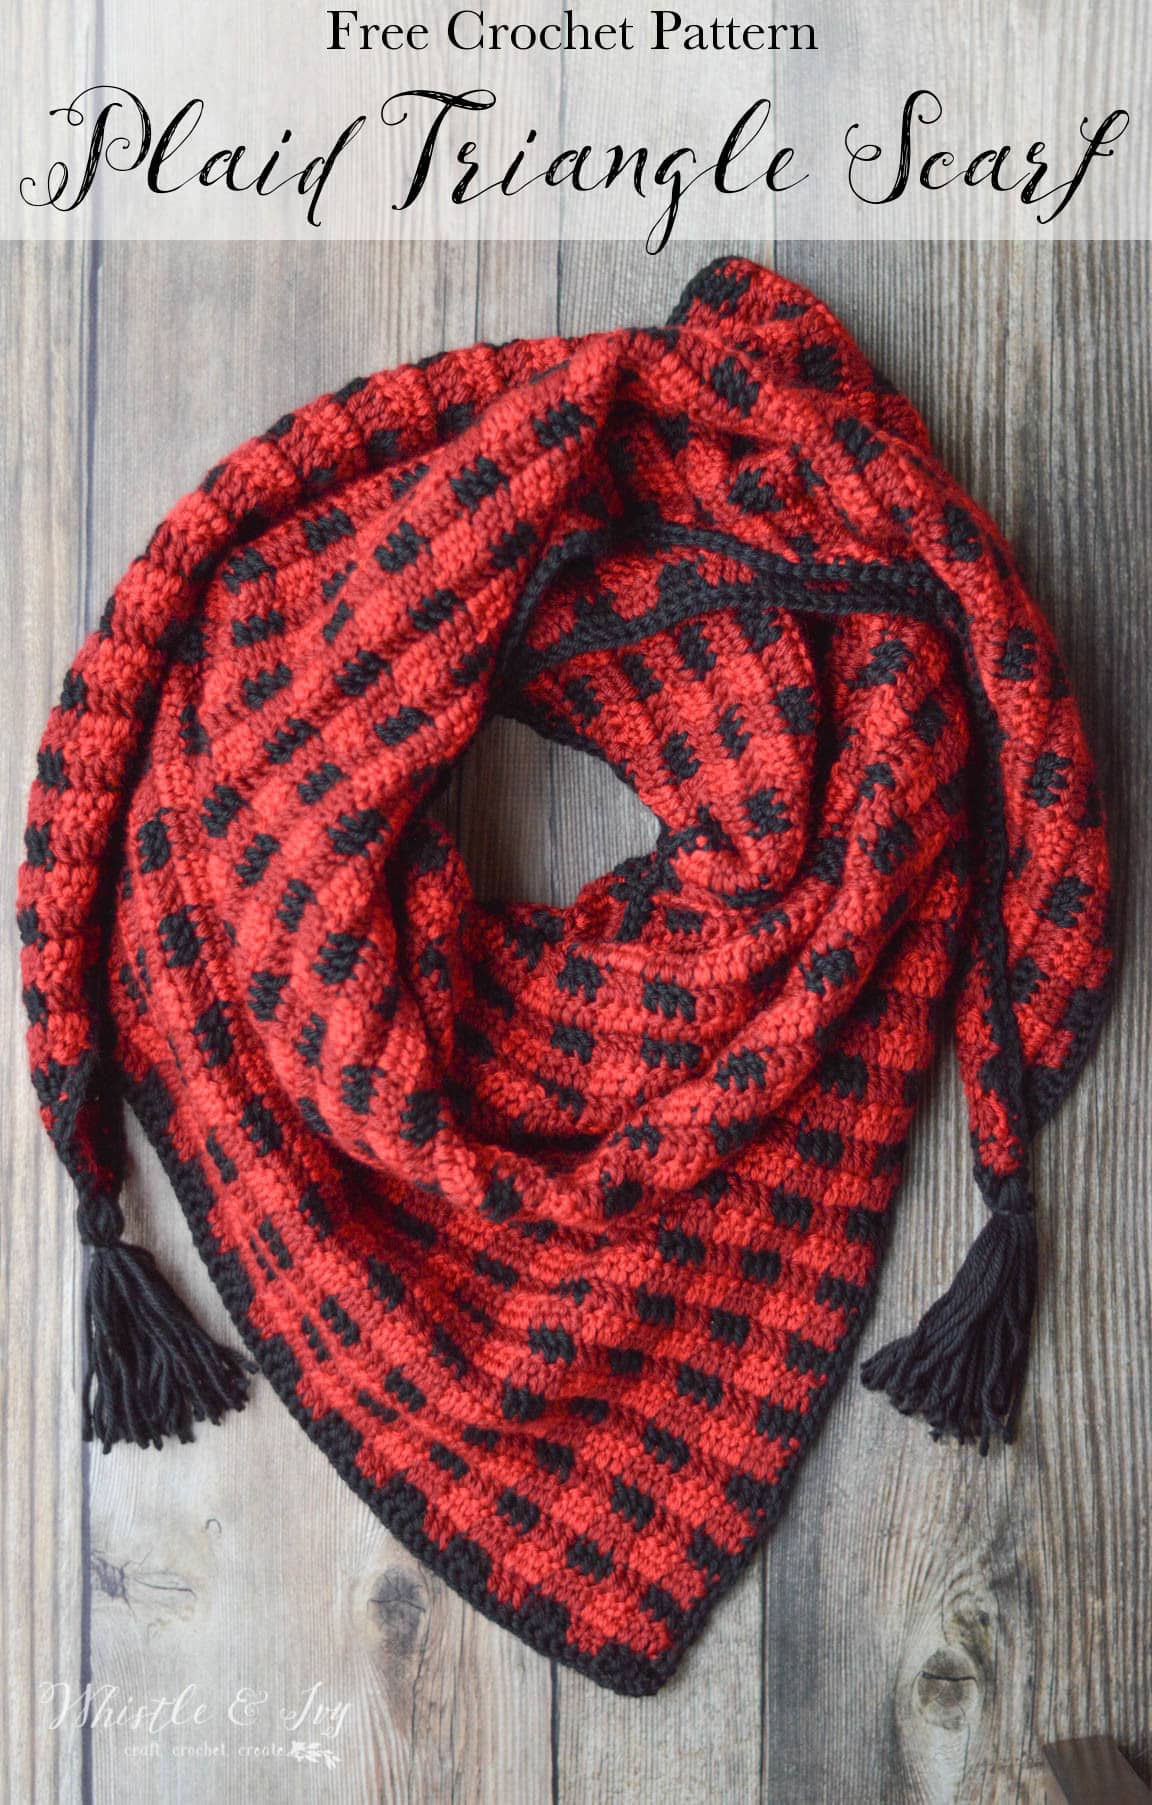
Wow this week is going by fast! We are already at Day 4 of Plaid Week, over halfway. I hope you have enjoyed the designs so far. This Crochet Plaid Triangle Scarf took some time, due to all the frogging (my bad). BUT it was worth the effort because I LOOOVE this scarf. The Red Heart Soft gives it a soft, silky texture, so it hangs beautifully, and it’s so cozy when worn. Plus, it doubles as a shawl.
-Nice, right?

You’re tired of sifting through complicated tutorials and patterns that leave you feeling overwhelmed.
Let me help.
PICTURE THIS:
Instant access to a library of modern, easy-to-follow patterns
Gifting your handcrafted treasures to your loved ones.
Feeling accomplished by your beautiful makes
It’s time to make your crafting experience as joyful as it should be.
CROCHET PLAID TRIANGLE SCARF
Please remember: You are free to use this crochet plaid triangle scarf pattern to make and sell, but do not republish or distribute this pattern in any way. DO NOT use my photos in your listings. Please do share my blog links! It’s a quick and FREE way of supporting Whistle and Ivy and more free crochet patterns in the future.
PLEASE read my Disclaimer before working my free patterns!
What you need: (affiliate links)
– J Hook
–Red Heart Soft in Black, Wine and Really Red – 2 balls of each
–Darning needle
Abbreviations: US Terms
Ch – chain
Sc – single crochet
Hdc – half double crochet
Dc – Double Crochet
Dc2tog – Dc decrease
Sc2tog – Sc decrease
Sl st – Slip Stitch
St – stitch
Gauge: 17 dc sts = 5″
Finished size: Approx. 72″ from corner to corner (hypotenuse), short ends are approx. 54″
Note: This pattern is worked in rows with decreases along one side. Because of the color changes every 3 sts (Plaid Stitch), this gets a bit tricky when working the decrease side. You can either use the same color for the entire stitch, or you can switch midway to keep the color changes consistent. Keep in mind, you will be working a row of sc up the diagonal decrease edge, so it will mostly be hidden either way.
The color changes will not be indicated in the pattern, you will change colors to keep the plaid pattern uniform.
There are a lot of rows and a lot of text in this pattern, but if you just work a dc3tog up one side and check the row for the stitch count, you should be able to work the pattern easily.
This video might help for the decreases:
Ch 2 does not count as first st through the pattern.
1. Sc foundation 168. (approx 40″ long) Turn.
2. Ch 2. Begin working the Plaid St across, alternating between black and mid. Leave last 3 sts unworked. Work a dc3tog over last 3 sts. Turn. (166 sts)
3. With Red, Ch 2. Begin the first dc of a dc3tog. Using Wine, finish the last 2 stitches of the dc3tog (this keeps the color changes cohesive). Dc in next st with Wine. Work the plaid St across the remaining sts. (164 sts)
4. Ch 2. Work plaid st all the way across, leaving last 3 sts unworked. Work dc3tog over last three stitches, changing color as needed. Turn. (162 sts)
5. Ch 2. Dc3tog across the first 3 sts. Work the Plaid St in each st across. Turn. (160 sts)
6. Ch 2. Work The Plaid St all the way across, leaving last 3 sts unworked. Work dc3tog over last three stitches, changing color as needed. Turn. (158 sts)
7. Ch 2. Work dc3tog, changing color as needed. Work Plaid St across remaining stitches. Turn. (156 sts)
8. Ch 2. Work the Plaid Stitch all the way across, leaving last 3 sts unworked. Work dc3tog over last three stitches, changing color as needed. Turn. (154 sts)
9. Ch 2. Work dc3tog, changing color as needed. Work Plaid St all the way across in each remains st. Turn. (152 sts)
10. Ch 2. Work the Plaid Stitch all the way across, leaving last 3 sts unworked. Work dc3tog over last three stitches, changing color as needed. Turn. (150)
11. Ch 2. Work dc3tog, changing color as needed. Work Plaid st all the way across. Turn. (148 sts)
12. Ch 2. Work Plaid St all the way across, leaving last 3 sts unworked. Work dc3tog over last three stitches, changing color as needed. Turn. (146 sts)
13. Ch 2. Work dc3tog, changing color as needed. Work Plaid St across each remaining stitches. (144 sts)
14. Ch 2. Work Plaid St all the way across, leaving last 3 sts unworked. Work dc3tog over last three stitches, changing color as needed. Turn. (142 sts)
15. Ch 2. Work dc3tog, changing color as needed. Work Plaid Stitch all the way across. Turn. (140 sts)
16. Ch 2. Work Plaid st all the way across, leaving last 3 sts unworked. Work dc3tog over last three stitches, changing color as needed. Turn. (138 sts)
17. Ch 2. Work dc3tog, changing color as needed. Work Plaid Stitch all the way across. Turn. (136 sts)
18. Ch 2. Work Plaid St all the way across, leaving last 3 sts unworked.Work dc3tog over last three stitches, changing color as needed. Turn. (134 sts)
19. Ch 2. Work dc3tog, changing color as needed. Work Plaid St all the way across. Turn. (132 sts).
20. Ch 2. Work Plaid st all the way across, leaving last 3 sts unworked. Work dc3tog over last three stitches, changing color as needed. Turn. (130 sts)
21. Ch 2. Work dc3tog, changing color as needed. Work Plaid St across. Turn. (128 sts).
22. Ch 2. Work Plaid St all the way across, leaving last 3 sts unworked. Work dc3tog over last three stitches, changing color as needed. Turn. (126 sts)
23. Ch 2. Work dc3tog, changing color as needed. Work Plaid St all the way across. Turn. (124 sts)
24. Ch 2. Work Plaid St all the way across, leaving last 3 sts unworked. Work dc3tog over last three stitches, changing color as needed. Turn. (122 sts)
25. Ch 2. Work dc3tog, changing color as needed. Work Plaid St all the way across. Turn. (120 sts)
26. Ch 2. Work Plaid st all the way across, leaving last 3 sts unworked. Work dc3tog over last three stitches, changing color as needed. Turn. (118 sts)
27. Ch 2. Work dc3tog, changing color as needed. Work Plaid St all the way across. Turn. (116 sts)
28. Ch 2. Work Plaid St all the way across, leaving last 3 sts unworked. Work dc3tog over last three stitches, changing color as needed. Turn. (114sts)
29. Ch 2. Work dc3tog, changing color as needed. Work Plaid St all the way across. (112 sts).
30. Ch 2. Work plaid st all the way across, leaving last 3 sts unworked. Work dc3tog over last three stitches, changing color as needed. Turn. (110 sts)
31. Ch 2. Work dc3tog, changing color as needed. Work Plaid St all the way across. Turn. (108 sts
32. Ch 2. Work plaid st all the way across, leaving last 3 sts unworked. Work dc3tog over last three stitches, changing color as needed. Turn. (106 sts)
33. Ch 2. Work dc3tog, changing color as needed. Work Plaid St all the way cross. Turn. (104 sts)
34. Ch 2. Work Plaid St all the way across, leaving last 3 sts unworked. Work dc3tog over last three stitches, changing color as needed. Turn. (102 sts)
35. Ch 2. Work dc3tog, changing color as needed. Work Plaid St all the way across. Turn. (100 sts).
36. Work Plaid Stitch all the way across, leaving last 3 sts unworked. Work dc3tog over last three stitches, changing color as needed. Turn. (98 sts)
37. Ch 2. Work dc3tog, changing color as needed. Work Plaid St all the way across. Turn. (96 sts)
38. Ch 2. Work Plaid St all the way across, leaving last 3 sts unworked. Work dc3tog over last three stitches, changing color as needed. Turn. (94 sts)
39. Ch 2. Work dc3tog, changing color as needed. Work Plaid St all the way across. Turn. (92 sts)
40. Ch 2. Work Plaid St all the way across, leaving last 3 sts unworked. Work dc3tog over last three stitches, changing color as needed. Turn. (90 sts)
41. Ch 2. Work dc3tog, changing color as needed. Work Plaid St all the way across. Turn. (88 sts)
42. Ch 2. Work Plaid St all the way across, leaving last 3 sts unworked. Work dc3tog over last three stitches, changing color as needed. Turn. (86 sts)
43. Ch 2. Work dc3tog, changing color as needed. Work Plaid St all the way across. Turn.(84 sts)
44. Ch 2. Work Plaid St all the way across, leaving last 3 sts unworked. Work dc3tog over last three stitches, changing color as needed. Turn. (82 sts)
45. Ch 2. Work dc3tog, changing color as needed. Work Plaid St all the way across. Turn. (80 sts)
46. Ch 2. Work Plaid St all the way across, leaving last 3 sts unworked. Work dc3tog over last three stitches, changing color as needed. Turn. (78 sts)
47. Ch 2. Work dc3tog, changing color as needed. Work Plaid St all the way across. Turn. (76 sts)
48. Ch 2. Work Plaid St all the way across, leaving last 3 sts unworked. Work dc3tog over last three stitches, changing color as needed. Turn. (74 sts)
49. Ch 2. Work dc3tog, changing color as needed. Work Plaid St all the way across. Turn. (72 sts)
50. Ch 2. Work Plaid St all the way across, leaving last 3 sts unworked. Work dc3tog over last three stitches, changing color as needed. Turn. (70 sts)
51. Ch 2. Work dc3tog, changing color as needed. Work Plaid St all the way across. Turn. (68 sts)
52. Ch 2. Work Plaid St all the way across, leaving last 3 sts unworked. Work dc3tog over last three stitches, changing color as needed. Turn. (66 sts)
53. Ch 2. Work dc3tog, changing color as needed. Work Plaid St all the way across. Turn. (64 sts
54. Ch 2. Work Plaid St all the way across, leaving last 3 sts unworked. Work dc3tog over last three stitches, changing color as needed. Turn. (62 sts)
55. Ch 2. Work dc3tog, changing color as needed. Work Plaid St all the way across. Turn. (60 sts)
56. Ch 2. Work Plaid St all the way across, leaving last 3 sts unworked. Work dc3tog over last three stitches, changing color as needed. Turn. (58 sts)
57. Ch 2. Work dc3tog, changing color as needed. Work Plaid St all the way across. Turn. (56 sts)
58. Ch 2. Work Plaid St all the way across, leaving last 3 sts unworked. Work dc3tog over last three stitches, changing color as needed. Turn. (54 sts)
59. Ch 2. Work dc3tog, changing color as needed. Work Plaid St all the way across. Turn. (52 sts)
60. Ch 2. Work Plaid St all the way across, leaving last 3 sts unworked. Work dc3tog over last three stitches, changing color as needed. Turn. (50 sts)
61. Ch 2. Work dc3tog, changing color as needed. Work Plaid St all the way across. Turn. (48 sts)
62. Ch 2. Work Plaid St all the way across, leaving last 3 sts unworked. Work dc3tog over last three stitches, changing color as needed. Turn. (46 sts)
63. Ch 2. Work dc3tog, changing color as needed. Work Plaid St all the way across. Turn. (44 sts)
64. Ch 2. Work Plaid St all the way across, leaving last 3 sts unworked. Work dc3tog over last three stitches, changing color as needed. Turn. (42 sts)
65. Ch 2. Work dc3tog, changing color as needed. Work Plaid St all the way across. Turn. (40 sts)
66. Ch 2. Work Plaid St all the way across, leaving last 3 sts unworked. Work dc3tog over last three stitches, changing color as needed. Turn. (38 sts)
67. Ch 2. Work dc3tog, changing color as needed. Work Plaid St all the way across. Turn. (36 sts)
68. Ch 2. Work Plaid St all the way across, leaving last 3 sts unworked. Work dc3tog over last three stitches, changing color as needed. Turn. (34 sts)
69. Ch 2. Work dc3tog, changing color as needed. Work Plaid St all the way across. Turn. (32 sts)
70. Ch 2. Work Plaid St all the way across, leaving last 3 sts unworked. Work dc3tog over last three stitches, changing color as needed. Turn. (30 sts)
71. Ch 2. Work dc3tog, changing color as needed. Work Plaid St all the way across. Turn. (28 sts)
72. Ch 2. Work Plaid St all the way across, leaving last 3 sts unworked. Work dc3tog over last three stitches, changing color as needed. Turn. (26 sts)
73. Ch 2. Work dc3tog, changing color as needed. Work Plaid St all the way across. Turn. (24 sts)
74. Ch 2. Work Plaid St all the way across, leaving last 3 sts unworked. Work dc3tog over last three stitches, changing color as needed. Turn. (22 sts)
75. Ch 2. Work dc3tog, changing color as needed. Work Plaid St all the way across. Turn. (20 sts)
76. Ch 2. Work Plaid St all the way across, leaving last 3 sts unworked. Work dc3tog over last three stitches, changing color as needed. Turn. (18 sts)
77. Ch 2. Work dc3tog, changing color as needed. Work Plaid St all the way across. Turn. (16 sts)
78. Ch 2. Work Plaid St all the way across, leaving last 3 sts unworked. Work dc3tog over last three stitches, changing color as needed. Turn. (14 sts)
79. Ch 2. Work dc3tog, changing color as needed. Work Plaid St all the way across. Turn. (12 sts)
80. Ch 2. Work Plaid St all the way across, leaving last 3 sts unworked. Work dc3tog over last three stitches, changing color as needed. Turn. (10 sts)
81. Ch 2. Work dc3tog, changing color as needed. Work Plaid St all the way across. Turn. (8 sts)
82. Ch 2. Work Plaid St all the way across, leaving last 3 sts unworked. Work dc3tog over last three stitches, changing color as needed. Turn. (6 sts)
83. Ch 2. Work dc3tog, changing color as needed. Dc in last 3 dc. Turn. (4 sts)
84. Ch 2. Dc in same st. Work dc3tog over last three stitches, changing color as needed. Turn.(2 sts)
85.Ch 2. Dc2tog. (1 st)
Break all yarn.
Border:
Starting on the straight edge at the bottom, sc up the side and down the diagonal side, working stitches as evenly and neatly as possibly. When you get to the bottom (the black foundation) join and tie off.
Weave in ends, add tassels to the side corners.
This project is a bit more time-consuming that the others, but I promise your effort will be well-worth it. This scarf is cozy and fun to wear and I am glad I persevered during the design process (there were a few tears of frustration shed over this Crochet Plaid Scarf ). This is my new favorite scarf this season. I hope it’s yours too!
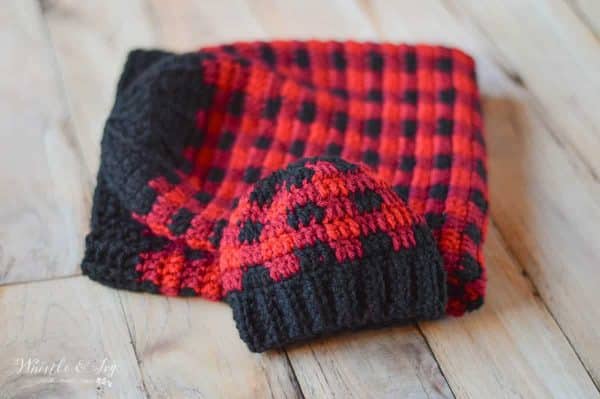
Get all the Plaid Week 2017 patterns:
Join our Facebook Community! We need YOU!


Hello
Very interesting, but it says to do the plaid st , but i don’t understand that one ..
sorry about that! You can learn how here:
https://www.whistleandivy.com/how-to-crochet-buffalo-plaid-the-plaid-stitch/
Hello!
I have a question
Decreases are in both sides?
Hello! No, just up one side. It’s a right triangle, the decreases make the hypotenuse.
I love this scarf and really want to make it! I am having trouble with the decreases. I also don”t know how to turn and add in the the third color to start the third row. Do you have any suggestions or videos that could help with beginning this scarf?
Thank you! I have this scarf on my list to do a full video tutorial! But I will try to explain and help. You would add the color the same way you would do any color, by pulling the color through with a ch 1. Are you familiar with any decrease, or is it the color changing decrease that is confusing you? I have a video for the color-changing decrease here in my Plaid Tree Skirt post:
https://www.whistleandivy.com/2017/10/crochet-plaid-tree-skirt.html
Hi Bethany! Thanks for this really special and creative pattern, I’m planning to get some yarn for it ASAP, just one quick question: if I want to make this a four color plaid, would I still need two balls of each color?
Thanks again and have a great day!
Oh boy, I am not sure. I would think that you would cut the mid yarn amount in half, since you will be splitting it into two colors.
Thanks!
Hi Bethany, I am a beginner with crochet and loved this scarf so much I decided to try it. Will there be decreases on both sides of the triangle? Reading the info above about decreasing, it seems to say decreases are all on one side. When I get to row 6 it seems the decrease will be on the opposite side of the triangle from lines 2,3,4 and 5? I was on row 20 and thought I messed up with the decreases, so I pulled it all out and have started again. Help!
Hi Shona!
The increases are all one one side. Because you are turning, the rows will alternate beginning and ending with the decreases.
Sorry, I meant decreases.
I used Hobby lobby “I Love This Yarn” ( I believe it is medium weight ) and it seems very heavy and bulky. What weight yarn should I have used?
Medium weight is what I used (Red Heart soft). Be sure to work a gauge swatch so you can get close to the gauge.
I am currently working on this scarf and am really loving it. I am on row 29, and have already went through 2 balls of my mid colour. My gauge is right. Do I just get another ball of yarn or have I done something wrong?
Whoa! Did you use Red Heart Soft?
How do you make the tassels?
LOVE LOVE LOVE this pattern! So happy with how it turned out! For me personally, I had to use a HDC instead of a SC for the black border to more closely resemble the base row.
Thanks so much for sharing!!
Great idea! So glad you love it!
thanks for sharing this pattern! love all of your plaid ideas especially the cowl! black and white combo is another idea. thanks again!
Thank you!
Hello! Just looking to start this project and was wondering if you got a tutorial video up? This pattern scares me! Thank you!!
I don’t have a video sorry! Did you watch my video on how to work plaid?
Yes, I did. It really helped. I just started the scarf, wish me luck!
I’m in love with this pattern! Thank you for sharing!
I’m in the middle of the project and I’m noticing that my scarf is tiny? Like not would wrap around a neck and hang down both sides? I think I’m loosing my marbles! I’m using the same weight yarn, the same hook…could tension make that much a difference perhaps? Anyone else have sizing issues?
Thank you! The chain edge is the bottom of the scarf, the “hypotenuse” of the triangle (the diagonal edge) is the part that will wrap around your neck, and it will be longer than the chain. What is the length of the bottom, foundation chain on your project?
ooo! I was using the chain edge (168 st) as where it would wrap around the neck! This explains it! THANK YOU! And I learned a new word! (I had to google what a hypotenuse was LOL) I’m loving all your plaid! And it was very easy for me to pick up and learn! I think I’m going to make the plaid animal hats next! SO CUTE!
You’re welcome!! Thanks so much <3
Rows 11 and 12 have the same stitch count. I about freaked by row 14 when I counted again. It should be 142 on row 14 right? Hopefully? Thank you!
Yes you are right! Thanks for letting me know.
Thanks for the pattern! I’m in love with it and can’t wait to give it a go. Can you tell me size the shawl ends up being? Length, width? Also, if we need it larger, what multiples of chain should we add to the beginning chain? Thanks for your help in advance!
Your biggest fan, Mary
I am so sorry for the delay on this, yikes! Your comment got buried somehow. The hypotenuse of the triangle scarf is approx 72″, and the shorter edges are approx. 54″. You won’t really need to do multiples, since the scarf increases at a different count than the plaid stitch (multiples of 6). For instance, you aren’t increasing by 3 or six each row, so you will be working half or 1/3 of a plaid block on some of the rows, so the beginning count won’t matter if you start with a different number.