
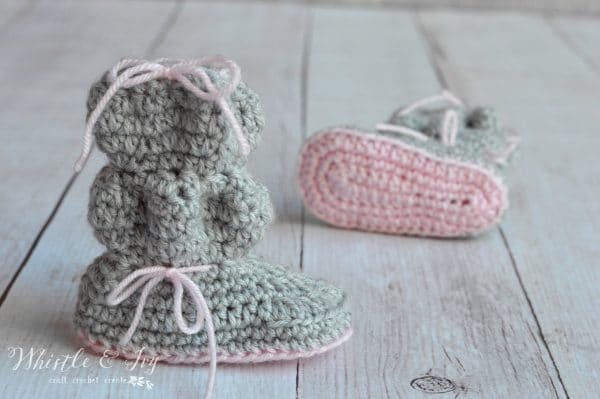
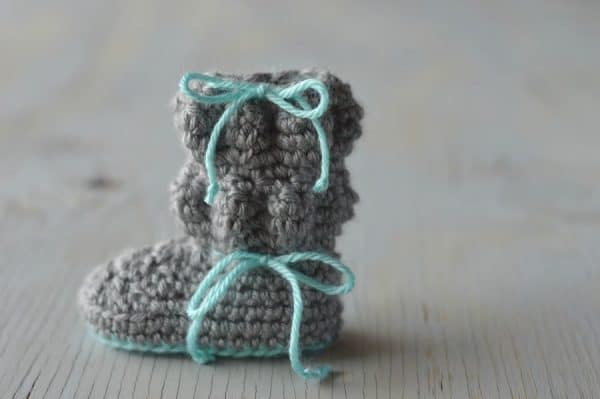
These darling little bubble baby booties have a cute slouchy design, a very stylish and warm accessory for baby! Perfect for your winter baby or for your next baby shower invite. This post contains affiliate links, which means I get a small commission if you make a purchase at no extra cost to you. Thank you for your support!
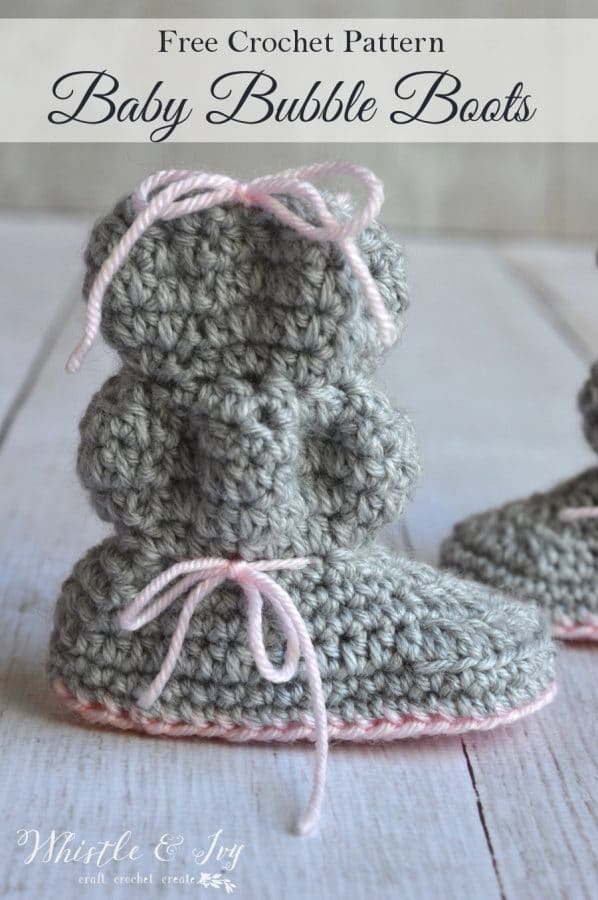
Happy New Year! I hope you all had a safe and fun celebration! We have been trying to stay warm in our “new” vintage home. It’s a bit drafty and while we work on getting it sealed up, we are having to bundle up a bit more than usual. Of course, the first step to feeling warm is having warm feet! We all bought new slippers and Sis needed some as well (those darn baby socks refuse to stay on her feet). Time for a new crochet pattern ;) I was so pleased with how these baby bubble booties turned out! They are super cute on baby feet, and the ties make sure they stay put.
I also made a pair with a chain instead of a single length of yarn for the ties. They both work great! Just choose the look you like best. Make sure to tie a small knot at the end of your tails so it doesn’t fray and get matted.
I can’t believe Sis has already outgrown her Simple Newborn Baby Booties (sniffle)! It’s The Boy all over again; time sure does fly when you are having fun!

You’re tired of sifting through complicated tutorials and patterns that leave you feeling overwhelmed.
Let me help.
PICTURE THIS:
Instant access to a library of modern, easy-to-follow patterns
Gifting your handcrafted treasures to your loved ones.
Feeling accomplished by your beautiful makes
It’s time to make your crafting experience as joyful as it should be.
BABY BUBBLE BOOTIES – FREE CROCHET PATTERN
Please remember: You are free to use this pattern to make and sell, but do not republish or distribute this pattern in any way. DO NOT use my photos in your listings. Please do share my blog links! It’s a quick and FREE way of supporting Whistle and Ivy and more free crochet patterns in the future.
What you need:
- Size F Hook
- Medium Weight Yarn (Knit Picks Brava – Dove Heather, Blush)
- Yarn Needle
Abbreviations (American Terms)
Ch – Chain
Sc – Single crochet
Dc – Double Crochet
Hdc – Half Double Crochet
Sc2tog – Single Crochet Decrease
Hdc2og – Hdc decrease
Dc2tog – Dc Decrease
Sl st – Slip Stitch
St – Stitch

LOVE THIS FREE PATTERN BUT WANT MORE SIZES?
The PDF download includes sizing from newborn to 12 months! Where would you like to shop today?
Get a full Video Tutorial HERE
3-6 months (Approx. 4”)
Start with 1st color for the sole. (worked in the round)
Ch 11.
1.Work 3 sc in 2nd ch from hook, sc in next 4 chs, hdc in next ch, dc in next 3 chs, 7 dc in last ch. Working across opposite side: dc in next 3 chs, hdc in next ch, sc in next 4 chs . (26 sts) Place marker and move up with each round.
2. Work 2 sc in next 3 sts. Sc in next 9 sts. Work 2 sc in next 5 sts. Sc in next 9 sts. ( 34 sts)
3. *Sc in next st. Work 2 sc in next st* work 3 times. Sc in next 9 sts. *Sc in next st. Work 2 sc in next st* work 5 times. Sc in next 9 sts. (42 sts)Sl st and tie off.
4. Work this round through Back Loops Only: Join 2nd color in the middle of the heel, 4th st from the join. Ch 1. Sc in same st. Sc in next 41 sts. (42 sts) Join with sl st. From here, you will work in joined rounds.
5. Ch 1. Sc in same st. Sc in next 41 sts. (42 sts) Join with sl st.
6. Ch 1. Sc in same st. Sc in next 12 sts. Hdc in next st. Dc2tog BLO 7 times. Hdc in next st. Sc in next 13 sts. (35 sts) Join with sl st.
7. Ch 1. Sc in same st. Sc in next 12 sts. Hdc in next st. Dc2tog 4 times. Hdc in next st. Sc in next 12 sts. (31 sts) Join with sl st.
8. Ch 1. Sc in same st. Sc2tog. Sc in next 10 sts. Hdc in next st. Hc2tog 3 times. Hdc in next st. Sc in next 8 sts. Sc2tog. (26 sts). Join with a sl st.
9. Ch 1. Sc in same st. Sc2tog 5 times. Hdc2tog 3 times. Sc2tog 4 times. Sc in last st. (14 sts) Join with sl st.
10. Ch 1.Sc in same st, work 2 sc in each stitch around. (27 sts) Join with sl st.
11. Ch 1. Sc in same st. Work 2 sc in the next st. *Sc in next st, work 2 sc in next st* work 12 times. Sc in last st. (40 sts)Join with sl st.
12. Ch 1. Sc in same st. Sc in next st. Work 2 sc in the next st. *Sc in next 2 sts, work 2 sc in the next st* work 12 times. Sc in last st. (53 sts) Join with sl st.
13. Ch 1. Sc in same st. Sc2tog 26 times. (27 sts) Join with sl st
14. Ch 1. Sc in same st. Sc2tog 13 times. (14 sts) Join with sl st.
15. – 19. Repeat rows 10. – 14. respectively. Tie off.
For the laces, take a length of yarn (or a length of chain) about 16-18” long. Weave in and out through the decreases around the ankle, and through the decreases around the very top. Make sure to begin on the outside, so the bows will be on the outside of the boots. Tie a small knot at the end of each lace (on both the yarn and chain).
xoxo,


Hi! How would I make these in a size 2?
Is that American sizing?
I’m sorry i meant for a 2 year old. She would be a size 6 toddler in U.S
Well, I don’t have toddler sizing for this pattern currently, and I am not sure of the exact stitch counts off the top of my head. I DO have toddler sizing in other slippers. You could use the sole as a guide and have a go.
http://www.whistleandivy.com/2014/03/toddler-boat-slippers.html
Hello!!!
I don’t know what am I doing wrong I never end up with the same stiches, what should I follow the video or the written pattern.😯 I’ ve tried the written like 10 times and it doesnt look right.
You have finished them 10 times, or you started them 10 times?
WOW! I finally finished it! Yeah the nuer of stiches were not the same….its is on perfectionnement but love it! I did the New born site wich was à mistake as they did not for long enough!!non i would love to do for my 2 years old! Is there any way to do so?! Il still not a pro!
Thank you
Sorry for the few mistake. ..look like my tablet does not like english and chance automatically!
Yes, I wrote this right after I had my baby and I have recently found some mistakes ( I guess I was more exhausted than I thought I was). I almost have them all fixed and will be updating it soon.
Haha! Tired or doing something at the same time! Cant wait for have the update! Ok thank you! Will it be available for toddler too?! Or how dan i do for make it?!
Thank! Wish I could do for me too!
I don’t have a toddler, but I will put it on my to-do list :) These would be very cute for an adult, too! You can try to adapt of my toddler patterns, the first 4 steps is the sole.
Ok thank you so much! Ill keep an eye to see you update!!! I am still beginner at crochet but i will try to make from tout advice since I love them so much! I would have another question…i made the little shoes with acrylic fabric but i find them little “thight” not strecht at all…i was thinking it was because I do too tight but is the fabric has to do something too!?! Thank you so much! Ill continue to follow you!!!
I don’t think it’s your yarn, I think your stitches are tight. Don’t pull them tight after working them, and just keep practicing! It takes time to get a consistent gauge.
Thank you so much. I am very happy that find your site and try to use it.
Thanks, you’re welcome!
I have been train to doo these…the written pattern does not say the same then your tutorial….so does not work for me…
Which part are you getting confused on?
Your written has a different sole pattern then the one you say to use in your tutorial. For 3-6 mths you also say 44 stitches in video but write 41 in the pattern.
No its the same. The last round actually has 42 sts.
5.
Join color B in the middle of the heel, 4th st from the join.
Ch 1. Sc in same st. Sc 41. Join with sl st. From here, you will work in joined
rounds.
That is not part of the sole. The sole is first 3 steps. That is the 2nd round of the body. Sc in same st (1 st) sc 41 (41 sts) 41+1=42
Don’t get me wrong .. I love and appreciate your patterns. It did take me two or three times to get this pattern down. I had to cut out step four, going by your video you don’t use step four. I made the sole according to your video and went straight to step five but used 41 like the written pattern says instead of the 44 on your video. I was simply saying I understand what the other comment was saying.
thanks for all your hard work in creating these lovely patterns for us to use.
These are simply adorable! I miss the days when Rachel could wear tiny little shoes.
Thank you! My little one has already grown out of a pair. So sad!
I must be doing something wrong. When I finish the 7 DC2tog BLO it doesn’t look even. By the time I get to row 10 one side is taller than the other. Is this normal? Also, when I join the 2nd color that goes into the 4th St from the sl st from row 4? Thank you!!
Hi Cortney
It sounds like you may not be joining in the right place. You want to join in the middle of the heel, which should be 4 sts from your join. Is that where you joined?
I have download this pattern along with some others, not sure on what I need to do. Your watermark will not let me see the entire pattern. I would like to try this pattern out please.
If you are using a reader/device, open the pattern in Adobe Reader instead of the default reader app. The watermark is light gray.
Guess what one of my goals for 2015 is? Learning to follow patterns in crochet and knit! Thank you so much for helping along in my endeavor. I love that your patterns are so easy to follow, as well as free…what a plus! Thank you so much.
You are so welcome! I am so glad you like them :)
Ok. Thank you! In going to try it out!
Thanks so much for all your wonderful patterns. I’m a beginner and find them so easy to follow. Are you planning on doing a video tutorial for these boots? I think I’m ending up with the wrong number of stitches for 10-14. If not, could you give and indication as to the number of stitches we should have when we complete each round?
Thanks!
You are welcome! You know, I have never used stitch counts with any pattern I have used, so I never saw a need when I wrote mine, which I am understanding is not true with most crocheters! Unfortunately, I don’t have a count without working up a pair and counting. Since I don’t have a stitch count, what makes you think you are off?
Thanks for replying! I’m not getting much of a bubble at the back, I think I’m doing something wrong when joining each round. Are we to stitch into the very last stitch of the previous round and then slip stitch into the first stitch (not the chain), ch1 and start again?
Yes, these are joined rows, not working in the round. When you start the second color, you will join each time you come around. Did you work a few rows? It doesn’t turn into a bubble until you increase it out, and then decrease it back in, it takes about 4 rows.
Yes, I have finished a pair and I’m joining at the end of each round but I think maybe I’m joining a stitch early, I usually count how many stitches I’ve done so I know when to join. The joins in my finished pair seem to be on an angle from the start of the increases which leads me to believe I’m missing the last stitch before I join.
Hm. Mine are always at a slight angle. If you look at your stitches, you notice that the loop on top of each stitch is not in the exact middle, so I thought the angle was normal. But this is making your bubbles not work out?
you are doing a great job and i thank you from the bottom of my heart for being so nice and sharing nice ideas and patterns with us :)
thumbs up from TUNISIA :)
Thank you so much!!! :D Thanks for being a reader!
I’ve used many of your patterns and really love the results. They are so ‘doable’.
Can’t wait to try the bubble boots. They have that ‘ugg’ look without the difficulty.
Thank you so much for sharing.
Thanks for your lovely comment! I am glad you like and can use my patterns. You are very welcome!
First pair of bubble boots done.
(blue/white).
Soooo cute.
Thank you for sharing!
Awesome! You’re welcome!
Fantástico o seu trabalho. Quero começar a fazer estes modelos em breve.
Amei poder estar aqui.
Obrigada.
Obrigado! De nada :)
Love these can’t wait to make them! Just need to finish my arm warmers first! :-) Thanks for all the patterns!
Thank you! You are welcome :)
Do you have the instructions for 12 or 12 -18 month size?
Sorry! This one only goes up to 6-9 months.
U have 9 to 12 months in your written patterns for the souls. Is there a way to get a written pattern or video of the 9 to 12 months please these are so cute and I’m trying to make them my niece
I am currently working on it! It will be coming very soon, stay tuned!
LOVE these!!!! THANK YOU so much for sharing!!!! I found this new yarn – well for me anyway – soft secret by HL and I think this pattern will be PERFECT for it (it’s similar to Caron’s). The bubbles are adorable!
Thank you so much! You are so welcome!
Can you suggest a way to make these bigger? I have a nine month grandson and eleven month granddaughter. Both of them have fat feet! Especially the girl! I made her a pair of elf slippers for Christmas in a medium of the same pattern I used to make slippers for cousins three and five years old, and they wouldn’t go on! Her foot is only 4.5″, as is Fosters, but fat!
Thanks!
You can work in hdc instead of sc, or use a larger hook and bulkier yarn. Caron Simple Soft is considered medium weight, but I find it’s lighter than Red Heart Medium.
I am so excited to start with some of your patterns. I love your wrk. Thank you in advance!!!!
Thank you so much! You are welcome :)
Just looking for some clarification here…to create the “bubbles”… Are the number of stitches meant to increase as you go up the boot? Or should it shrink back to the same number of stitches you get in row 9?
It increases and then shrinks.
I just realized I was reading the pattern wrong…and that there are two rows of sc2tog. *sigh*
Making these for a friend who’s giving birth to a baby girl this month. Hope she likes them! Thanks for all the amazing patterns!
You’re welcome :) I hope she does too! They stay on so well, I have made a few pairs for my own baby!
I just love your work! Thank you for free patterns, as a South African it is expensive bying patterns, so I always turn back to your site. Awesome work. May you be blessed!
Thank you so much! I am so glad you use my patterns :) Thank you for taking the time to leave such a nice comment! Happy New Year!