
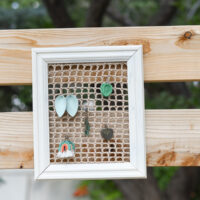
Do you have an old frame lying around? Grab it and make yourself a crochet earring holder! This pattern works with any size rectangle/square frame, and is suitable for advanced beginners and above!
This post contains affiliate links, thanks for your support.

CROCHET EARRING HOLDER CROCHET PATTERN
Wake up, wake up campers, it’s time for Day Three of Crochet Summer Camp!
If you are someone (or know someone) who loves a good dangly earring, this project is for you. You may even have an old frame that has been tossed in the donation bin.
Well, fish it out, you’ve got the perfect use for it!
Notice some crochet earring are in there too ;)


You’re tired of sifting through complicated tutorials and patterns that leave you feeling overwhelmed.
Let me help.
PICTURE THIS:
Instant access to a library of modern, easy-to-follow patterns
Gifting your handcrafted treasures to your loved ones.
Feeling accomplished by your beautiful makes
It’s time to make your crafting experience as joyful as it should be.
ABOUT THIS PATTERN:
This pattern is super simple. It uses repetitive rows and simple stitches, so it would be suitable for an advanced beginner, or possibly a beginner who has one or two projects under their belt.
It’s so simple, you can make it work with any sized rectangular/square frame.
READY TO FRAMED EARRING HOLDER?
The pattern is FREE in-text below! However, if you prefer a pretty downloadable ad-free PDF, one can be purchased from my shops:
What you need:
– 3mm Hook
- Coboo Yarn (#3 cotton yarn)
– Old Frame, any size
- Hot Glue
Abbreviations: US Terms
Ch –chain
Dc –double crochet
St – stitch
Sk – Skip
Note: if you plan to paint your frame, be sure to give it 2 coats and let it dry completely beforehand.
FRAME CROCHET EARRING HOLDER
Begin by working a foundation ch that stretches to the width of your frame, making sure its an even number.
Pull a tight as you can, and give yourself a tiny amount of space to turn. You want it to be as exact as possible.
1. Dc in 3rd ch from hook. Dc in each ch. Turn.
2. Ch 2. Dc in same st. *Ch 2, sk 2 sts, dc in next st* repeat across your piece. Dc in last st. Turn.
3. Ch 2 (counts as first dc). Dc in next st. *Ch 2, sk 2 chs, dc in next dc* repeat across your piece. Dc in last st. Turn.
Repeat row 3 until your piece is the height of your frame when pulled very taut. It should be quite a bit smaller, unstretched.
Weave in ends.

CONSTRUCTION:
With your gun heated, glue your piece to your frame in 1″- 2″ sections starting with either top corner, going across the top.
To achieve a more even stretch, pull the fabric corner to the corner of the frame each time you put down a section of glue.

Once the top is glued, work down one side, again pulling the corner fabric to the corner of the frame.

Finish gluing around the rest of the fabric/frame and let cool.


Now, you just need to make some crochet earrings ;)

Finished with your summer camp project? Please share! Hop over to this Facebook post, add it to our Facebook group, or tag me on instagram!
xoxo,


What a fantastic idea! I love how creative and resourceful this crochet earring holder project is. It’s perfect for giving old frames a new life while making something beautiful and functional. Can’t wait to try it out!
Love this frame. Wondering what color the yarn is??
Thanks
Thanks Cheryl! I used “Beige” in Coboo.