
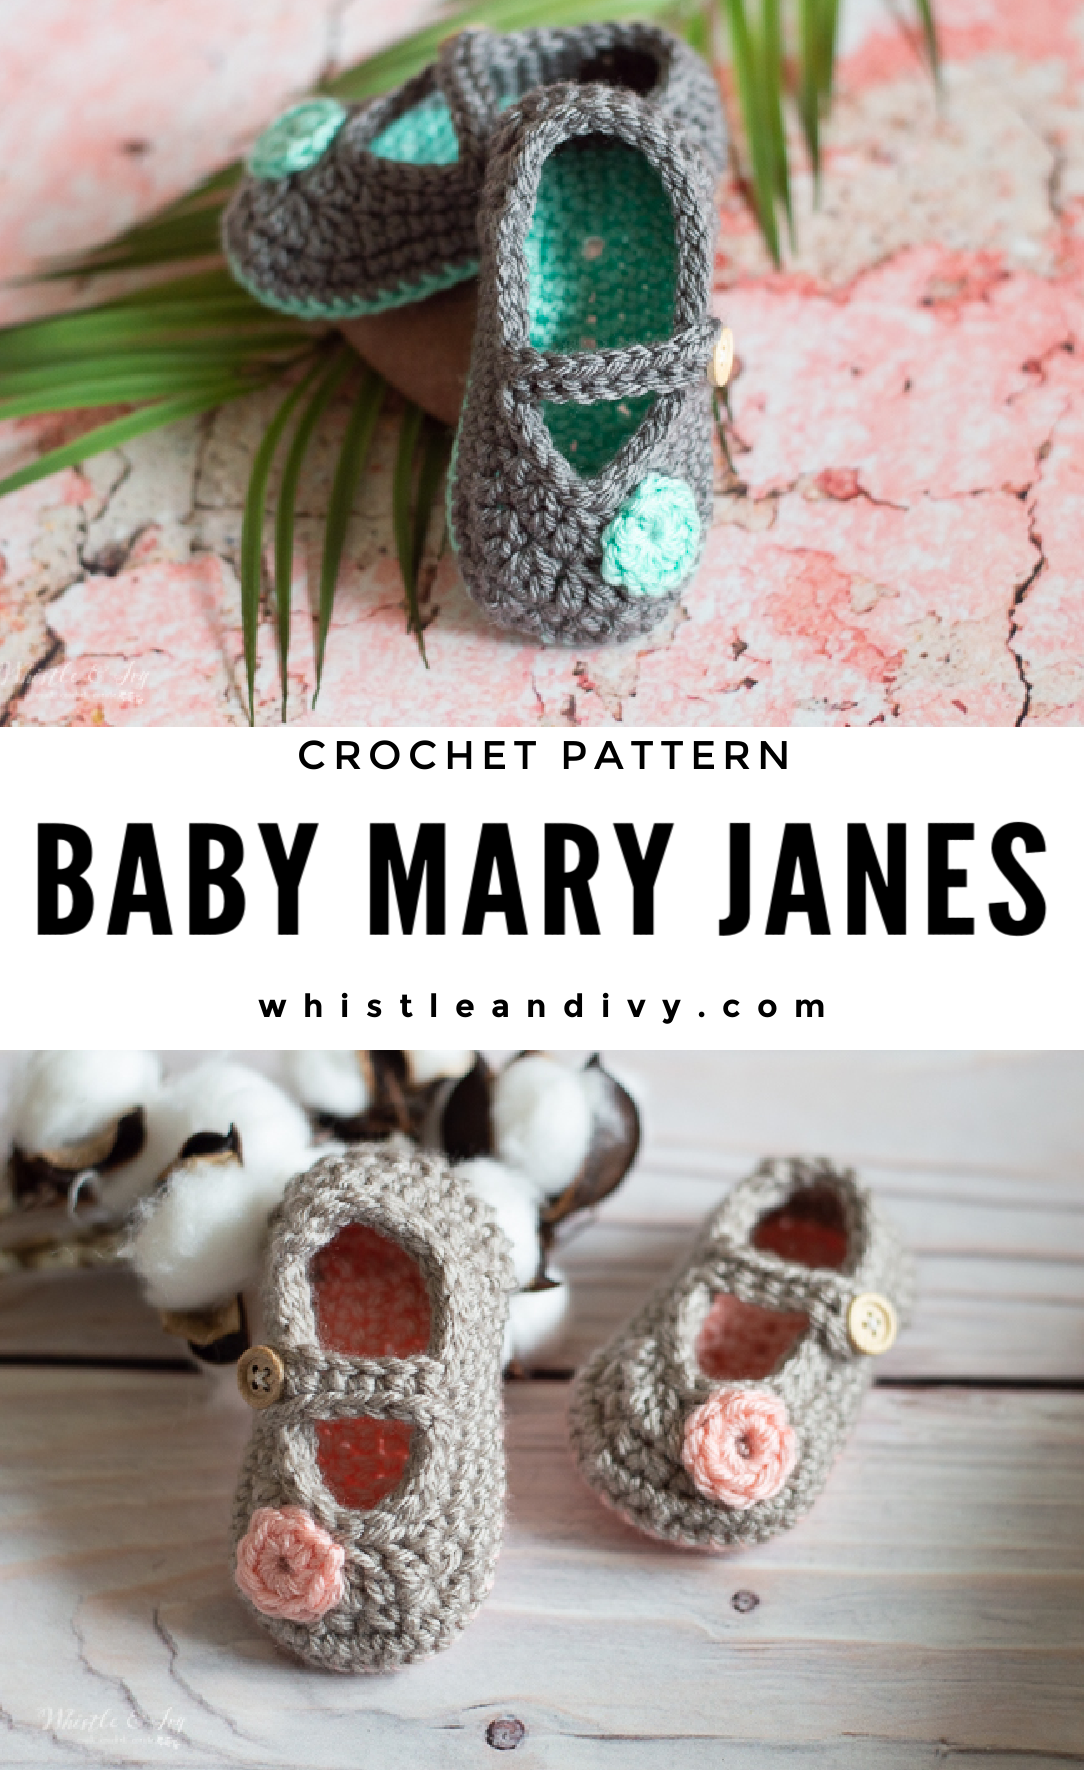
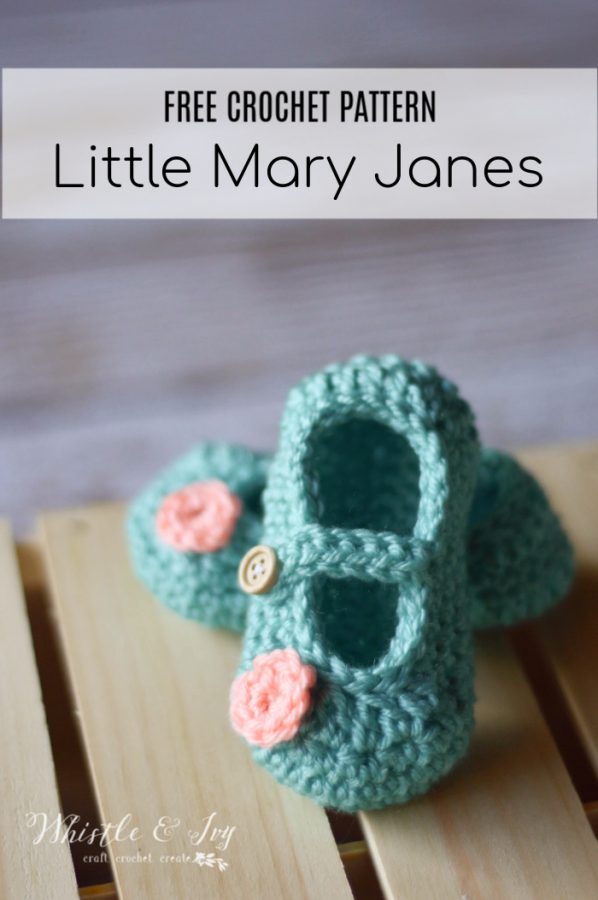
This classic baby booties crochet pattern will become your favorite go-to crochet Mary Janes for baby! This pattern works up fast and the pop of color makes them a fun project to make. They are perfect for your next baby shower! Pattern PDF includes sizing from newborn to toddler.
This post includes affiliate links, which means I get a small commission if you make a purchase. For more information, click HERE.Thanks for supporting Whistle and Ivy!
Are you someone who is a fan of the classics?
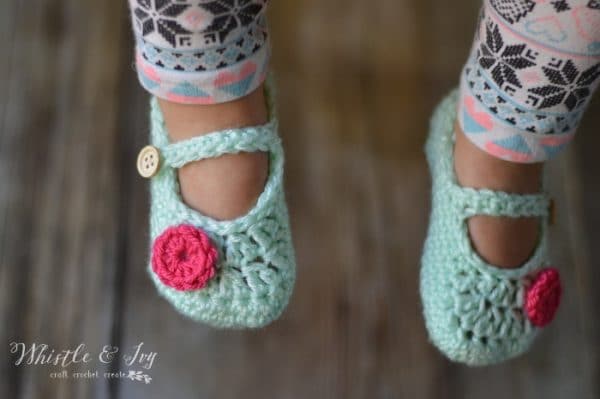
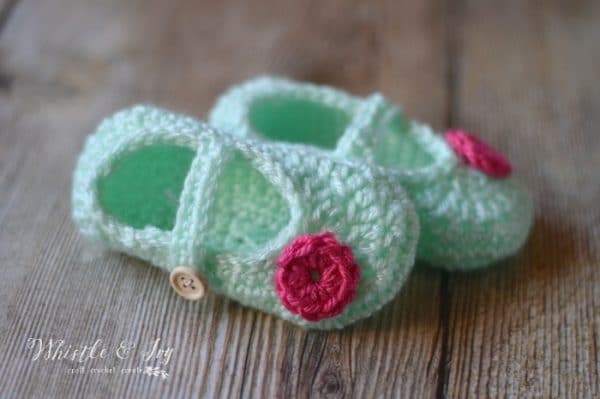
These crochet Mary janes baby shoes are definitely classic. When I set out to design these, I knew I wanted something cute and quick. These crochet baby booties fit the bill. Not only will you love everyone’s “oohs ” and “ahhhs” over how cute they are, you will love that you can crochet a pair in under an hour. Plus, the little dot (flower?) gives an extra bit of contrast to make these little crochet baby shoes extra adorable

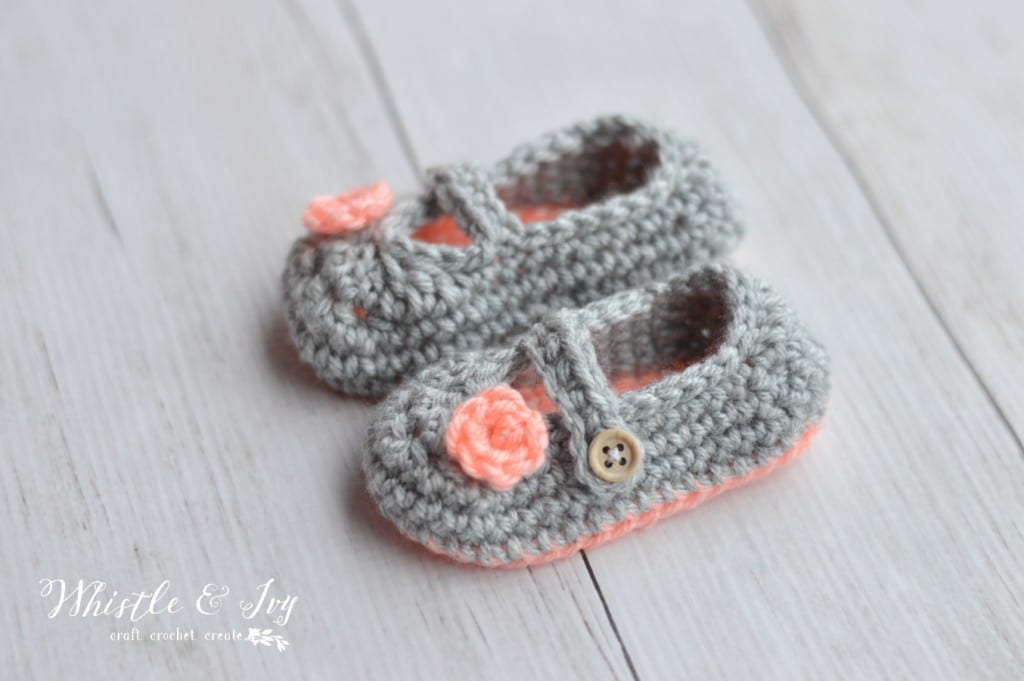
You can either make the button functional or decorative, it’s your choice! Either way, be sure to seal the threads with super glue or clear nail polish so there is no risk of the button coming off.
And, due to a Youtube commenter, I also made these crochet baby booties with a little more color pop! Read directions on how to make the bottom sole a different color.

You’re tired of sifting through complicated tutorials and patterns that leave you feeling overwhelmed.
Let me help.
PICTURE THIS:
Instant access to a library of modern, easy-to-follow patterns
Gifting your handcrafted treasures to your loved ones.
Feeling accomplished by your beautiful makes
It’s time to make your crafting experience as joyful as it should be.
CROCHET MARY JANES BABY SHOES: CROCHET PATTERN
I hope you enjoy this pattern! But please remember, the content contained herein is a copyrighted work, tediously designed by myself. Distribution of this pattern (or parts of it) in any way, digital or physical, or use of this pattern (or parts of it) to create your own patterns beyond personal use is strictly prohibited. You are welcome to sell what you make from this pattern, but please do not use any of my photos in your listings.

READY TO MAKE YOUR BABY SHOES?
Want more sizes? The ad-free PDF pattern for these darling crochet Mary Janes booties Pattern is also available in my shops! The PDF includes sizes from Newborn to Toddler 8/9
Where would you like to shop today?
What you need to make crochet Mary janes :
- Medium Weight Yarn, your favorite soft acrylic (KnitPicks Brava in Seashell and Cornflower)
- Size F Hook (My favorite hooks)
- 2 small buttons
Abbreviations: (American Terms)
St – Stitch
Ch – Chain
Sc – Single crochet
Dc – Double Crochet
Hdc – Half Double Crochet
Sc decrease – Sc2tog
hdc decrease – Hdc2og
Dc decrease – Dc2tog
Sl st – Slip Stitch
Gauge: 9 dcs – 2”
SIZE 3-6 MONTHS CROCHET MARY JANES
Make 2 (Worked in continuous rounds)
Approx. 4″ long
Ch 11.
1. Work 3 sc in 2nd ch from hook, sc in next 4 chs, hdc in next ch, dc in next 3 chs, 7 dc in last ch.
Working across opposite side :
Dc in next 3 chs, hdc in next ch, sc in next 4 chs.
Place marker and move up each round. (26 sts)
2. Work 2 sc in next 3 sts. Sc in next 9 sts. Work 2 sc in next 5 sts. Sc in next 9 sts. ( 34 sts)
3.*Sc in next st. Work 2 sc in next st* work 3 times. Sc in next 9 sts. *Sc in next st. Work 2 sc in next st* work 5 times. Sc in next 9 sts. (42 sts)
4. Sc in next 41 sts. Hdc in last st. (42 sts)
5. Dc in next 10 sts. Hdc in next st. Sc in next 31 sts.(42 sts)
6. Sc2tog. Sc in next 6 sts. Sc2tog. Sc in next 9 sts. Sc2tog 7 times. Sc in next 9 sts. (33 sts)
7. Hdc2tog. Hdc in next 4 sts. Hdc2tog. Sc in next 9 sts. Dc2tog 4 times. Sc in next 8 sts. (27 sts)
8.
Right: Sl st 12. Ch 9. Sc into 5th ch from hook. Sc in next 4 sts. sl st into next st on the shoe. Sl st in next 14 sts. (27 sts {not including the sc and ch sts of the strap})
Tie off.
Left shoe: Sl st in next 23 sts. Ch 9. Sc into 5th ch from hook. Sc in next 4 sts. Sl st into next st on the shoe. Sl st in next 3 sts. [27 sts (not including the sc and ch sts of the strap)] Tie off. Weave in ends.
To make the shoes two-toned, work steps 1 -3, but end round 3 by moving up your stitch marker, sl st into next st and tie off.
4. Join Color B at the stitch marker. Work through BLO. Ch 1. Sc in same st. Sc in next 41 sts. (42 sts) Join with a sl st.
5. Ch 1. Sc in same st. Hdc in next st. Dc in next 7 sts. Hdc in next st. Sc in next 32 sts.(42 sts) Join with a sl st.
6. Ch 1. Sc in same st. Sc2tog. Sc in next 5 sts. Sc2tog. Sc in next 10 sts. Sc2tog 7 times. Sc in next 8 sts. (33 sts) Join with a sl st.
7. Ch 1. Sc in same st. Hdc2tog. Hdc in next 3 sts. Hdc2tog. Sc in next 9 sts. Dc2tog 4 times. Sc in next 8 sts. (27 sts) Join with a sl st.
8.
Right Shoe: Sl st in next 12 sts. Ch 9. Sc into 5thch from hook. Sc in next 4 sts. sl st into next st on the shoe. Sl st in next 14 sts. [27 sts (not including the sc and ch sts of the strap)] Tie off.
Left shoe:
Sl st in next 23 sts. Ch 9. Sc into 5thch from hook. Sc in next 4 sts. Sl st into next st on the shoe. Sl st in next 3 sts. [27 sts (not including the sc and ch sts of the strap)] Tie off.
Dot: Start with adjustable ring or 3-ch loop.
Work 8 sc into the ring. Pull your ring tight.
Join with a sl st and tie off.
Construction:
Attach a small button on the opposite side of your strap with a needle and thread. Make sure it is VERY secure, and seal the button’s threads with a dot of super glue or finger nail polish over where they cross on the button. Attach the dot by hand sewing, or attaching with hot glue. If you are using hot glue, but sure your are gluing to the very edge of the dot, as the edges of the small circle may curl up over time.
These crochet Mary Jane shoes are perfect for almost any occasion! Enjoy!
→ Love this? Follow us on Facebook!
xoxo,


Perfectly written, beautiful pattern. I made two pair. Thank you, Bethany.
Thank you very much Angie!
I followed the 9-12month pattern for my 7 month old and it did not fit her foot (the bootie was too small.) I also must have made a mistake somewhere because I wasn’t in the correct spot when it was time to make the strap. Will try again because I love this pattern. <3
I hope you give it another try! Your gauge might just be tighter than mine, so you can make your slippers larger by going up a hook size :)
Found this pattern on Pinterest and made the 0-3 month size for my niece. Turned out perfectly! I made sure to mark my stitch rounds and the video was awesome for the few questions I had. Thanks for the great pattern!
So glad you liked it! Thanks for your kind words!
Where did you find the 0 to 3 months pattern, please. Thank you
The other sizes are available in the printable PDF! You can find it in my Ravelry or Etsy shops :)
Thanks for the pattern, it’s adorable! I just wanted to make sure about the number of chains for the strap? You write ch.9 in the 3-6 months pattern but you chain 12 in the video…I chained 12 but was just wondering? Also, 12 is more than the ch count for the bigger sizes…should it be 12 in all of them?
Thanks!
Hi Jessica! I have edited the written pattern over the years (this is one my first patterns) but have never went back and made a new video. I perfer the smaller chain, but it’s not a huge difference either way.
I made this pattern with a different embellishment. I gave them as a gift at a baby shower. I wanted to show you a picture but not sure how to post it.
I would love to see! You can post a photo on my wall on Facebook or tag me on Instagram! @whistleandivy
Thank you so much for this darling pattern. I will be making them for our new great granddaughter.
You are very welcome!
Hi! I tried making the 3-6m shoe, and my rounds kept ending up on the side of the shoe forcing the decrease stitches to be off-center and the strap too close to the front of the shoe. I kept careful track of my stitch count making sure it lined up with yours at the end of each round. I backtracked and could not find any errors, at least with stitch count or stitch sequence… The only thing I can think of that might be wrong is in the second round… Do you start your first stitch of the second round in the first sc of the first round or in the ch1 behind it? I skipped the chain, since you didn’t count as a stitch, but that is when I noticed things being slightly off-center, which of course became more extreme by the time the shoe was finished.
The end is on the side, that is correct. This is because the round ends before you begin the increases around the heel, because you begin the show with the increase (working 3 sc in 2nd ch). Everything should be perfectly centered, because I designed it that way. You must be getting off somewhere else. You begin the second round is the first sc, but there should not be a chain, as this shoe is worked in the round without any joins. Did you watch the video?
I did not watch the video yet. With a foundation chain, there is always a loop behind the first stitch. It’s what allows continuing. When doing larger stitches, such as hdc or dc, the chain is usually 2 or 3 loops. I will try again and watch the video to see what else I am missing. I have a science-math side, and since one other person had a similar problem, I must solve the mystery. Thanks. :)
I made a second attempt at the shoe, and still don’t know what I did wrong. I only know which round I messed up on. Round 6. The only thing that looked wrong was that I had to pass my marker to complete the last stitch (which is how I knew there was an error), recounted stitches (seemed right), counted the difference between your written round stitches (also seemed right), and counted my stitches again (seemed right again). The only thing that I found looked wrong was my first 2tg stitch was sloppy… So I fixed that, and everything came out right the second time… I am chocking this twilight moment to preggo hormones. :P
Ok, I just started to make the partner shoe (after successfully making the first) and immediately noticed a problem, and after watching your video, I believe I have solved the mystery. When I first began crocheting and reading patterns a year ago, I was often confused, not knowing whether the actual loop for the stitch was before the stitch or after it. After a lot more experience, I learned that the loop that is after (to the left) the stitch is the actual top stitch loop. After watching your video, I now know that you are starting round 2 into the loop from ch11 in your pattern, not the 1st sc loop from round 1. That is why my first attempt was off-center and also why several people end up needing to watch the video to understand what you are doing. If you wanted to correct the pattern, you would either tell people to start the round in the ch1, or you would write 2sc in 2 stitches and finish the round with the third 2sc. That should remedy the misunderstanding. I also wanted to point out that the strap in your 3-6m pattern (ch9) is written to be shorter than the 0-3m strap (ch11), which made no sense to me; so I made mine the same length as the 0-3m. Maybe that was an oops, or maybe you had other reasons for doing it that way, but I thought I would bring it to your attention. :)
I do, in fact, work in the first sc in row 2, otherwise you would end early. You begin with 3 sc in the 2nd ch, and you begin row 2 working 2 sc in each of those three. But if you have figured out an alternate method that works for you, then do that!
Adorable shoes! Had no problems whatsoever. Did thr smallest and used a smaller hook to get tje size I needed! I used a different fastener amd will nr adding the dot as well. And yes, took no time at all! ❤❤❤ Thank you…I love Mary Janes!
Thank you so much! I am so glad you loved them!
Tried it again and it ends closer to heel. Must have been counting wrong. Thanks
Glad you got it!
These Mary Jane’s are adorable. Going to give them a try.
What does *Sc 2 sc in next st* work 3 times mean?
Thank you.
Thank you!
It is an increase. Increase 3 times around the toe.
So is it sc/2sc in next stitch and then in next 3 stitches? I’m confused as you can see!
You single crochet in the next stitch, then two single crochets in the one after that, and repeat that three times– for a total of 9 single crochets worked into six stitches. Using a row marker (I took out an earring and stuck it in as I was working!) really helps– you should end up with the right stitch count (as noted in the pattern) as you reach that marker every time! :) Hope that helps.
Thanks for the clarification. I was having a problem with this part also which was leaving me short about 9 stitches. I will try again and am sure that I got it now.
Hi again. I am doing the 3-6 month Mary Jane and am ending each round in the middle not at the heel. Not sure what I’m doing wrong.
Lovely little shoes <3 I modified them a little with a contrasting colour on the edge of the sole and some little holes at front for a friend. Thank you for the pattern!
You’re welcome!
Your patterns are adorable! I really enjoy how it’s your style!
Thank you very much!! <3
Hi,
I am new in reading patterns.What does the * mean in step 3? Thanks.
It holds a piece of the instructions together, so you will work the entire contents the indicated number of times.
I love this slipper and would like to make it for my 18 month old granddaughter as house slippers. Can you tell me how to increase to that size? This is a great pattern and looks exactly like the picture!
Thank you! In fact, I have a toddler version. You can find it here:
http://www.whistleandivy.com/2013/10/toddler-little-dot-mary-janes.html
For the 3 month size, step 3 has an incorrect count. The stitches only equal 30 stitches, not 38….
The pattern needs a few tweeks and more testing.
You are not counting the increases. Step 2 has 30 sts, step 3 increases by 8 (3 around the heel, 5 around the toe), bringing the count to 38.
This is for Jessie. After several tries I realized I was skipping the sc on the repeats.
I did the same, three times, before I saw the sc just before the sc2! Finally got the pattern correct, thank you. I think that possibly the US instructions may be set out differently to Aus, and of course, we need to remember to crochet the correct stitch. Now I need to find a pretty flower pattern for the decoration.
I wondered if you knew how many stitches you would add to beginning to make size one or size two. I haven’t started to make them yet, but they are adorable. Mary
Well, I believe the size 0-3 would be a size 1, no?
I did this pattern in 2 different sizes and its nowhere like it is in the picture. I did the 3-6 & 9-12 and both the counts were wrong on the pattern. Cute shoe but the pattern needs to be corrected and actually tested in each size. Wasted yarn.
I assure you, these patterns have been throughly tested. Would you like help? I offer help for anyone needing it with my patterns. I also have a video (link in the post) if you are interested in watching.
Where can I find the 9-12 mo pattern?
On the second page :)
These are great! You weren’t kidding when you said they work up in an hour. I just did one shoe in a beautiful green and it came out adorable! Do you have a pattern for the little dot flower as well?
Thanks, so glad you like them!
Yes the dot is before the construction on the second page.
Wonderful thank you! I guess I didn’t pay attention to the second page!
No problem!
I’ve made the 3-6 month size and just made the 6-9 month size. I felt the button hole was a little too small and hard to get around a button, so I single crochet into the 6th stitch from the hook and it is working much easier. Just thought I’d send that little tip along. By the way…..these are SO adorable!
Is the button a “working” button, or decorative? The hole left in the strap is soooo tiny!
It is a working button. Did you work into the 5th ch from the hook? This actually makes the buttonhole a good size, so I am guessing you may have misread that part? Let me know.
I did work into the 5th chain, but I crochet rather tight. I’m using a G hook rather than an F for that reason. I will just work the chains a little looser.
Thank you! Love the pattern!
Do you turn them inside out so they are the right way when you finish them or as you go? Have just made one and it looks inside out
They should be right side-out as you make them, be sure you are working them from the outside.
Not sure if it’s because im left handed, but it woked out I just had to crochet in the backloop onthe sc round with the hdc. Its the right way and still the right shape.
Well sometimes when you are working something curved, it can accidentally curve up the wrong way. It’s something I did when I first started. You just have to be aware of it, and make sure you are working so the right sides of your stitch are facing out. Really, it’s no harm done, you just have to turn it right-side-out when you are done. I am glad you got it! Please let me know if you have more questions.
Thanks for the patterns! Very well written! Yeah, I followed the directions for the right shoe but it made a left shoe inside out so now I will have to make the right one inside out too because I already accessorized. I added elastic under the strap and a non skid sole made from shelf liner.