
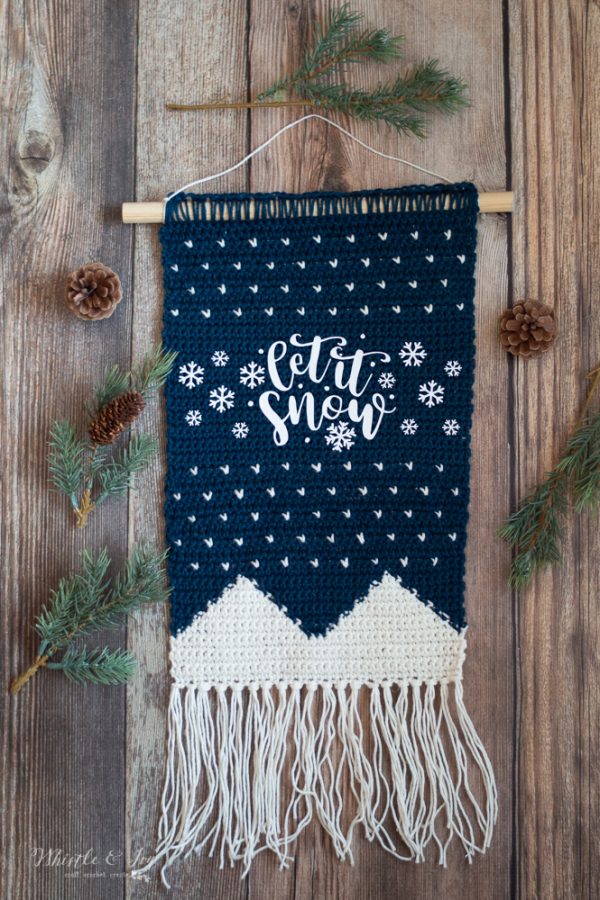
This beautiful fair isle crochet wall hanging features simple color work to create a classic design. Add some Heat Transfer vinyl to your crochet wall hinging or some freehand embroidery to make it a lovely wintry addition to your wall decor. This post is brought to you by WeCrochet, an online yarn shop especially for crocheters! Find yarn, books, merch, and other goodies for crochet lovers at crochet.com. This post also includes affiliate links which means I get a small commission at no extra cost to you. Thank you for your support!
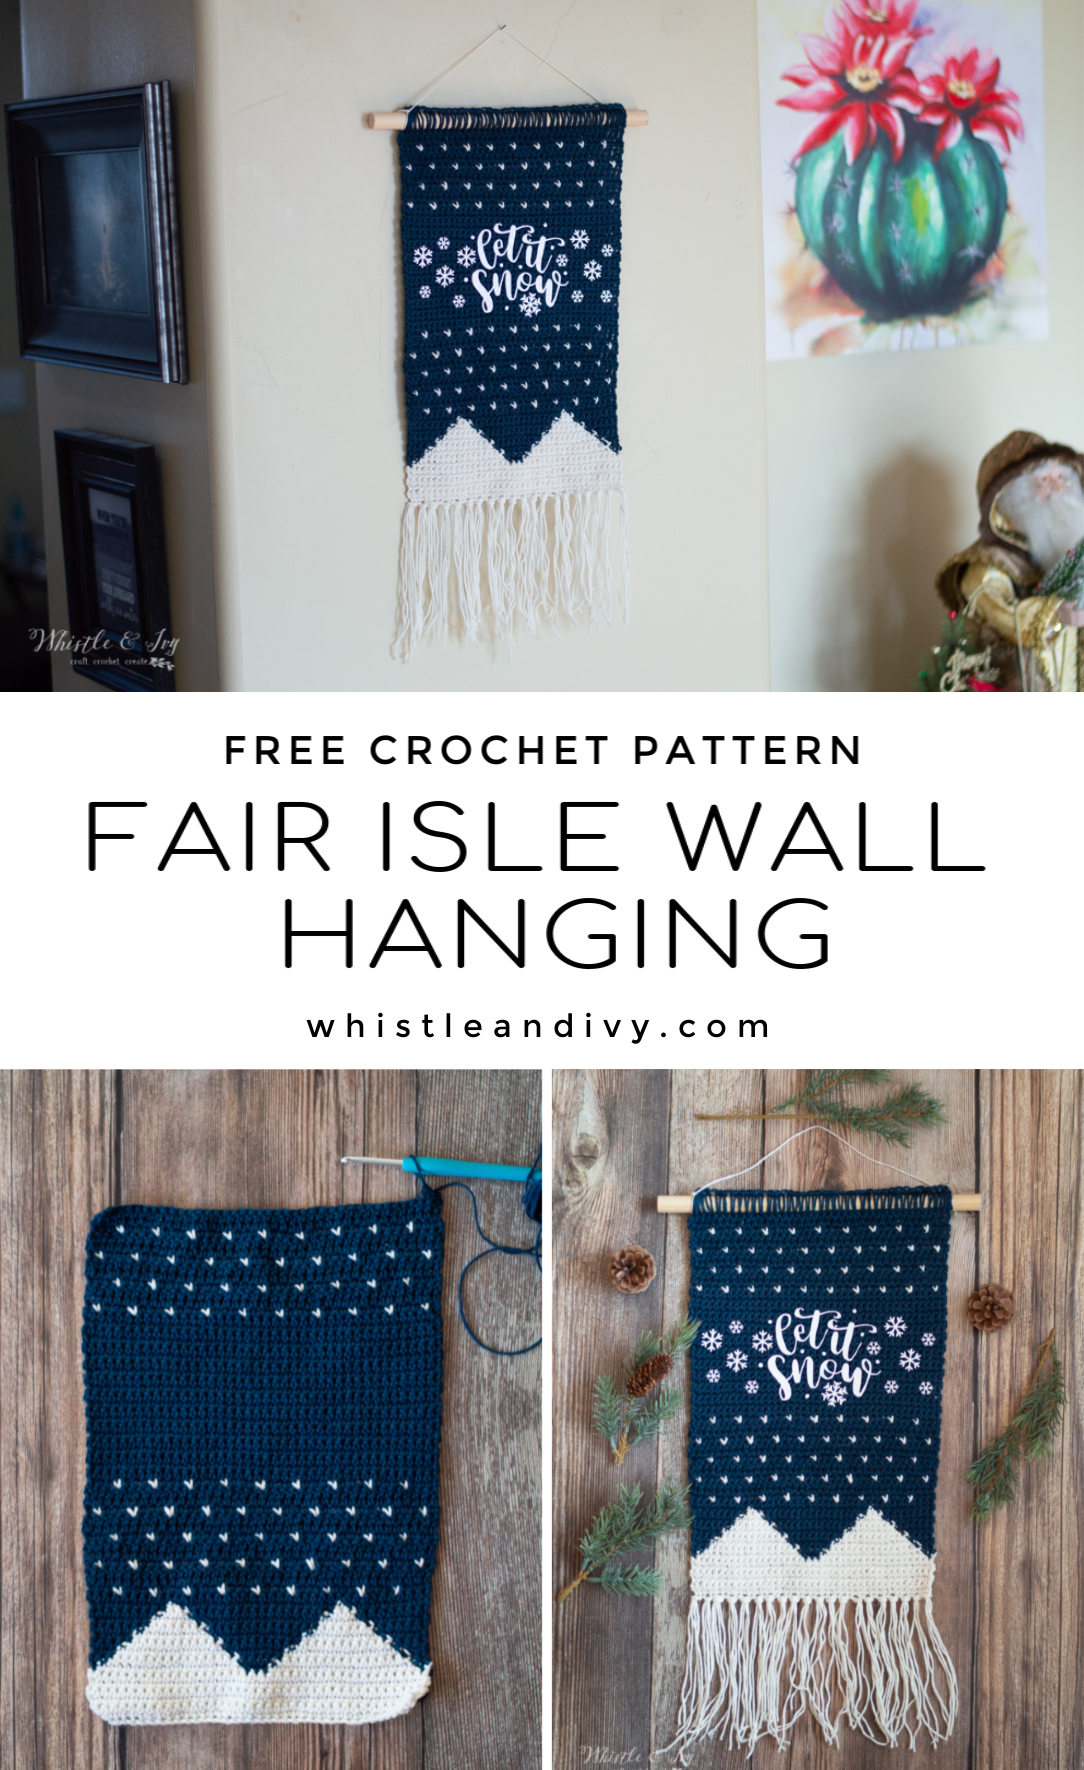
When I made my plaid wall hanging back in October, I discovered that heat transfer vinyl works surprisingly well on a tight crochet fabric. So many possibilities! I wanted more, this time something less Christmasy and more wintry that could be left up for a couple more months.
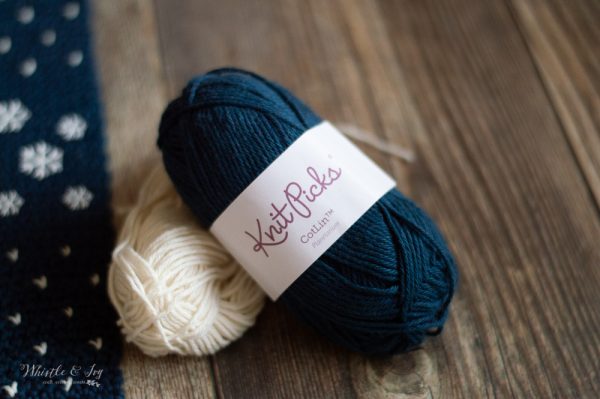
To do heat transfer vinyl on crochet, you must use natural fibers like cotton. I decided to go with CotLin for this project, which is lovely yarn that is 70% cotton and 30% linen. Linen is a plant fiber, so this yarn is perfect for heat transfer vinyl projects. I wanted a gorgeous, deep navy blue and Planetarium was exactly what I was looking for. You can get this yarn at WeCrochet, which is a new sister company of Knit Picks that caters especially to crocheters (um, how darling is this crocheting unicorn pin?!). It’s nice to finally have a yarn shop for crocheters!
This yarn would also work wonderfully for amigurumi, and the color palette is wide enough that you can surely find the right colors for your project. Now that I have seen this yarn in person, I think it would make a beautiful nativity, an alternate to wool which some people are allergic to. It’s DK weight, but I think going down a hook size, the same size could easily be achieved.
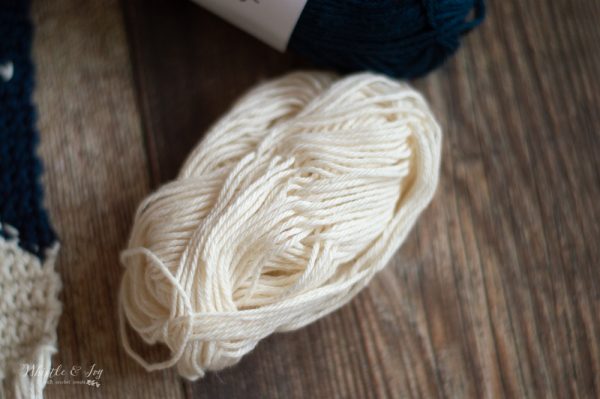
I am a sucker for beautiful off-white colors, isn’t Swan beautiful?
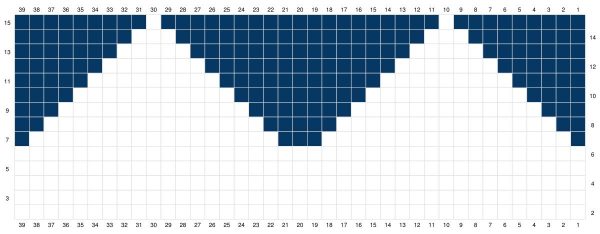
This pattern includes a graph, which is the easiest way to explain the simple color work. If you need help with simple graphwork and color changes, please watch this video: (you will work this graph in both loops as you are turning after each row)

You’re tired of sifting through complicated tutorials and patterns that leave you feeling overwhelmed.
Let me help.
PICTURE THIS:
Instant access to a library of modern, easy-to-follow patterns
Gifting your handcrafted treasures to your loved ones.
Feeling accomplished by your beautiful makes
It’s time to make your crafting experience as joyful as it should be.
FAIR ISLE CROCHET WALL HANGING – FREE CROCHET PATTERN
Please remember: You are free to use this fair isle crochet walling hanging pattern to make and sell, but do not republish or distribute this pattern in any way. DO NOT use my photos in your listings. Please do share my blog links! It’s a quick and FREE way of supporting Whistle and Ivy and more free crochet patterns in the future.
PLEASE read my Disclaimer before working my free patterns!
What you need: (affiliate links)
– Size 7 Hook (4.5mm)
– WeCrochet Cot Lin in Planetarium and Swan
– 5/8″ Dowel
– Winter Cut File
– Heat Transfer Vinyl
– Darning Needle
– You can also commission a pre-cut vinyl sticker here
Abbreviations: US Terms
Ch – chain
Sc – single crochet
Dc – Double Crochet
St – stitch
Gauge: not important
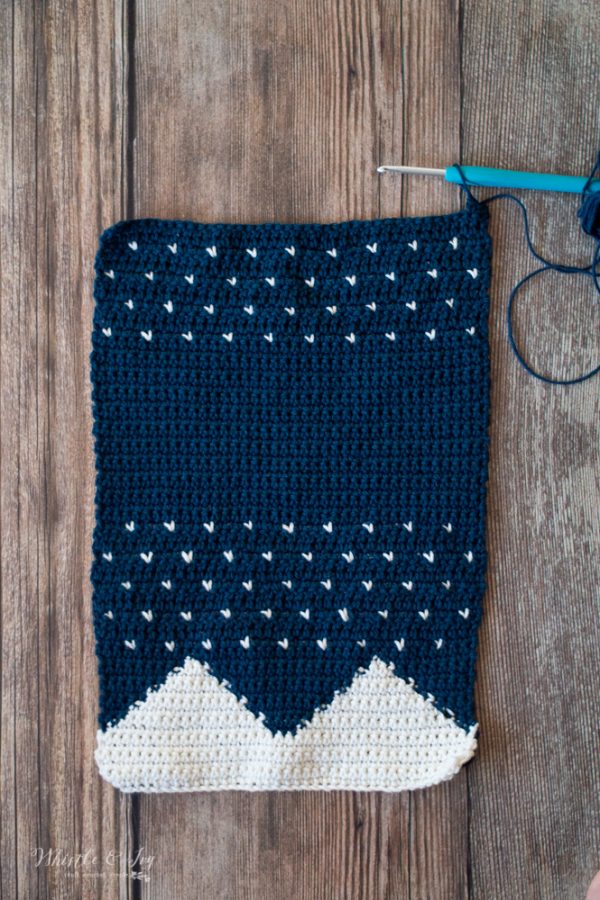
Finished Piece measures approx. 9″ W x 13″L
Notes: Ch does not count as a stitch. Always work the first st in the same st as the chain. \

LOVE THIS, BUT HATE THE ADS?
Get the ad-free PDF download!
With Swan, Ch 40.
1. Sc in 2nd ch from hook. Sc in each remaining ch. Turn. (39 sts)
2. – 15. Work the graph treating each square as a sc. Ch 1 at the beginning of each row and turn at the end of each row.
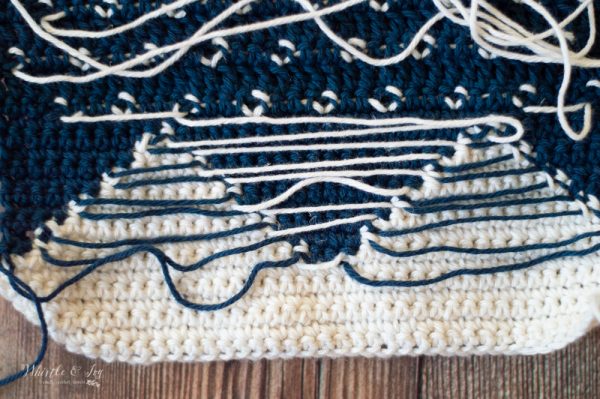
Because this piece has a right and wrong side (the odd number rows are the front side) I recommend dragging your ends on the back instead of carrying them within the stitch. When you switch colors, be sure to put your yarn toward the wrong side of your piece. Keep the dragged yarn loose!
16. With Planetarium, Ch 1. Sc in each st across. Turn. (39 sts)
This begins the snowfall technique.
17. With Planetarium: Ch 1. *Sc in next 3 sts. Insert hook and pull up a loop of Swan. Drop Swan, with loops still on your hook, pull up a loop of Planetarium and finished the sc. (This will give you a white V shape with blue loops at the top. For the rest of the pattern, this white V stitch with blue loops at the top will be referred to as “snowfall stitch”.)* work 9 times. With Planetarium, sc in last 3 sts. Turn.
For general help working the snowfall technique, please watch this video:
18. With Planetarium, Ch 1. Dc in each st across. Turn. (39 sts)
19. With Planetarium, ch 1. Sc in next st. Work a snowfall stitch in next st. *Sc in next 3 sts. Work a snowfall stitch in next st* work 9 times. With Planetarium, Sc in last st. Turn. (39 sts)
20. With Planetarium, Ch 1. Dc in each st across. Turn. (39 sts)
21. – 25. Repeat rows 17 – 21 respectively.
26. – 46. Ch 1. Sc in each st across. Turn. (39 sts)
47. – 53. Repeat rows 19, 20, 17, 18
Don’t tie off.
You will want to iron-on your design (or embroider it) before you attach it to the dowel. If you made the Plaid Wall Hanging, you possibly already purchase this bundle of holiday/winter sayings, and there are a couple that might work. I specifically wanted mine to say “Let it Snow”, so I found this bundle with a few other cute ones as well.
For a full tutorial on working with HTV, you can view this in-depth post by Persia Lou. The main thing to remember is that you want to cut the design mirrored, with shiny side down on your mat. It’s also IMPERATIVE that you use CotLin or 100% cotton yarn for the project. Anything synthetic will melt from the heat of an iron.
You also need to wait at least 5 minutes before removing the shiny plastic. If the HTV doesn’t cool, it will peel right off!

Once your design is set on your peice, you can finish by sc around the dowel to attach it. Work slow and nice and loose. It will be a bit awkward at first but gets easier after just a few stitches.
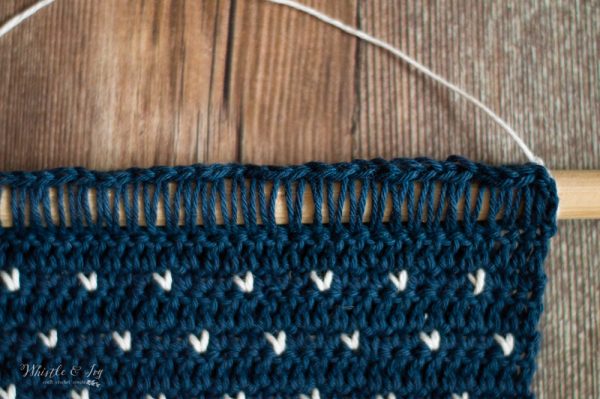
I also added some fringe to the bottom of my crochet wall hanging. To finish, tie a piece of yarn to either end of the dowel and hang it up.
I am in love! Do you keep winter decor up after you taken down your holiday decorations?
Happy holidays friends! I hope your week is magical and relaxing and spent with loved ones.
xoxo,


I love it. ! I want to knit it. Do you think that I can change it to knit?
Sure, I would think you could use the same graph for knit! I would love to see it when you are done!
Can you print pattern?
Yep! Just like any webpage, you can highlight the text and print.
This is lovely, Beth. Thanks for sharing. I will probably change the saying but this will be my 1st crochet project for 2020. Merry Christmas and Happy New Year.
Thank you, you are so welcome! Happy New Year!
So pretty. But I thought the “Let it Snow” was also part of the wall hanging done in the fair isle as well. I don’t understand what it is you have used for the writing though. Do you buy the sayings premade and just iron it on?
Thank you! It’s called Heat Transfer Vinyl and I explain about it in the writing of the post :) I have a cutting machine and cut my own but I have put a link in the materials list for an etsy shop where you can purchase a pre-cut one.
That was SHOWED ON!!!!
This is so cute!!! It will be perfect on my apartment door! Where it won’t get showed on! THANK YOU for sharing your creativity and for all that you do for this community!!!
MERRY CHRISTMAS TO YOU AND YOURS!
HAPPY HOLIDAYS and a GREAT NEW YEAR!
Rosalie McCreary
I love this wall hanging. It’s beautiful.
Merry Christmas and Happy New year to you 🎉