
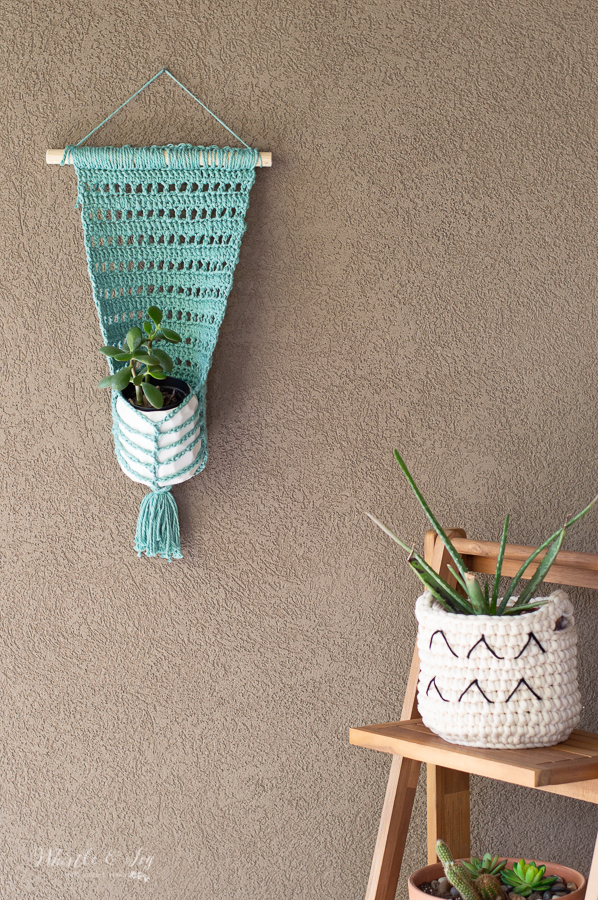
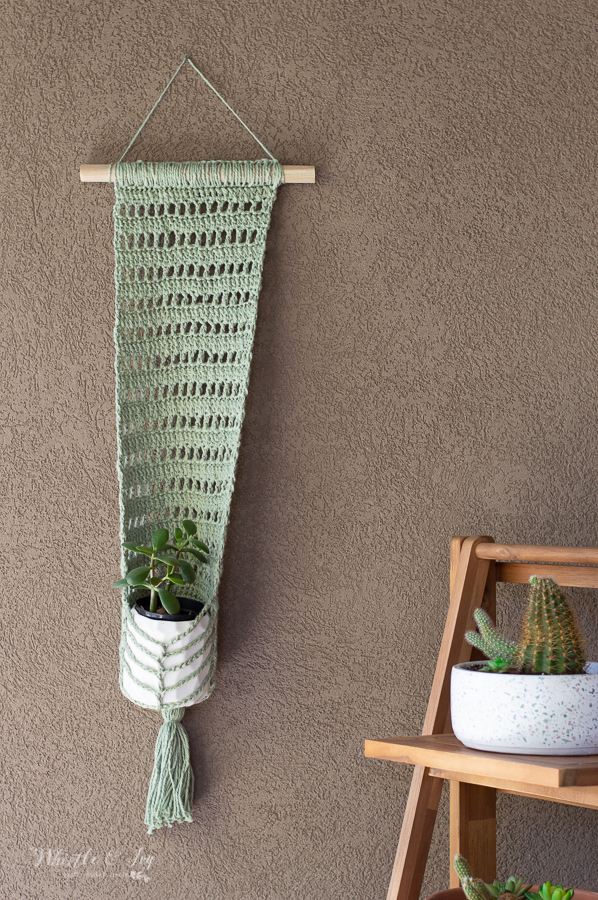
Bring some modern hippie boho vibe to your home or outdoor space with this crochet wall hanging planter. It fits a cute 4″ pot and hangs beautifully inside or outside. It has the look and feel of macrame but uses your favorite yarn technique: crochet! This article contains affiliate links which means I get a small commission at no extra cost to you. Thanks for your support!

I am slowing surrounding myself with plants. I have found a few that are very hardy; hardy enough to withstand my black thumb, and that is really saying something. I just repotted my poinsettia (they actually turn lush and green if you can keep them alive after Christmas!). I am running out of places to put them, but hubby bought me a pretty little collapsable shelf that fits several of them. Since it’s warm enough to have them outside all day and night, I have been wanting to get a bit more creative with them.
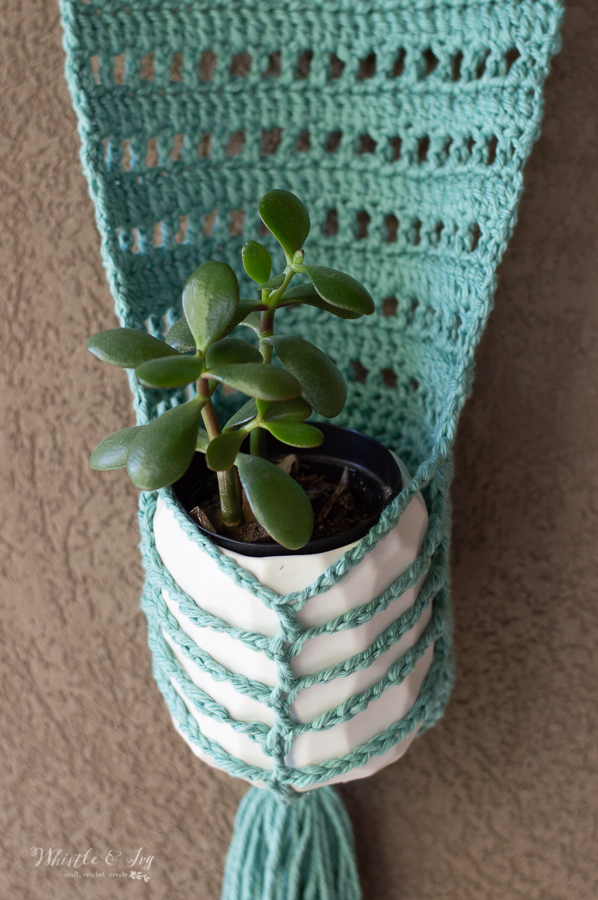
I have really been digging macrame, especially those macrame wall hangings that have a pocket to keep a plant. I am okay at working macrame, but obviously crochet is my favorite, so I though it would be fun to make something similar with crochet.
Natural fibers definitely felt right for this project. I wanted something with a boho vibe, so decided on using Billow, which is a thick-and-thin cotton yarn.
I admit, I really wanted to use an off-white color, I thought it would help the design more closely resemble classic macrame, however it was out of stock when I needed to order, so I chose a couple desert green colors.
What happy accident that I was forced to leave my comfort zone; I love the extra pop of color on my porch!
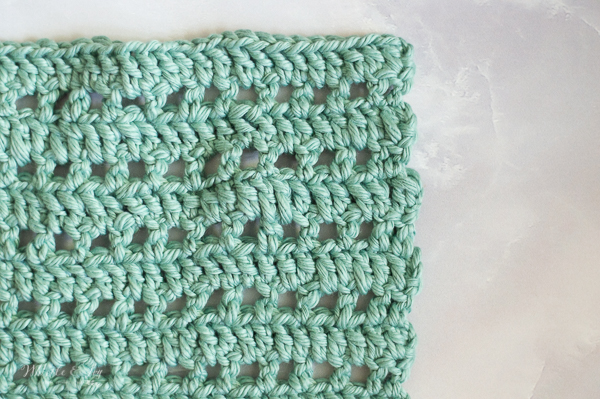
This pretty pattern had many versions during the design process, me-oh-my! I wanted it to look lacy and open-knit in the front, but I also needed it to have integrity to hold a pot.
It took a few weeks and a few nights of “sleeping on it”, but I figured it out and it turned out better than I had hoped.
With all the tweaks and changes, it really is very simple and has a hippie vibe that I love.
I have had this jade for a year, so I think I might be doing okay with it. She will get a summertime home in the crochet wall hanging planter right on my porch.

You’re tired of sifting through complicated tutorials and patterns that leave you feeling overwhelmed.
Let me help.
PICTURE THIS:
Instant access to a library of modern, easy-to-follow patterns
Gifting your handcrafted treasures to your loved ones.
Feeling accomplished by your beautiful makes
It’s time to make your crafting experience as joyful as it should be.
CROCHET WALL HANGING PLANTER
Please read: You are free and welcome to use this pattern to make and sell finished items, but do not republish/distribute/print and distribute this pattern in any way. If you are selling items made from this pattern, please DO NOT use my photos in your listings.
PLEASE read my Disclaimer before working my free patterns!
What you need: (affiliate links)
– 5.5mm Hook
– 1 Skein Billow in Celedon or Sagebrush
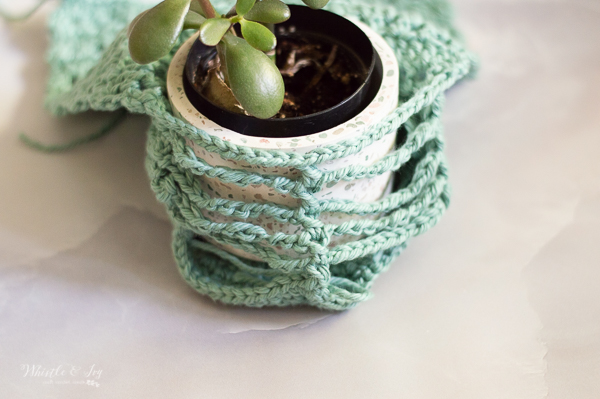
– 4″ diameter pot/potted plant
– Darning Needle
– 1/2″ or 3/4″ dowel
Abbreviations: US Terms
Ch – Chain
Sc – Single crochet
Dc – Double Crochet
Sl st – Slip Stitch
St – Stitch
Sp – Space
Gauge: 15 sc = 4″ (Gauge Pattern)
Finished Size: approx. 9″ x 14″ (you will need an extra skein to make it longer)

Looking to size up your project? Instructions are available in the printable PDF.
The written pattern below is FREE in-text. However, if you would like a pretty downloadable PDF, which also includes a brief explanation for sizing the planter up, you can get one in my Ravelry or Etsy shops. The PDF is formatted for easy crocheting on-the-go or for easy printing, it doesn’t include ads or comments.
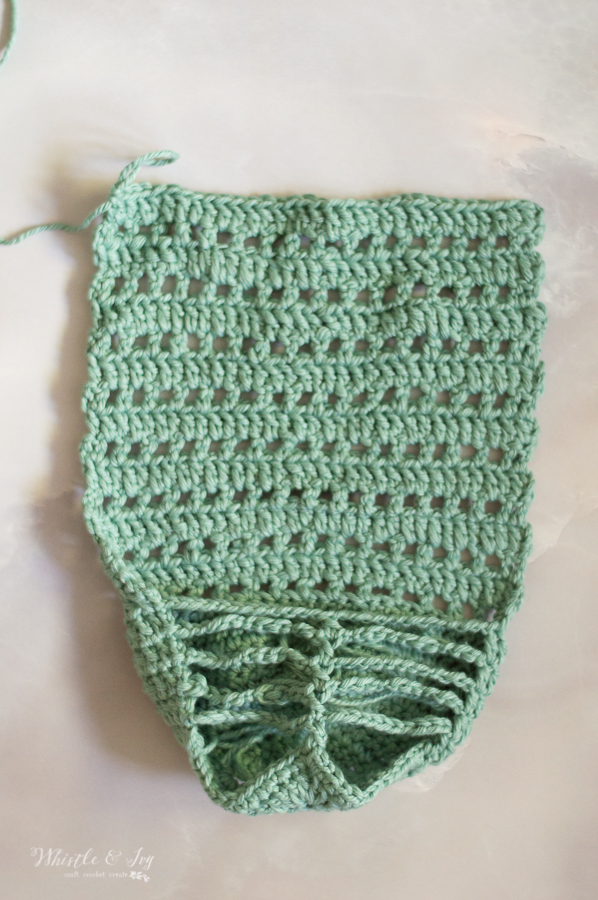
Faux Macrame Crochet Wall Hanging Pattern
Foundation Square:
Magic ring
1. Ch 2. Worked all into the ring: *2 dc, ch 2* work 4 times. Join with first st. (16 sts)
2. Ch 2. *Dc in next 2 sts. In the 2-ch space: work 2 dc, ch 2, work 2 dc.* work 4 times. Join with first st. ( 32 sts)
3. Ch 2. Dc in next 4 sts. *In the 2-ch space: work 2 dc, ch 2, work 2 dc. Dc in next 6 sts.* work 3 times. In the 2-ch space: work 2 dc, ch 2, work 2 dc. Dc in next 2 sts. Join with first st. (48 sts)
4. Ch 1. Sc in next 6 sts. *In the 2-ch space: work 2 sc, ch 2, work 2 sc. Sc in next work 10 sts.*work 3 times. n the 2-ch space: work 2 sc, ch 1, work 2 sc. Sc in next 4 sts. Join with first st. (60 sts)
Break Yarn. Join yarn at one of ch 2 spaces of one the corners.
5. – 9. Ch 2. Dc in same st. Dc in next 31 sts (make sure you work a dc in the ch-2 space as well as each sc).
*Ch 12. Dc in next ch-2 corner space* work 2 times. Join with first dc. (58 sts)
10. (you will now be working in turning rows instead of joined rows)
Ch 1. Dc in same st. *Ch 1. Sk next st. Dc in next st* work 15 times. Dc in last st. Turn.(32 sts)
11. Ch 2. Dc in same st. *Dc in next st. Dc in next ch 1 sp* repeat all across the row. Turn. (32 sts)
12. – 25. Alternate rows 10 and 11 unto you reach 25 total rows.
Don’t tie off. Set a side.
(to make piece longer, continue alternating 10 and 11 to your desired length.)
Rows 12 – 25 should be about 9 1/2″ long.
This should leave you with enough yarn leftover to sc the wall hanging to a dowel and to add a robust tassel at the bottom. A 2nd skein you can make your wall hanging longer.
CONSTRUCTION:
Prepare your dowel by cutting it about 12″ long, it should be the width of your wall hanging with an added 1″ on either side. Adjust this measurement as needed.
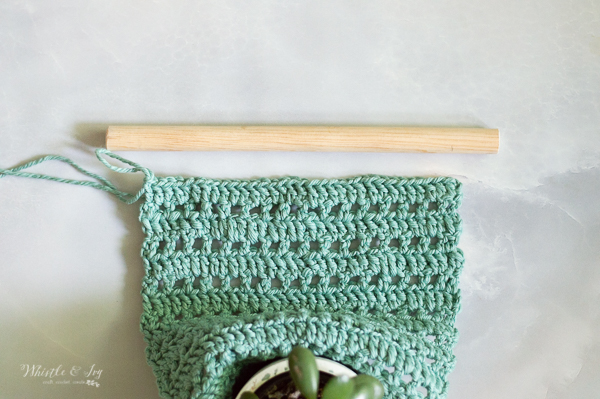
Starting where you left off, work a sc across the top of your wall hanging working around the dowel. Be sure you work loosely.
Tie off, leaving a long tail.
Wrap the tail once around the dowel and pull it through the nearest stitch on the wall hanging to secure it (so it’s not hanging just by the fabric, but by the dowel as well). Tie it on the other side of the dowel make a string to hang it from.
Weave in and clip all ends.
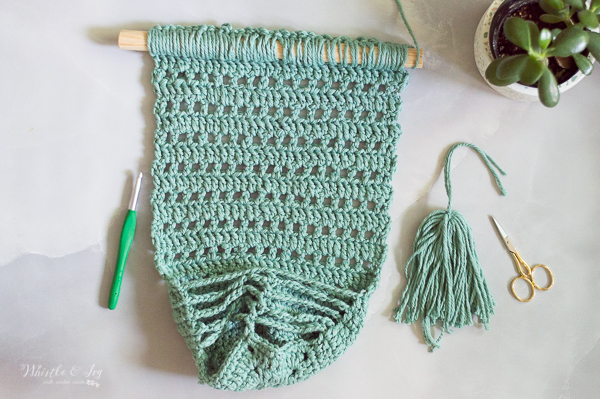
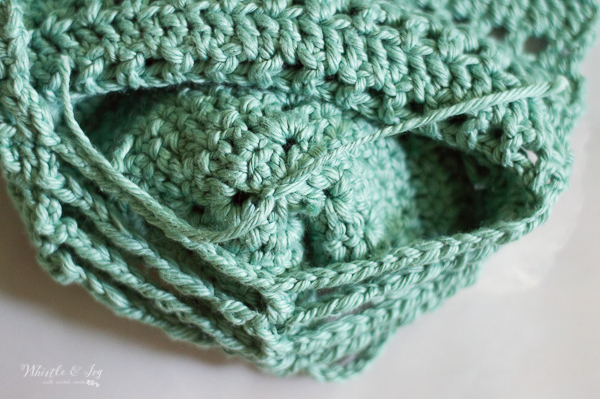
Using the rest of your yarn from your skein (or however much yarn it takes) , make a thick tassel. Tie it to the middle of the foundation square by pulling up both ends of the tie on top of the tassel through either side of the foundation square. Tie the two ends together on the inside. Clip ends.
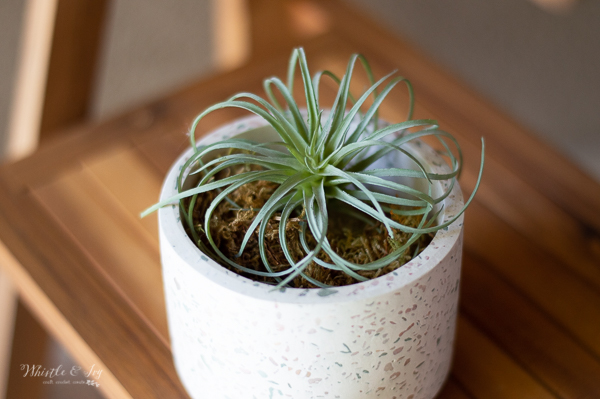
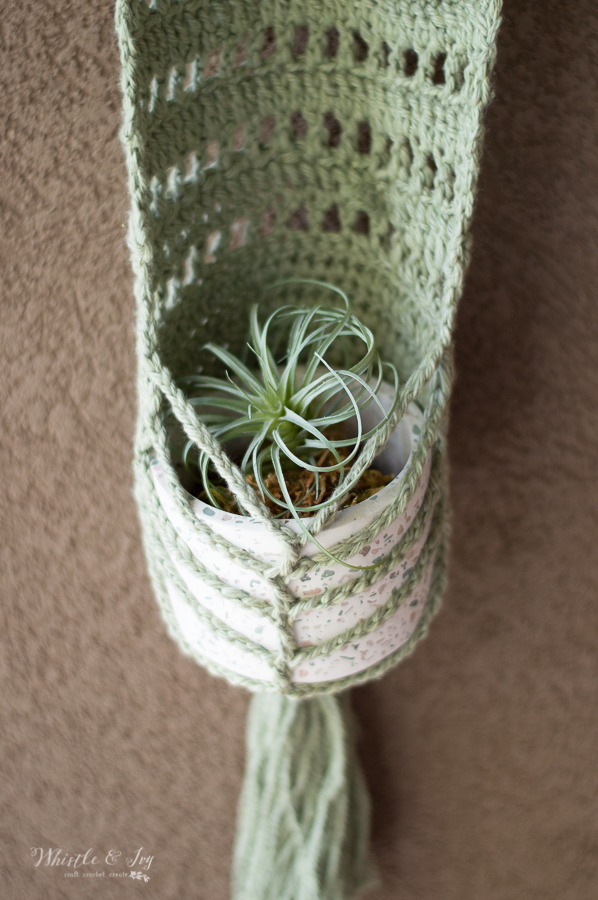
Faux plants would be a great option as well. I placed my faux air plant in some Spanish moss and it looked divine This can be an alternative idea if you are worried about hanging a heavy terra cotta or concrete planter with soil on your wall.
It took some time work out the shape and usability, but it turned out lovely. Now that all the kinks are worked out, I am confident you will find it super easy to make. You will love displaying one of your tiny green babies.
Happy crocheting!

xoxo,

I absolutely love this. I made one using your pattern but uses bigger needle and yarn. (Didn’t have required size). I was going to post a picture but don’t know how to on here. Thank you again for sharing.
Yay! I am so happy to hear this! If you have instagram, I would love to see! @whistleandivy
I love this! Thank you :)
Hi Bethany, thank you for sharing.. I Love it.. I have just the shade for it too.. burnt orange.. I’ll send a photo upon finishing this.. if it comes out right!! I may make them as gifts.. : ) how long may I ask did it take?! Not much time on my hands always busy but sneak in a few stitches here and there when I can. Take care hope all is well…
Rhonda F.
I am a rather slow crocheter, honestly, but it took me about 2 hours maybe.
So cute!! I love macrame but haven’t tried it yet so this is the perfect project for me
Thanks Hannah! This is actually not macrame, it’s crochet :)
I love this!
Thank you!