
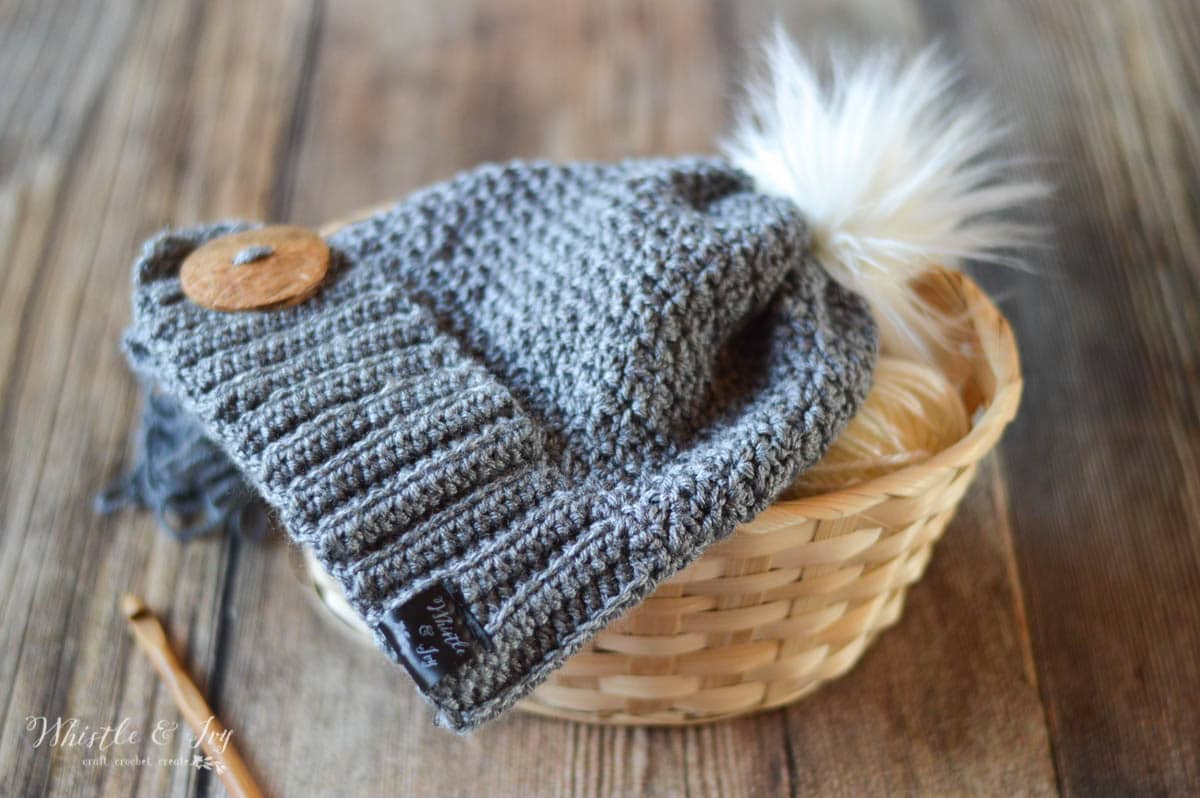
This sweet crochet hat features a lovely stitch texture and a white fur pom-pom that looks just like a little bunny tail! The fold over technique of the brim makes it extra cozy.
This post may contain affiliate links, which means I get a small commission at no extra cost to you. Thanks for your support!
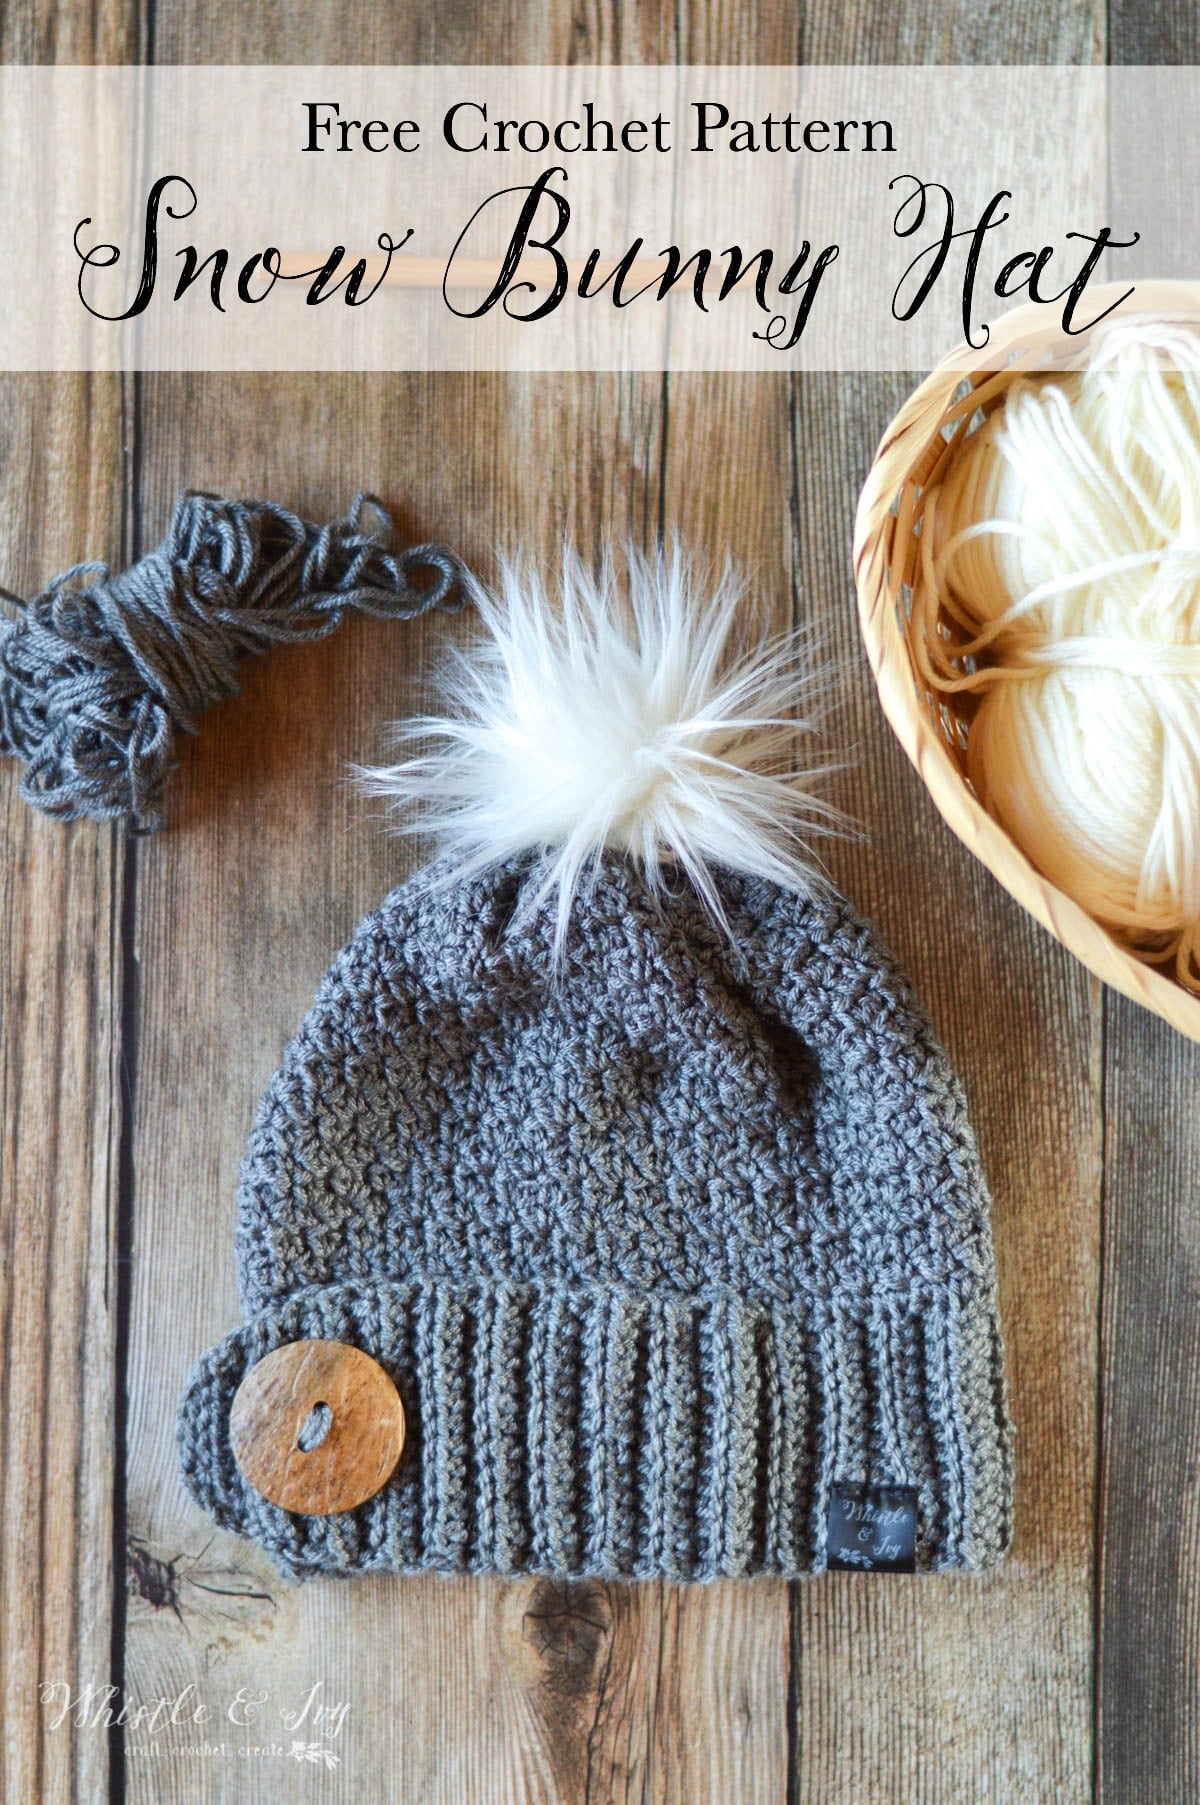
The weather here has been crazy. We are used to below-freezing temps even in the afternoon during this time of year, but it has been so warm. Like, go-outside-and-ride-your-scooter-without-a-jacket warm. This crochet hat almost feels like false advertising. However, I think that there is someone, somewhere who needs to bundle up (and most likely it will be us in April, because Utah weather is like that…), so this Snow Bunny Crochet Hat may just be the perfect crochet hat for a cold soul! Isn’t that white fur cottontail pom-pom so cute?

You’re tired of sifting through complicated tutorials and patterns that leave you feeling overwhelmed.
Let me help.
PICTURE THIS:
Instant access to a library of modern, easy-to-follow patterns
Gifting your handcrafted treasures to your loved ones.
Feeling accomplished by your beautiful makes
It’s time to make your crafting experience as joyful as it should be.
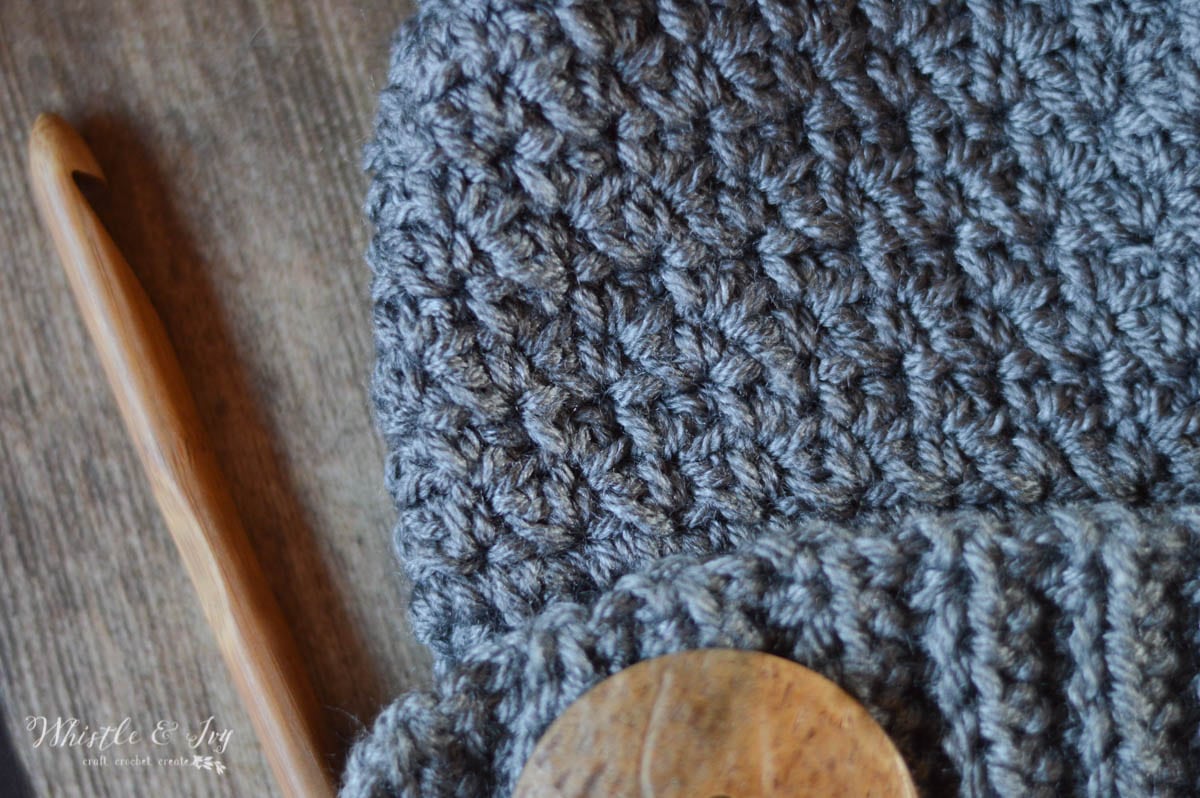
I just love the grit stitch. It has such a lovey and unique texture (that is easily achieved as well). I made my Baby Hooded Cowl with the grit stitch and it looks so pretty in that soft, silky yarn. It’s one of my favorite stitches. The beautiful texture is achieved by alternating the sc first then the dc first so the stitches alternate their direction a bit. The effect is very pretty.
SNOW BUNNY CROCHET HAT
Please remember: You are free to use this pattern to make and sell, but do not republish or distribute this pattern in any way. DO NOT use my photos in your listings. Please do share my blog links! It’s a quick and FREE way of supporting Whistle and Ivy and more free crochet patterns in the future.
PLEASE read my Disclaimer before working my free patterns!
What you need to make this crochet hat: (affiliate links)
– I Hook
– 1 Ball of Knit Picks Brava in Cobblestone Heather (Medium Weight Yarn)
– Pom-Pom (you can make a yarn or fur one)
– Darning Needle
– Tags (optional)
Abbreviations: US Terms
Ch – chain
Sc – single crochet
Dc – Double Crochet
Hdc – Half Double Crochet
Sl st – Slip Stitch
St – stitch
BLO – Back Loops Only
Gauge: 14 dc = 4″ (Gauge Pattern)

LOVE THIS PATTERN BUT HATE THE ADS?
Get an ad-free PDF pattern download! Where would you like to shop today?
Ribbed Band:
Begin with a long tail. Ch 14.
1. Hdc in 2nd ch from hook. Hdc 12. Turn. (13 sts)
2. Ch 1. Hdc in same st. In BLO, hdc in next 11 sts. Hdc in last st, going through both loops. Turn. (13 sts)
Repeat row 2 until your piece is 18″ – 19″ long. You will get this measurement by gently stretching your band and measuring the length, not the pre-stretch length. You want the hat to be snug and due to differences in yarn stretchiness, I am not providing a row count. Instead, use your measuring tape. Place a stitch marker.
Repeat row 2 for another 15 rows.
Tapered End of Band: Work these rows in BLO
1. (This row makes a button hole) Ch 1. Hdc in same st. Hdc 3. Ch 5. Sk 5 sts, hdc into next st. Hdc 3. Turn.( 13 sts)
2. Ch 2. Sk same st. Hdc in next st. Hdc 9 (be sure to work in each chain). Sk next st. Hdc in last st. Turn. (11 sts)
3. Ch 2. Sk same st. Hdc in next st. Hdc 7. Sk next st. Hdc in last st. Turn. (9 sts)
4. Ch 2. Sk same st. Hdc in next st. Hdc 5. Sk next st. Hdc in last st. Turn. (7 sts)
5. Ch 2. Sk same st. Hdc in next st. Hdc 3. Sk next st. Hdc in last st. (5 sts)
Tie off.
Fold the band over until the flat end lines up with the row you marked with a stitch marker. Using your long tail from the beginning, sew in place with a length of yarn and your darning needle.
Hat Body:
1. Flatten the band so the seam that connects the band is in the front. The flap will lay across the seam, like it’s wrapped around, not fold backward itself. Join your yarn directly opposite of the seam on the back. Working from the outside, ch 1. Sc around the top of the band, working 72 sts. Work on either the top or the bottom of the band, depending on which way you want the button and flap to lay. Be sure not to work through both the band and the flap, just work around the main band of the hat.
Note: the keep your seam from shifting, you can begin every other row with 2 sl sts, and this will keep the seam more straight.
2. Ch 1. Sc, Dc in same st. Sk next st. *Sc, Dc in next st. Sk next st* repeat all around the hat. Join with the first sc. (72 sts)
3. Ch 2. Dc, sc in same st. Sk next st. *Dc, sc in next st. Sk next st* work all around the hat. Join with a sl st. (72 sts)
4. – 17. Repeat rows 2 and 3 respectively.
Note: you can work extra or fewer rows here to adjust the slouchiness of your hat.
18. Ch 1. *Sc, dc in same st. Sk 2 sts.* work all around the hat. Join with sl st. (48 sts)
19. Ch 2. Dc2tog 24 times. Join with a sl st. (24 sts)
Tie off. Weave in ends.
Using a length of yarn, sew a loose running stitch across the remaining hole at the top of the hat and cinch closed. Tie a firm knot and clip ends. Attach a pom-pom to the top. Sew a very large button on the hat brim under the button hold of the flap.
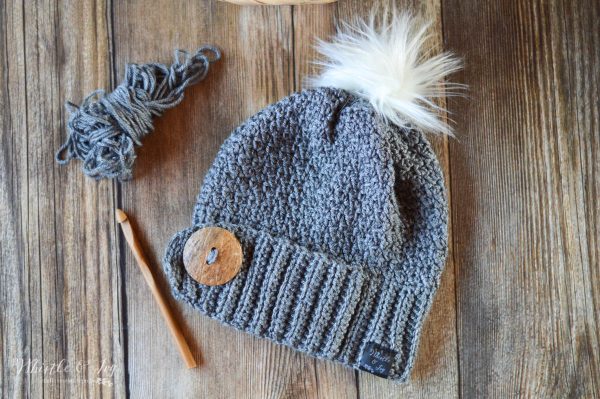
I named it the Snow Bunny Crochet Hat, and I thought the white fur pom-pom looked perfect on top! I make my own and they are easier than you can imagine, see a tutorial here.
Be sure to join our Facebook Community!


Hi,
Thank you for your pattern! What size is it?
Hi Catherine! It’s adult (women/teen)
Hi can i use a 5 size hook instead i dont have a 5.5
Be surer to make a gauge swatch so you know which hook to use. The 5.5 is only a suggestion.
Will you ever make a baby versionnof this pattern?
Possibly! Are you wanting one?
I want one. I work for a surrogacy agency and I make hats for the new babies. I would love to make this to give as gifts to the new parents.
what a loving, caring thing to do. Bless our heart for this kindness. I knot they really appreciate the, and you for making them.
Hi! Thank you for this pattern. I was wondering, what method should I use to join my yarn to the band when I am ready to begin the hat body. Thank you!
You can simply slip stitches and start with the loop on your hook.
Where did you buy your button?
Hm, I don’t recall, I am sorry! It was just in my stash.