
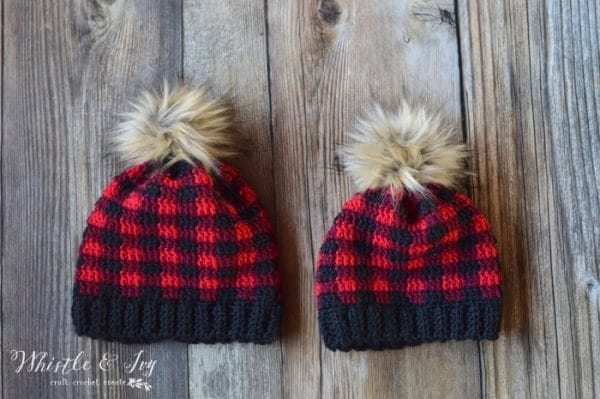
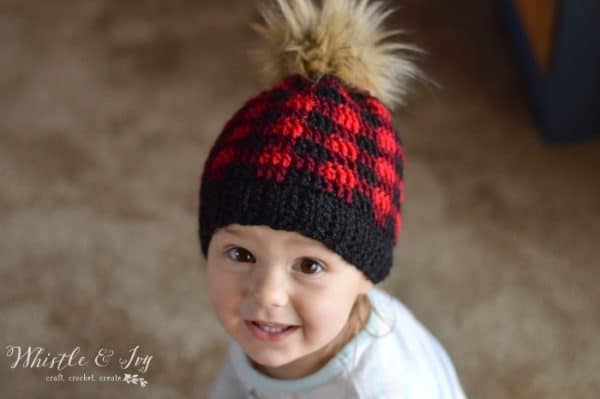
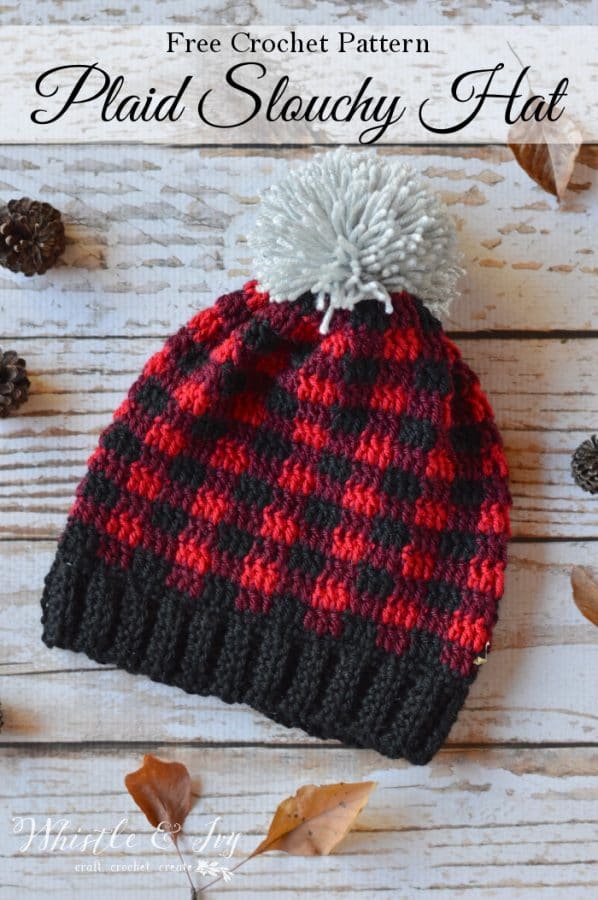
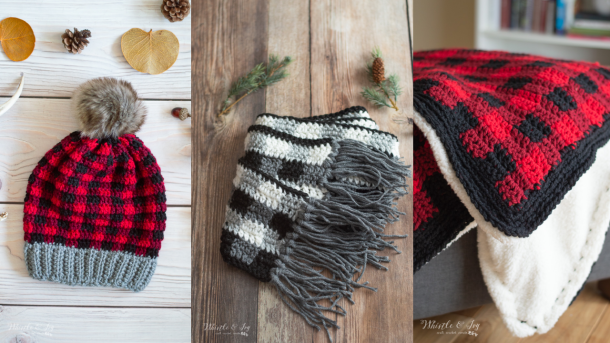
This crochet plaid hat is a classic. You need one in every color! You will love this fun and unique crochet plaid technique! Once you start crochet plaid, you can’t stop. The free pattern includes instruction for adults, but you can get additional sizing in the downloadable PDF!
This post included affiliate links which means I get a small commission if you make a purchase (at no extra cost to you!)Thanks for supporting Whistle and Ivy!

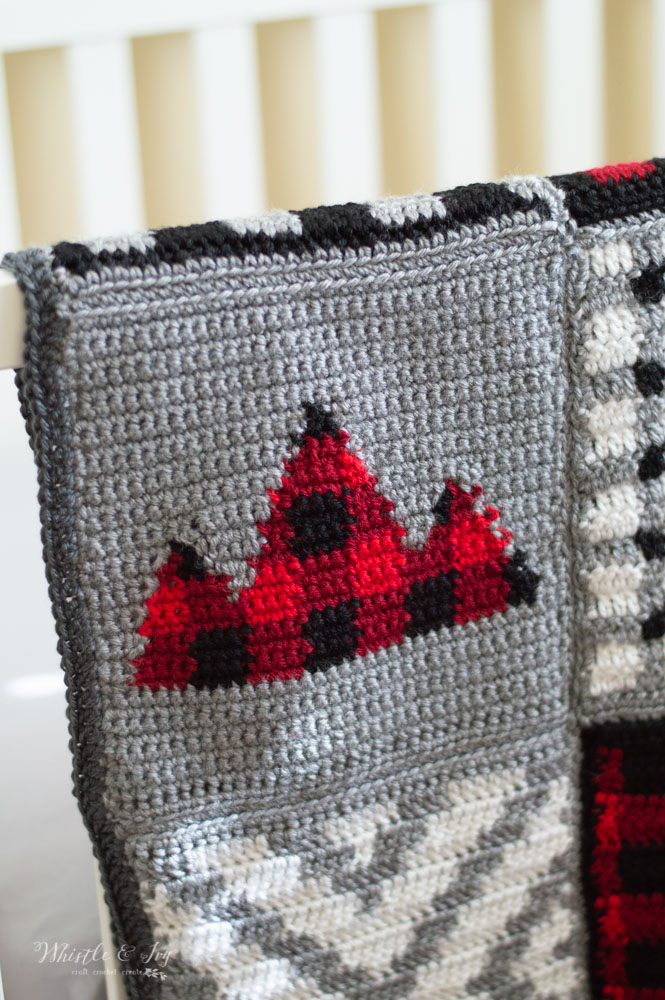
Growing up, we spent most of our holidays in the very tip-top of Utah at my Grandma’s house. She made delicious meals, personal-sized pies for each grandchild, and the most amazing cheeseball you ever tasted. It was always snowy and wonderful. My grandpa, a retired dairy farmer, also wore a plaid jacket around the house during the cold months, and I especially remember it during our Christmas get-together. Every time I see red and black checked plaid, it reminds me of those wonderful snowy Christmas’s surrounded by family and my beloved grandparents. I don’t incorporate a ton of plaid into my wardrobe (I don’t wear a lot of red), but it screams HOLIDAY to me, and I love how this crochet plaid hat turned out, perfect for this time of year!
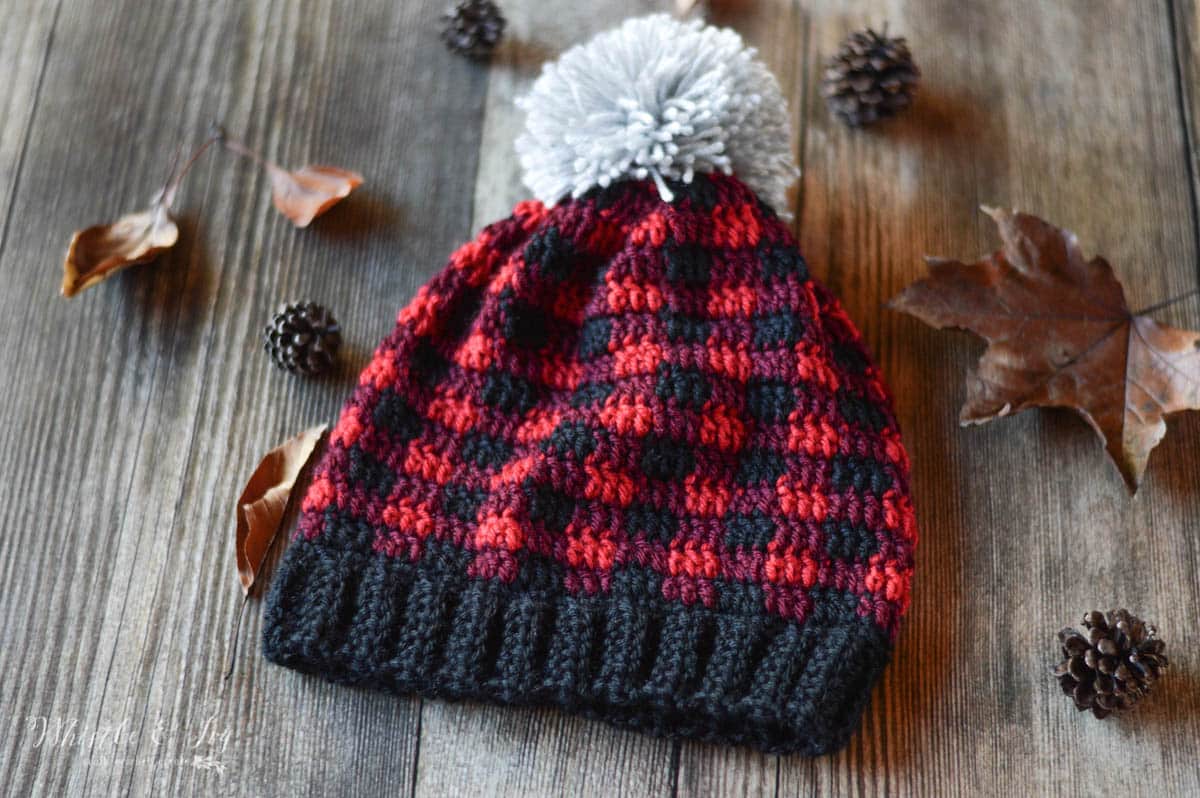
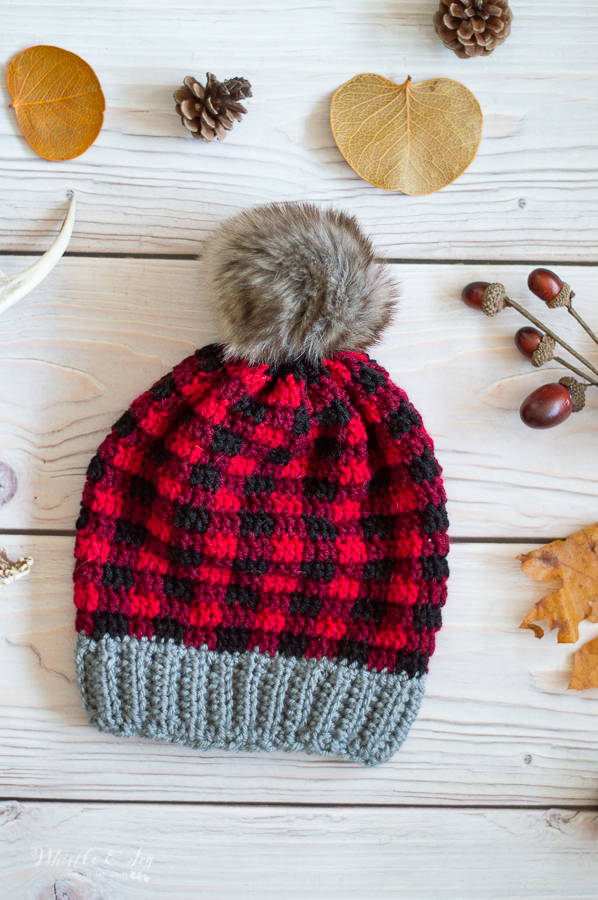
This crochet plaid hat is almost ALL dc stitches (yay!), and works up pretty quickly. The color changes can slow you down a bit, but I made this hat in just a couple hours. My first plaid hat I put a yarn pom-pom on top which was okay, but when so many people suggested adding a fur pom-pom I decided I must give it a try! Quite a winning combination, I must say.

You’re tired of sifting through complicated tutorials and patterns that leave you feeling overwhelmed.
Let me help.
PICTURE THIS:
Instant access to a library of modern, easy-to-follow patterns
Gifting your handcrafted treasures to your loved ones.
Feeling accomplished by your beautiful makes
It’s time to make your crafting experience as joyful as it should be.


CROCHET PLAID HAT – FREE CROCHET PATTERN
Please remember: You are free to use this pattern to make and sell, but do not republish or distribute this pattern in any way. DO NOT use my photos in your listings. Please do share my blog links! It’s a quick and FREE way of supporting Whistle and Ivy and more free crochet patterns in the future.
Watch a video tutorial for how to make a women’s size crochet plaid hat:
What you need:
Medium Weight Yarn (Knit Picks Brava in Red, Wine and Black, plus Dove Heather for pom-pom)
I Hook
Darning Needle
Abbreviations: (click for videos)
St – Stitch
Sc – Single Crochet
Ch – Chain
Hdc – Half Double Crochet
Dc – Double Crochet
Gauge: 14 dc = 4″ (gauge pattern)


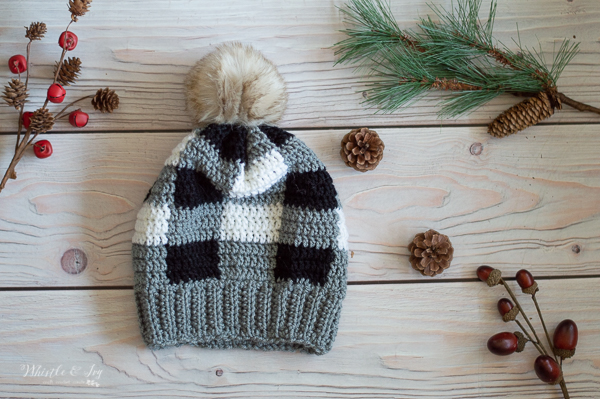
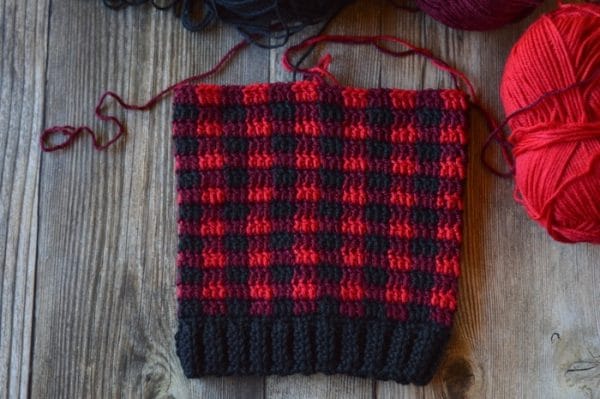
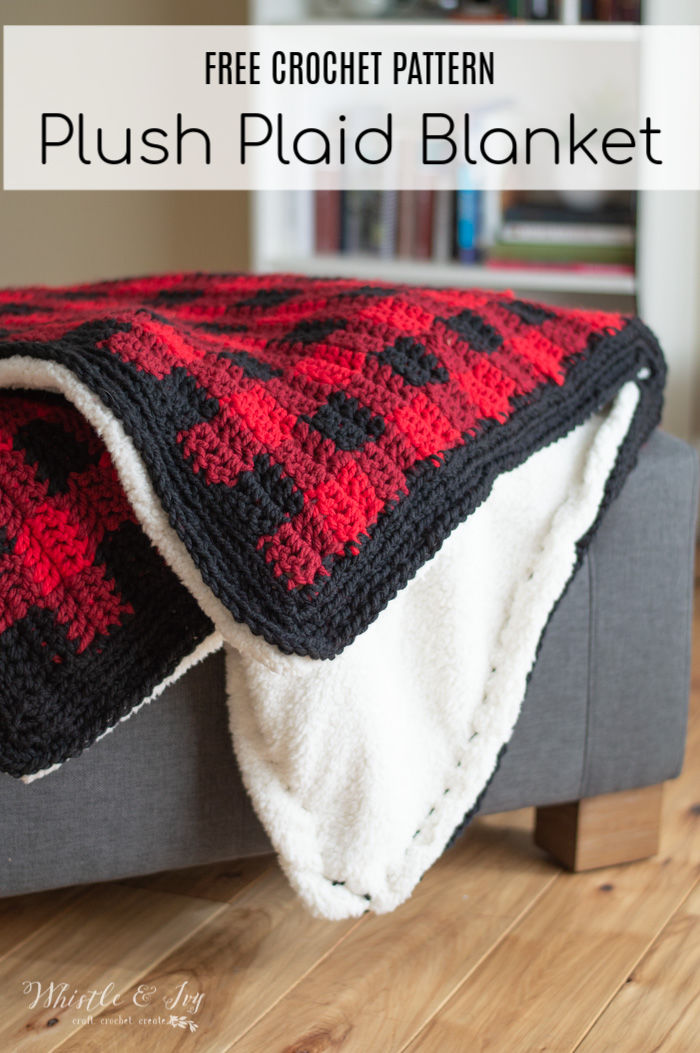
CLASSIC CROCHET BUFFALO PLAID HAT – CROCHET PATTERN
This free version includes one size: Women/Teen. If you need more sizes, consider grabbing the PDF download! It includes 6 sizes from Newborn, 6-12 months, Toddler, Child, Women, Men.
WOMEN/TEEN SIZE:
Note: The height of the hat is a slouchy fit, to make it more fitted, simply work fewer rows.
Ribbed Band (use black)
Ch 7.
1. Hdc in 2nd ch from hook. Hdc 5. Turn. (6 sts)
2. Ch 1. Hdc in same st. Hdc 4 in BLO. Hdc in last st, going through both loops. Turn. (6 sts)
Repeat row two until your band reaches about 18″ – 19″ for adult.
You will get this measurement by gently stretching your band and measuring the length, not the pre-stretch length. You want the hat to be snug and due to differences in yarn stretchiness, I am not providing a row count. Instead, use your measuring tape. Don’t break yarn.
Note: You can make the hat band longer to make the hat larger ( or visa versa). When you begin the hat body, make sure your first round is worked in multiples of 6.
Fold long piece in half and sl st up the side, making a band. Turn so the seam is on the inside and your loop is at the top.
Hat Body:
1. Continuing where you left off from the band, Ch 1 and sc in same space. Sc all around the top of the band, achieving a total of 71 sts (multiples of 6 minus 1) . Join with a sl st.
Watch this video to see why the “minus 1” in the multiples:
Join Wine.
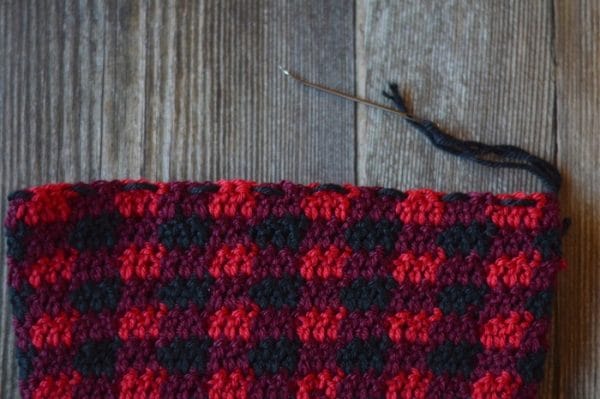
2. Ch 2. Dc in same st. Begin a 2nd dc, but finish the final pull through with black. Drop wine and carry it through the next 3 stitches. Work 2 dc with black. Finished 3rd dc with wine. Continue this pattern all around the hat. Join with a sl st. (71 sts)
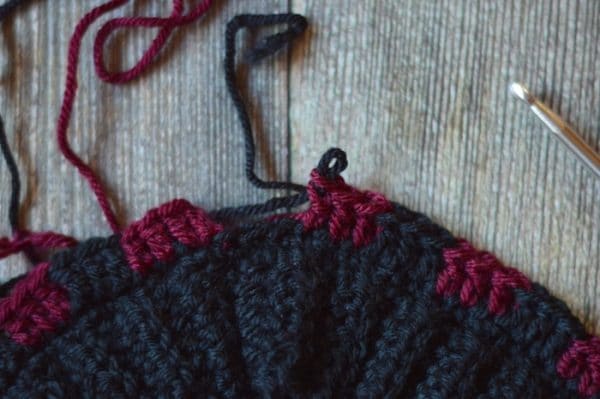
Join Red.
3. Ch 2. Dc in same st. Begin a 2nd dc, but finish the final pull through with Wine. Drop Red and carry it through the next 3 stitches. Work 2 dc with Wine. Finished 3rd dc with Red. Continue this alternating pattern all around the hat. Join with a sl st. (71 sts)
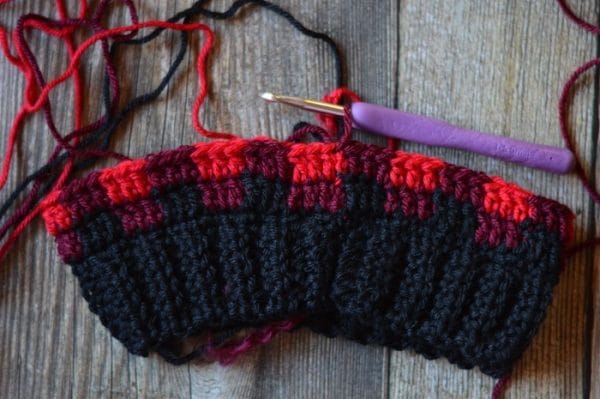
4. – 15. Repeat rows 2 and 3 respectively until you reach 14 total rows.
Tie off your yarn and weave in ends.
(If you still need help, I have an extensive plaid course. You can enroll in Learn Crochet Plaid course here, OR you can join my all-access pass and get ALL my patterns, ALL downloads, ALL videos and MORE!
Alternately, to give your hat a bit more stretch, you can carry the yarn behind instead of working it inside. This gives you the strings on the inside of the hat, however, so you can decide which way you prefer.
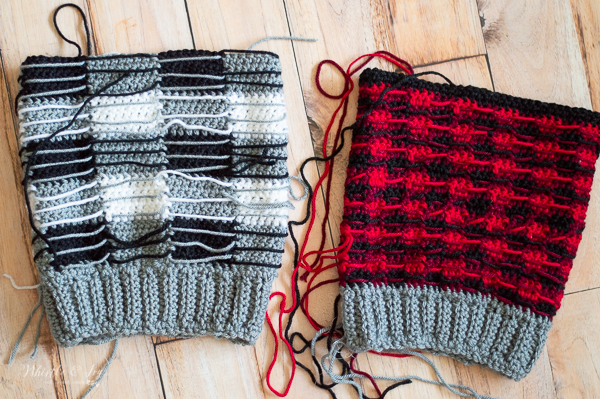
You can also make the hat with larger-sized color blocks. To do this, just make sure your count will work with 72 sts (minus one). For the black and white hat, I made my blocks 8 sts wide, 3 rows tall. The multiple needs to be 16 (the width of two blocks) so you don’t end up with two blocks of the same color meeting up at the seam.
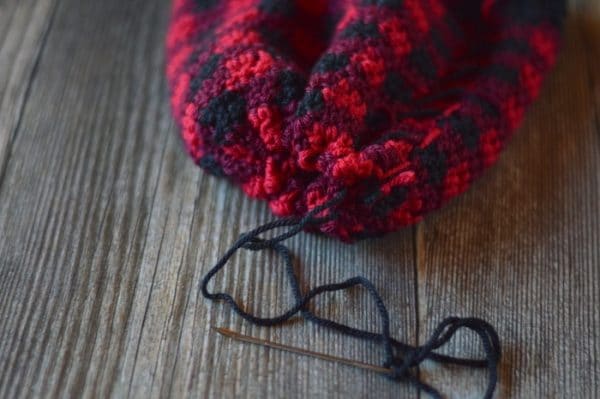
To close the hat, cut a length of yarn longer than the circumference of the hat and thread it through your darning needle. Turn your hat inside-out. Sew a running stitch all around the top of the hat.
Once you reach the beginning, pull the thread tight cinching the hat closed. Tie a firm and sturdy knot. Clip ends. Turn hat right-side out.
Make and attach a pom-pom, you can make it with yarn or fur or plush sherpa! Learn how here.
Are you mad about crochet plaid?!
I hope you love your new crochet plaid hat :)
xoxo,

Any thoughts on how to convert this pattern into one of the messy bun hats? Or if it would even be possible?
yes, you can work fewer rounds of the plaid stitch and work a few rounds of decreases.
How much smaller do you need to make the band so that it fits a child? Say 6 years old
I have a pattern for children’s sizing here: http://www.whistleandivy.com/2016/12/toddler-and-child-crochet-plaid-hat.html
I would love to make this in a newborn. Any thoughts on how big to make the band? I want the hat about 14=16″ if that makes sense. I’m not sure how to shorten it or make it smaller. this is a great pattern. Love the plaid Thanks
I have a toddler version here, you can maybe make it with a smaller hook, but to make its smaller, work less rows on the band, and make sure the body of the hat is in multiples of 6.
http://www.whistleandivy.com/2016/12/toddler-and-child-crochet-plaid-hat.html
thank you so much for the link and help. Can’t wait to try this out
You’re welcome!
Very woodsy indeed! I’m up in the Northwest, and plaid is quite popular here as well. Thank you for sharing this pattern. :)
You’re welcome!
I am working on my 2nd one but changed to greys and black on the second. The result on the red ,wine and black is great and the grey is pretty good too. I made a mistake on not doing multiple of 6 and it shows but will wear it to the back . The lesson is pay attention to the instructions! To close the top I chained a strand and wove it through. Mine is slouchy and I really like it. Thank you.
I want to make one in gray too! I bet it’s super cute. Glad you like the pattern :)
What size should this hat fit when completed? Women’s?
Thanks
Yes, women’s (it’s in the title).
omg!!!! now I feel Silly lol. Thank you :)
lol! No problem :)
I love the plaid. It’s so sharp! I only wish I could make it from the top down. Any idea on how I would do that? Thank you for the pattern.
You know, I am not sure! Doing the increases while keeping the square check patterns would be a bit tricky, but I will see if I can figure it out.
I started to make one,but I a little confused about the band part,from having 46 stitches how can you ended having 72? I made theasy Increase every 6,but still don’t get the 72.do I need to make more increases every how many stitch????
Sorry! It’s a bit hard to explain. It depends on where you are working your stitches. I work doubt 3 sts per 2 rows or hdc. If you work that any stitches and you increase every 6 is should get you there. Try this, and count your stitches when you are halfway around to see if you are on track.
Just finished my first hat! It’s beautiful and was so easy to do, using the same colors here. Looks more complicated than it really is. Very nice pattern and great instructions! Now I’m digging through my stash to see other color combinations to use!
Thank you! So glad you liked it!!
Hi! I love this hat it is sooo cute! I’m really new to crocheting and want to know what -46 ch. 1 mean. I don’t know what the negative 46 means.. can you help me out?
It means rows 2 through 46 :)
Love this hat!!. Thank you. Is definitely on my To Do List. I wish I could figure out how to make a scarf without the back side looking messy!! Any ideas anyone??
I have a pattern coming soon! Plaid Week will be Dec 5- 9 with lots of fun plaid ideas :)
Woo hoo! Looking forward to it. Thank you.
:D
I did mine without a pompom it looked cute. just pull it tightly as per her last step. If there is still a hole you can sew it up tight by grabbing a few back loops using a needle and same color yarn. do this with the hat wrong side out of course.
I love this! and want to try it. I’m a little confused. When you say “carry it through the next three stitches” do you mean bring the yarn behind your new stitches, or join it into the new stitches? So does the wrong side have some short lengths of yarn that are not worked in? Like loops?
It means to lay your yarn behind your two loops and work it within the stitch so it is hidden. Does that make sense?
Do you have a knit pattern for a slouch hat??
I don’t really knit, I am sorry! I can do a knit stitch washcloth and that is about it!
Hi! If I add 6 to my ribbed brim, how many sc do I have to put for the start of the hat? Thanks!
The body of the hat needs to be in multiples of 6.
Hi, this might be a silly question but when you slip stitch at the end of the round, does it go into the top of the chain 1 and 2 or into the 1st sc and dc?
Not silly at all! It goes into the first st of the round. (the ch doesn’t count)
Ok, thank you!
This hat is adorable! I am thinking about making it without the pom pom. Do you have any suggestions on how to finish off the hat, and still have it look clean? Thank you so much for this beautifully written pattern :)
Thank you! The only way I can think is to do maybe 3 rows without the color casing and work increases.
What an adorable pom-pom hat Bethany. I love the mix of colors. Do you sell these?
Welcome by and linkup with my brand-new, recent Thursday Moda. Come share your latest posts and style with me and my readers. Thanks and enjoy the weekend!
http://eleganceandmommyhood.blogspot.com/2016/11/the-6-remix-neutral-gray-plaid-blanket.html
I’m pretty new at crocheting. So would u have a link on a tutorial on how to do the plaid pattern
I don’t have one yet,but I am hoping to get it finished next week.
Can you just use 2 colors or do you have to have 3? I am using dark purple instead of your black and light purple instead of your wine. I don’t know what to use instead of your red.
You need three colors to make the plaid pattern. You could use black, dark purple instead of wine, and light purple instead of red?
THank you! I picked grey. I looks great. How can we share our finished projects with you?
You can share it on my Facebook page, or tag me on Instagram! @whistleandivy
When crocheting this left handed, would I turn the band so the seam is on the outside instead if in? I hope the question makes sense. I’ve just found some stuff work up backwards for us lefties.
That depends. When your working left handed, is your stitch facing you or facing away from you? Would you turn the hat inside out when you are finished, or would it be right, side out? The seam should be on the same side as the wrong-side of the stitches.