
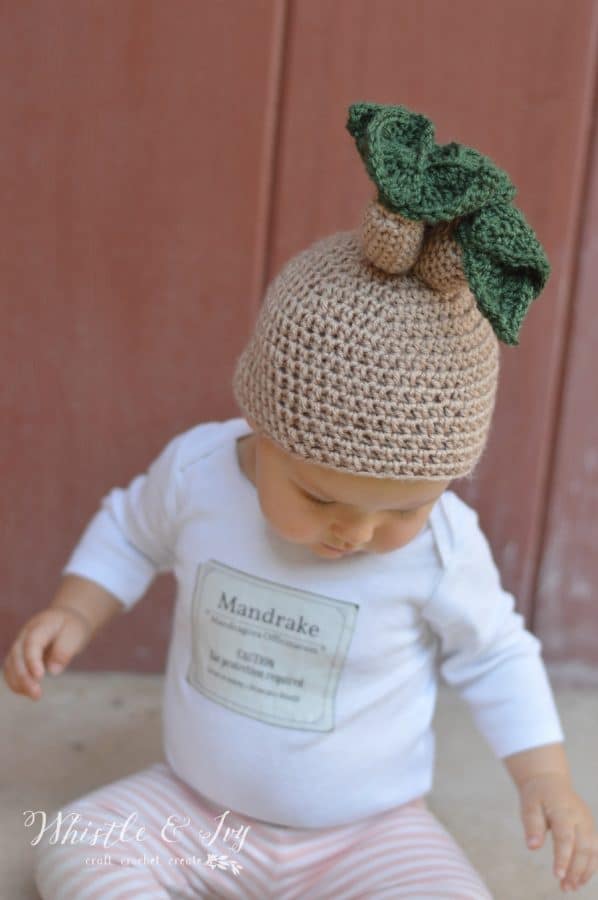
This darling crochet mandrake hat makes an easy and cute Halloween costume for baby! Remember, ear protection required! This pattern PDF includes sizing from newborn to 12 months, as well as an antique-style mandrake label, perfect for a baby onesie or to print and place on a pot.
[This pattern has been updated! For the older version, scroll to the bottom.]
This post may contain affiliate links, which means we may get a small commission if you make a purchase, at no additional cost to you. Thank you for your support!

It’s hard to believe the baby in these old photos is a tween now! My gosh, when you are told how fast the time flies when those little ones are tiny, you don’t believe it until it finally happens to you. This is Sis at 11 months celebrating her first Halloween wearing her very first Halloween costume! It was pretty darn easy. I made her a crochet mandrake hat, and ironed an image onto a plain onesie.
Still one of the easiest costumes I have made any of my kids.

The mandrake hat design is simple enough; a basic hat with stems and leaves attached at the top. It ended up being a bit top-heavy, but worked great for her little costume. I dressed up as a student with a house scarf and earmuffs, and I carried her around as my costume accessory. Everyone thought we were an adorable pair!

You’re tired of sifting through complicated tutorials and patterns that leave you feeling overwhelmed.
Let me help.
PICTURE THIS:
Instant access to a library of modern, easy-to-follow patterns
Gifting your handcrafted treasures to your loved ones.
Feeling accomplished by your beautiful makes
It’s time to make your crafting experience as joyful as it should be.
Since, then, however, I have given this mandrake crochet pattern a makeover. The new design has a cleaner look. The hat is now thicker and includes ear flaps for added warmth and staying power. I also added additional sizes to the pattern digital file as I had been asked quite a few times over the years to make a newborn size available.
For anyone feeling nostalgic and would like to continue making the original version, it will remain available on this page. Scroll down past the new pattern to see it.
I also re-designed the mandrake label. The label is included in your digital file purchase and has two versions: a full color “antique paper” label png, as well as a plain transparent black png.

CROCHET MANDRAKE BABY HAT – FREE CROCHET PATTERN
Please remember: You are free to use this crochet mandrake baby hat pattern to make and sell, but do not republish or distribute this pattern in any way. DO NOT use my photos in your listings. Please do share my blog links! It’s a quick and FREE way of supporting Whistle and Ivy and more free crochet patterns in the future.
What you need: (affiliate links)
– 4mm, 6mm, 7mm
-Medium Weight Yarn ([Lion Brand Heartland)]
– Polyfil
– Darning Needle
Abbreviations: US Terms
Ch – chain
Sc – single crochet
Dc – Double Crochet
Hdc – Half Double Crochet
Sl st – Slip Stitch
St – stitch


MANDRAKE BABY HATS – CROCHET PATTERN
$5.99
This cute mandrake hat is worked with worsted weight yarn and includes 3 sizes from newborn to 12 months. Included in your purchase is a mandrake label png image file!
6- 12 MONTHS
16.5” circumference
7 mm hook (suggested)
[check gauge after round 2]
Begin with magic ring:
1. Ch 1, work 10 sc into ring. Join with a sl st. (10 sts)
2. Ch 1, work 2 sc in each st. Join with a sl st. (20 sts) [2.5″ diameter]
3. Ch 1, *sc in next st, work 2 sc in next st* work 10 times. Join with a sl st. (30 sts)
4. Ch 1, *sc in next 2 sts, work 2 sc in next st* work 10 times. Join with a sl st. (40 sts)
5. Ch 1, *sc in next 4 sts, work 2 in next* work 8 times. Join with a sl st. (48 sts)
6. – 16. Ch 1, sc in each st. Join with a sl st.
(40 sts)
Tie off.
FIRST EAR FLAP:
Join yarn in the 6th st to the left of the join.
1. – 2. Ch 1. Sc in next 12 sts. Turn. (12 sts)
3. Ch 1. Sc2tog. Sc in next 8 sts. Sc2tog. Turn. (10 sts)
4. Ch 1, sc in each st across. Turn. (10 sts)
5. Ch 1, sc2tog, sc in next 6 sts, sc2tog. Turn. (8 sts)
6. Ch 1, sc2tog, sc in next 4 sts, sc2tog. Turn.
(6 sts)
7. Ch 1, sc2tog, dc in next 2 sts, sc2tog. Turn. (4 sts)
8. Ch 1, sc2tog twice. (2 sts)
SECOND EAR FLAP:
Join yarn in 17th st to the right of the join.
Repeat First Ear Flap instructions.
Don’t tie off.
BORDER: (after both flaps are completed)
Turn. Ch 1.
Continuing where you left off, work a round of sc around the bottom of the hat and going around each of the ear flaps; work 2 sc in each corner of the ear flaps. Join with the first st of the border.
Tie off.
SMALL LEAF:
(Make 4)
Work with 1 strand, use 4mm hook.
Begin with ch 9
1. Sc in 2nd ch from hook, hdc in next ch, dc in next 2 chs, hdc in next ch, sc in next 2 chs. (Sl st, ch 1, sl st )in last ch.
Working from the other side of the ch:
sc in next 2 chs, hdc in next ch, dc in next 2 chs, hdc in next ch, sc in last ch. Join with first sc using a sl st. (17 sts)
Leave a long tail, weave in beginning tail.

LARGE LEAF:
(Make 4)
Work with 2 strands held together, use 6mm hook.
Begin with a ch 10
1. Sc in 2nd ch from hook, hdc in next ch, dc in next 3 chs, hdc in next ch, sc in next 2 chs. (Sl st, ch 2, sl st) in last ch.
Working across other side: sc in next 2 chs, hdc in next ch, dc in next 3 chs, hdc in next ch, sc in last ch. Join with first sc using a sl st. (19 sts)
Leave a long tail, weave in beginning tail.

STEM:
Use 1 strand and 4mm hook, worked in continuous rounds
Begin with a magic ring
1. Ch 1, sc 8 into ring. Place stitch marker and move up with each round. (8 sts)
2. *Sc in next st, work 2 sc in next st* work 4 times. Join with a sl st. (12 sts)
3 – 7. Sc in each st around. (12 sts
)
8. Sc in next st, work 2 sc in next st* work 6 times. (18 sts)
9. Sc in each st around. (18 sts)
Sl st into next st, tie off leaving a long tail.

CROCHET MANDRAKE HAT CONSTRUCTION
Using the tails on the bottom of each LARGE leaf, pull each tail through the top center of the stem by threading each onto your darning needle and sewing downward.
Once all tails are through the top of the stem, thread one of the tails onto your darning needle and push the needle back up so you can work with the tail from the top.

Proceed to sew the sides of the leaves together where they touch each other at the bases. This helps stabilize the leaves, and minimize them flopping around. Additionally, as you are going along, sew the underside of each leaf to the top of the stem, just below each leaf.
Use the additional tails as needed until your leaves are secure.

Next, attached the smaller leaves by pulling the tails of each leaf down the center, same as the large leaves. Orient them so they are in the spaces between the large leaves.

Using your tails one at a time as needed, sew the sides of the leaves together where they touch each other at the bases. As you sew around, tack them to the larger leaves below them for additional support and structure. Next, stuff the stem as firmly as you can. Pin to the top of the hat, an inch or so in front of the crown.

Sew your stem in place with a neat overcast stitch, which can be done by inserting the tip of your needle under 2 or so of the closet loops in your fabric, and up and out of the base of the stem, repeated until your stem is sewn firmly.
Because the hat is worked with 2 strands, you can sew in place catching loops just on the surface of the hat instead of going all the way down through the entire thickness of the hat.
Finish by making sure all tails are weaved in and clipped.


ORIGINAL VERSION:
Size 6-12 months Hat:

Start with Magic Ring or 3-ch loop.
1. Hdc 8 inside the ring. (8 sts)Join with a sl st.
2. Work 2 hdc in same st. Work 2 hdc in next 7 sts. (16 sts) Join with sl st.
3. Ch 1. Hdc in same st. Work 2 hdc in next st. *Hdc in next st, work 2 hdc in next st* work 7 times. (24 sts) Join with a sl st.
4. Ch 1. Hdc in same st. Hdc in next st. Work 2 hdc in next st. *Hdc in next 2 sts, work 2 hdc in next st* work 7 times. (32 sts) (3 “diameter) Join with sl st.
5. Ch 1. Hdc in same st. Hdc in next 2 sts. Work 2 hdc in next st. *Hdc in next 3 sts, work 2 hdc in next st* work 7 times. (40 sts)Join with sl st.
6. Ch 1. Hdc in same st. Hdc in next 3 sts. Work 2 hdc in next st. *Hdc in next 4 sts, work 2 hdc in next st* work 7 times. (48 sts) Join with with a sl st.
7. Ch 1. Hdc in same st. Hdc in next 4 sts. Work 2 hdc in next st. *Hdc in next st 5, work 2 hdc in next st* work 7 times. Join with sl st.(56 sts)
8. – 17. Ch 1. Hdc in same st. Hdc in each st all around the hat. (56 sts)
Join with sl st.
Tie off.
Leaves: Make 7 (or more)
1. Ch 12. Sl st in 2nd ch from hook. Sc in next 2 chs. Hdc in next ch. Dc in next 5 chs. Hdc in next ch. Sc in last ch. Ch 1. Working across other side, sc in same st. Sc in next st. Hdc in next st. Dc in next 5 sts. Hdc in next st. Sc in next st. join.
2. Ch 2. Sk same st. sc in next st. Sc in next st. Hdc in next st. Work 2 dc in next 5 sts. Hdc in next st. Sc in next st. Ch 1. Sl st in next st. Tie off.
Stems: (make 3)
Start with a magic ring.
1. Hdc 12 in ring. Join with sl st.
2.- 8. Ch 1. Sc in same st. Sc in next 11 sts. Join with sl st. Leave a long tail.
Construction:
Stuff each stem with polyfil. Using the tail, sew the stems on the top of the hat. Sew them a bit forward on the hat, and not perfectly centered on the first round.
Sew on the the leaves in any manner that works for you. Sew the base of the leaves to the stem. To keep the stems upright, baste stitch the leaves together with a few strategically places stitches. This keeps the hat and roots upright and sturdy.
xoxo,


Might you have suggestions for 3-6 month size?
Mandrake baby hat
Hi Kristy! I’m actually working on getting this hat resized right now!
I made this! Thank you for the pattern.
Yay! you are so welcome!
Hi! I found this pattern and I really loved it especially since my aunt LOVES Harry Potter, I am making it for my baby cousin. I am pretty new to crocheting, and in your video tutorial on how to do the hdc, it was only in chain stitches and I was wondering how you do it in a regular round- Do you just go through the whole stitch or just the front loop? Thanks!
Hi Gracie! It depends on the pattern, but normally you will work through both loops on top. For the mandrake pattern, you will work through both loops! Please let me know if I can help with anything else!
Thank you so much I really appreciate this!
You are very welcome!
Haven’t trouble with the leaves. Do you have a video for leaves?
I don’t Rita, I’m sorry! Which part is tripping you up?
Hello! What hook size did you used for this project?
4mm G hook
I cannot for the life of me make the leaf pattern look like leaves :(
I tried turning the piece between step one and two and it just came out like a rectangle and I tried going in a round and I just got a half circle
Can you maybe provide some additional details? I’m not really sure how they are supposed to come out from the photos
Hm, this is interesting! You are working it in the round, are you working across the other side of the chain? The chain should be down the middle, like the middle vein on a leaf.
I also struggle with the leaves. So for the first part of step 1 I use one of the loops from the chain. For the second part of step 1 (after “Working across other side”) I use the second loop of the chain. However, these are only 10 stiches, not 12. Where/how do I join and where does step 2 continue?
You start with a 12 ch foundation, but when you sl st into 2nd ch from hook, your piece will be 11 sts long, as you lose one ch off the foundation when you began your round. The sc, ch 1, sc counts as the last st of the first side and the first st of the second side, which leaves 10 remaining sts for the 11 sts along each side. Does that make sense?
Not really, sorry! Close ups of one leaf or the criticle steps might help…
But all my results with different tries end up looking somehow like leaves, so I will just use them ;)
It is nature (and magic) so no need to be strict :D
Thanks for trying to help!
I tried printing the label on transfer paper and it won’t print clearly. Do you think it’s the paper? I’ve never used transfer paper before.
It’s possible! I printed the same exact thing and you see see the result on the onesie. Is it blurry or is it faint?
Por favor necesitaria este tutorial en español. Muchas gracias.
I know this has been awhile since this pattern was submitted, but I’m having trouble with the leaves. Would someone mind posting a close up picture of their leaves??
I don’t have a close up, I am sorry! How can I help?
Do I sew two leaves together to make one leaf? I followed the pattern and it doesn’t look like a complete leaf- if that makes sense.
Hm. It should look like a leaf on it’s own! Can you share a photo so I can assess the problem?
This comment box won’t allow me to post a photo.
I think I got it- it didn’t say if I was supposed to keep going in a round or if I turn for round two. When I went in the round it looked better
To modify for newborn size, would I use a smaller hook and reduce by a couple of stitches in each section of the instructions? Any other suggestions? My daughter has requested these for newborn photos of her twins :)
Hello!
The trick to perfectly sized hats is the circumference! You will want to make a circle with a circumference of about 12″. To find the circumference of your circle, you will take the diameter and multiple it by PI.
I hope this helps!
Melissa, how did using a smaller hook and reducing stitches work out for you? I am just starting this for project for myself. My baby will be very fresh for halloween!!
I just made one sized down for an infant. I used the same size hook, but only followed the pattern to Row 5 (40 stitches), then I added 7 additional rows for a total of 12 and it measured very close to the other newborn hats I’ve done.
Thank you.
I would love to make one of these for my friend who is due a baby in September, she just adores all things Harry Potter. How much of the Almond colour is required?
Thank you! You will need less than one skein.
This has to be one of the cutest baby costumes I’ve ever seen! So adorable and fitting!
Thank you so much Celeste!
what a great idea! So cute too! Thanks for sharing at the #HomeMattersParty
Thanks so much!
This is such an amazing idea! Thanks for sharing it. I’m Anita visiting from Handmade Hangout Link Party.
Thank you so much! Thanks for visiting me :)
If that’s not the cutest hat…(and baby)!
Thank you so much Cynthia!
So cute! Thanks for sharing.
Thank you!
That is the cutest thing ever!!! Would make a great hat for a newborn photo shot.
Thanks so much! That is a great idea :)
Aww…this is such a cute hat. Do you have a panda pattern btw? My daughters love panda, and I’m thinking to make a crocheted hat pattern for her.
Thanks so much! I don’t have a panda pattern, so sorry!
When I first saw the link, I thought “WHY would anyone make a mandrake hat for a baby?” Historically, mandrakes were thought to be an aphrodisiac! But ok, a baby mandrake and the two of you wearing earmuffs – that’s cute. :)
Haha! I am glad you came around to the idea :)
Oh, this is just too cute!
Thanks so much Emily!