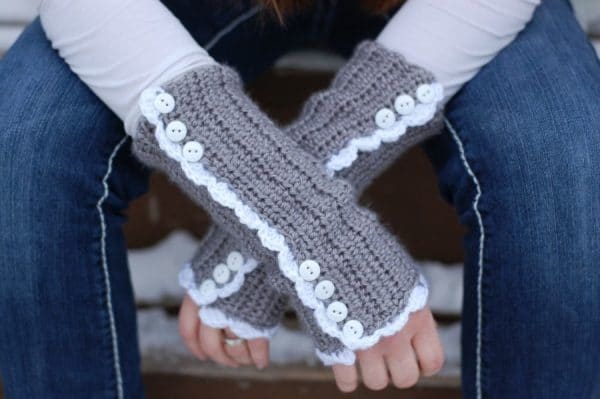
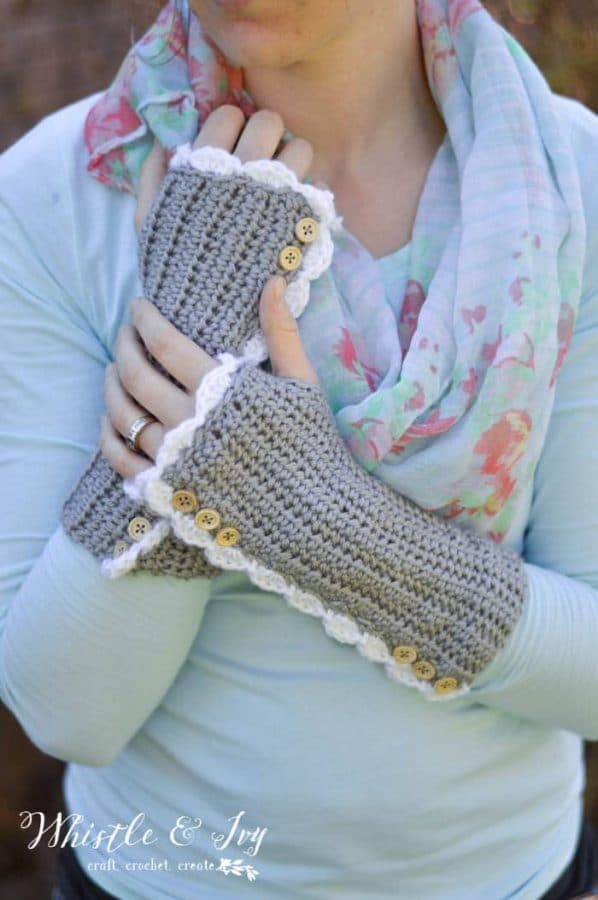
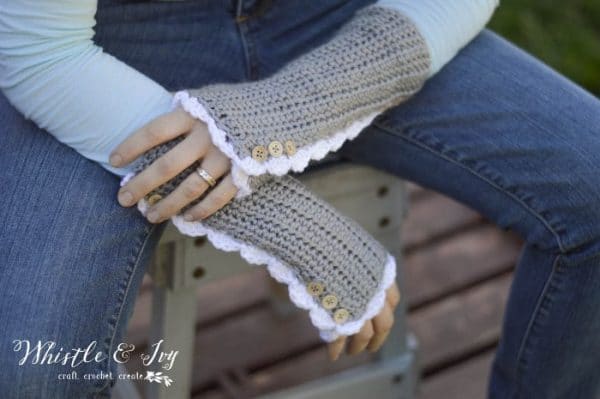
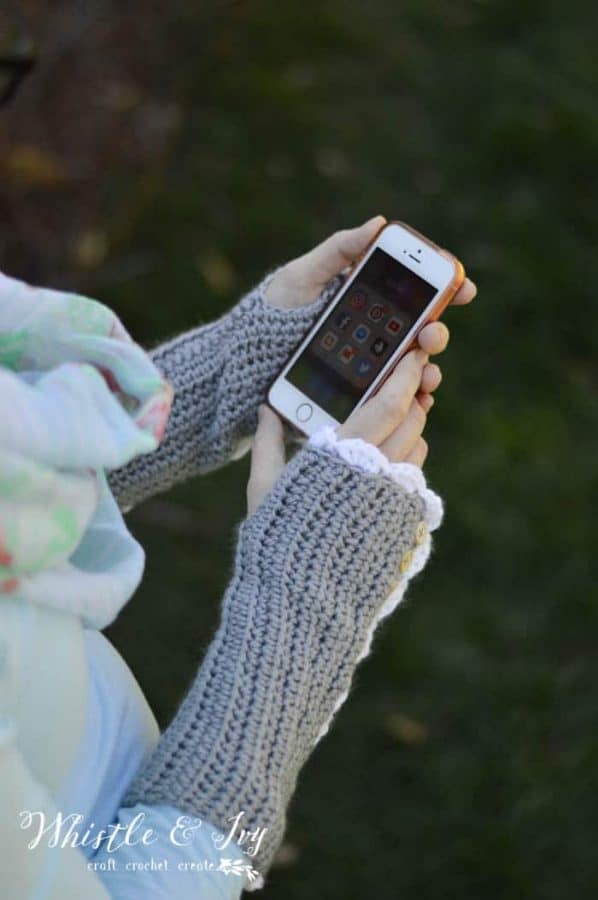
Whistle and Ivy

Craft. Crochet. Create.

  • About
  • The Endless Bundle
    • Get your Pass
  • Resources
    • Premium Patterns
    • Free Patterns
      • Crochet for Women
      • Crochet for Kids
      • Crochet for Baby
      • Christmas
      • Buffalo Plaid
      • Crochet for Home
    • Tips
    • Reviews
  • Shop
  • Member Login

Vintage Style Crochet Arm Warmers (with Thumbholes) – Free Crochet Pattern

October 7, 2016 by Bethany 60 Comments

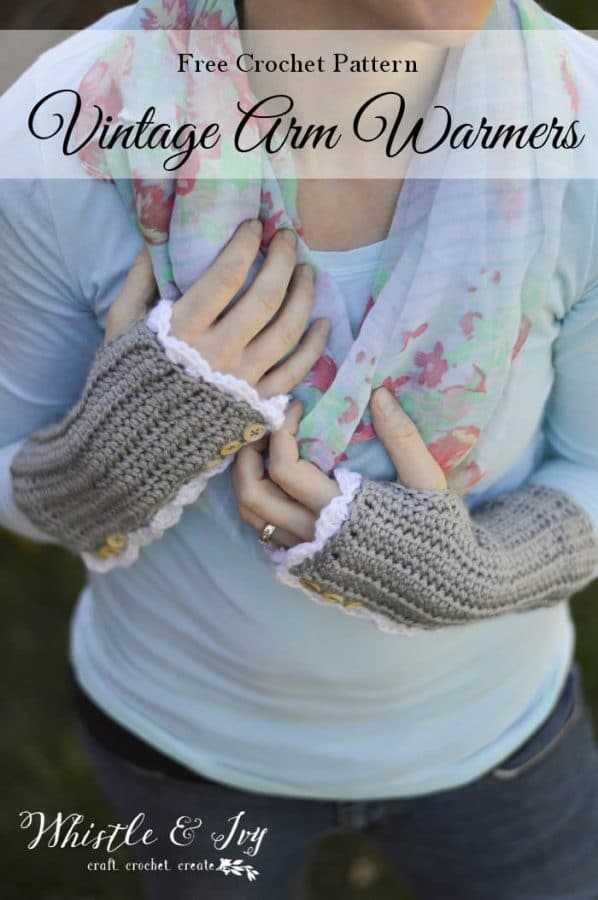
Happy Friday friends! I hope you have fabulous plans for the weekend. I am feeling fine because I FINALLY finished redesigning my Vintage Style Crochet Arm Warmers to have thumbholes! When The Boy was in the hospital, crocheting helped me stay sane and luckily this project was in my bag so I was able to finish them there. I just love them with wooden buttons.


free crochet pattern vintage style arm warmers with button and lacy edge


It occurred to me as I was doing the pattern redesign that you don’t really need the button holes along the sides. Feel free to skip the button hole instructions by working a complete row of sc and sew the buttons on very last. My buttons are functional, but they can be decorative if you prefer. 

VINTAGE STYLE CROCHET ARM WARMERS  – FREE CROCHET PATTERN

Please remember: You are free to use this vintage style crochet arm warmers pattern to make and sell, but do not republish or distribute this pattern in any way. DO NOT use my photos in your listings. Please do share my blog links! It’s a quick and FREE way of supporting Whistle and Ivy and more free crochet patterns in the future. 

What you need: (affiliate links)
Medium Weight Yarn (Knit Picks Mighty Stitch in Silver and White)
H hook
Darning Needle
12 small buttons

Abbreviations: (American Terms)
Ch – Chain
Sc – Single Crochet
Hdc – Half Double Crochet
Sk – Skip
St – Stitch
FLO – Front Loops Only

Gauge: 12 sc = 3″


::::::

The written pattern below is for my Vintage Style Crochet Arm Warmers. You can view the pattern for free on my blog or you can purchase a PDF in my Ravelry Shop or my Etsy Shop.  
The PDF is formatted for easy crocheting on-the-go or for easy printing, it doesn’t include ads or comments. Thanks for your support!

Get the Pattern on Ravelry

Get the Pattern on Etsy 

::::::


Vintage Style Crochet Arm Warmers Pattern: 

Right:
Ch 35. 
1. Hdc in 2nd ch from hook. Hdc 33. Turn. (34 sts)
2. (FLO) Ch 1. Sc in same st. Sc in each st across. Turn.  (34 sts)
3. Ch 1. Hdc in same st. Hdc in each st across. Turn. (34 sts)
4. – 11. Repeat rows 2 and 3 respectively until 11 total rows. 
12. Ch 1. Sc in same st. Sc in next st. Ch 5. Sk 5 sts, sc in next st. FLO – work a sc in each remaining st. (34 sts)
13. Ch 1. Hdc in same st. Hdc in each st across. Turn. (34 sts)
14. – 23. Repeat rows 2 and 3 respectively until 23 total rows. 
24. Ch 1. Sc in same st. *Ch 1. Sk next st. Sc in next st. Sc in next st* work 3 times. Sc 16. *Ch 1. Sk next st. Sc in next st. Sc in next st* work twice. Ch 1. Sk next st. Sc in last st. (34 sts)
Break yarn, tie off. 

Join yarn at the top (with thumbhole at the top). Sc across the top, working stitches as evenly as possible, achieving 28 sts. Break yarn. Tie off. Your piece should measure approx. 9″ x 7.5 “

Shell Edging: 
Start on long side with thumbhole to your left. 
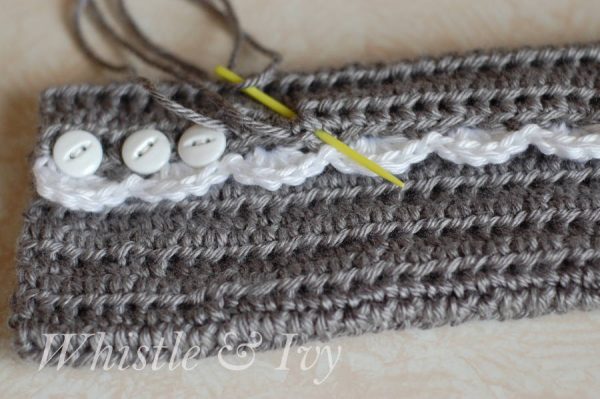
Join white yarn. Starting in next st,  *dc 4. Sk next st. Sl st in next st. Sk next st* repeat down the side and across the top. Tie off.  

Left Hand: 
Ch 35. 
1. Sc in 2nd ch from hook. *Ch 1. Sk next ch. Sc in next ch. Sc in next ch * work 3 times. Sc 16. Ch 1. Sk next ch. Sc in next ch. Sc in next ch* work twice. Ch 1. Sk next st. Sc in last st. (34 sts)
2. Ch 1. Hdc in same st. Hdc in each st across. Turn. (34 sts)
3. (FLO) Ch 1. Sc in same st. Sc in each st across. Turn. (34 sts)
4. – 11. Repeat rows 2 and 3 respectively until 11 total rows. 
12. Ch 1. Sc in same st. Sc in next st. Ch 5. Sk 5 sts, sc in next st. FLO – work a sc in each remaining st. (34 sts)
13. Ch 1. Hdc in same st. Hdc in each st across. Turn. (34 sts)
14. – 24. Repeat rows 2 and 3 respectively until 24 total rows. 
Break yarn, tie off. 
Join yarn at the top (with thumbhole at the top). Sc across the top, working stitches as evenly as possible, achieving 28 sts. Break yarn. Tie off.  Your piece should measure approx. 9″ x 7.5 “

Shell Edging: 
Start on the top right of piece. Join white yarn. Starting in next st,  *dc 4. Sk next st. Sl st in next st. Sk next st* repeat across the top and down the side. Tie off.  

flat crochet arm warmers free pattern sewing


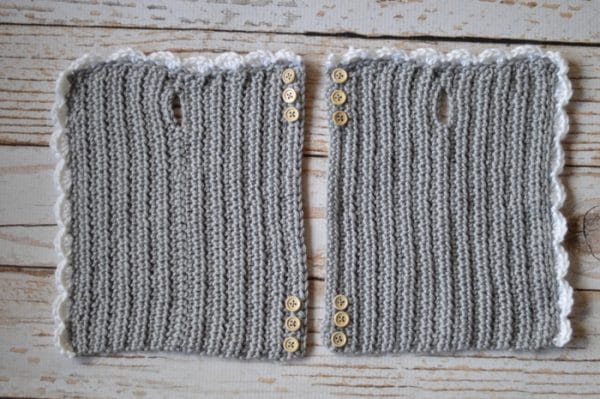
To sew them together, fold the the shells edge over the other edge. Using a darning needle, sew the arm warmers closed in between the buttons. Work down from the top, putting your needle down through both layers and up, all in one stitch. 

button vintage style crochet arm warmers free pattern


crochet arm warmers free pattern vintage style with buttons

vintage style crochet arm warmers free crochet pattern


Join our Facebook Community! We need YOU! 


Love these vintage style crochet arm warmers? Subscribe!
(and get a free gift!)
subscribe2


Filed Under: Uncategorized Tagged With: arm warmers, crochet pattern, elegant, fingerless gloves, free crochet pattern, vintage, wrist warmers

Comments

  1. Kim says

    December 11, 2018 at 8:28 am

    How many yards of medium yarn will it take to make a pair?

    Reply
    • Bethany says

      December 11, 2018 at 9:06 am

      Less than one skein of the Caron Simply Soft.

      Reply
  2. Keen says

    November 21, 2018 at 6:20 am

    Using the provided gauge, the pattern is way too small. Falls about an inch and a half short and can’t close over a rather thin adult arm. The thumb hole is also very small, and even increasing it a little is too small. I feel like this pattern needs to be adjusted to fit the average adult, or it needs to clarify if it is meant for children. Very disappointed as it is a long and painful process for me to crochet, but I wanted to make this as a Christmas gift for my mother. I cannot possibly go back and change so many things about it to make it fit.

    Reply
    • Bethany says

      November 21, 2018 at 2:33 pm

      This is adult size, that was my gauge and they fit my arms. I am not sure why they didn’t fit you. What yarn did you use? You won’t need to change anything, just use a larger hook.

      Reply
  3. Faith says

    November 17, 2018 at 2:17 pm

    Such a cute pattern! However, my hands are a bit on the bigger side, so my question is: would making the thumbhole bigger affect the rest of the pattern at all?

    Reply
    • Bethany says

      November 17, 2018 at 4:42 pm

      Thank you faith! No it wouldn’t! You can just skip a few extra stitches there.

      Reply
  4. Nancy Pilgrim says

    October 23, 2018 at 9:03 pm

    I love, love, love this pattern. Thank you for sharing. It is
    so pretty.

    Reply
    • Bethany says

      October 23, 2018 at 9:41 pm

      You are very welcome!

      Reply
  5. Angela D Smith says

    September 23, 2018 at 9:20 am

    These are so adorable, I’m going to try these in girly colors for my daughter! Can’t wait to see if they turn out!

    Reply
    • Bethany says

      September 23, 2018 at 7:24 pm

      Thank you! That sounds so cute!

      Reply
  6. Donette S. Powers says

    August 4, 2018 at 10:51 am

    So looking forward to these for work this winter but not sure if I should start with 35 ch or 36 ch.

    Reply
    • Bethany says

      August 4, 2018 at 3:11 pm

      You start with a Ch 35.

      Reply
  7. Jana says

    March 1, 2018 at 3:50 pm

    Hi Bethany,

    This isn’t my first major crocheting project and the pattern is so simple and easy. I finished the right pair and am worried it doesn’t fit (width wise). I was wondering if I add some more rows of it would affect the rest of the project.

    Reply
    • Bethany says

      March 1, 2018 at 5:03 pm

      You can definitely add more rows! You might end up doing the button holes on the Hdc row instead of sc row, but that shouldn’t affect the pattern hardly at all.

      Reply
  8. Jana says

    February 7, 2018 at 4:36 pm

    I don’t see your reply but my daughter is 31 and very outdoorsy- I’ve made her multiple fingerless gloves and she likes them plain… oh well. As I said, I am going to make myself a pair in a beautiful Rowan tween that I have.
    Thanks Bethany!!

    Reply
  9. Jana says

    February 7, 2018 at 3:52 pm

    I made these for my daughter in a beautiful soft marino with a contrasting color. She didn’t like them, thinking they were too “girly” for her so she gave them to her 11 yr old step-sister. I LOVED them so I am going to make myself a pair next.
    The pattern was easy but I think they look very elegant. thanks Bethany!!!

    Reply
    • Bethany says

      February 7, 2018 at 4:20 pm

      Lol! Well they sounds like they are lovely, and maybe in a few years she will want a pair :) You are welcome, so glad you liked the pattern!

      Reply
  10. Dian Richardson says

    November 24, 2017 at 1:20 pm

    I love this pattern. I am on my 2nd pair working with a blue heather & gray heather. Then picked up a blue for the scallops. I still need one more pr before Christmas. They are so easy & fast which is what I like. Thank you so very much for sharing.
    Dian

    Reply
    • Bethany says

      November 25, 2017 at 9:15 pm

      So glad you like this pattern! I bet they are beautiful in blue!

      Reply
  11. Kayleen says

    November 17, 2017 at 11:36 am

    Hi! Will one skein of medium weight yarn be enough or will I need to get two or more to make these?

    Reply
    • Bethany says

      November 17, 2017 at 11:51 am

      One is enough :)

      Reply
  12. Emmaleigh Kowal says

    August 9, 2017 at 1:55 pm

    YAY!! It fits! I was so worried that it wouldn’t and it fits perfectly. Your instructions were so easy to follow and the finished product is adorable! Thank you so much!

    Reply
    • Bethany says

      August 10, 2017 at 8:33 am

      Yay! I’m so glad you like them! Thank you for your kind words, you are welcome!

      Reply
  13. Shirley Mahony says

    July 23, 2017 at 7:46 pm

    Hi Bethany,
    Thank you for your free Vintage Arm Warmer with Thumbholes, pattern.
    Hope mine turn out as nice as your’s.

    Reply
    • Bethany says

      July 24, 2017 at 9:21 am

      You are very welcome! I bet they will :)

      Reply
  14. lena pfeffer says

    January 11, 2017 at 3:14 pm

    i bought the pattern but it seems like it is a bit different than what you have on the website. on the paid version, it says to chain 36. on your website it’s 35.

    Reply
    • Bethany says

      January 11, 2017 at 5:32 pm

      Oh dear! Sorry about that. I have emailed you an updated version.

      Reply
      • lena Pfeffer says

        January 11, 2017 at 5:37 pm

        thanks. not sure where you emailed it to but when i bought it i used this email address.

        Reply
        • Bethany says

          January 11, 2017 at 9:20 pm

          The service automatically sends the email with the updated pattern to the email you used to purchase it. Let me know if it didn’t come through!

          Reply
  15. Lisa Weeks says

    November 27, 2016 at 3:55 pm

    Thank you. If I add 12 chs, how many scs should I get when working the top edge? With ch 36 it says to work 28 scs. Also, with the added chs, how would I work row 24 of right glove (row 1 of left) ?

    Thank you!!

    Reply
  16. Lisa Weeks says

    November 26, 2016 at 8:41 pm

    Hi,
    I love this pattern! I need to make this elbow length, how would I do this? Is the thumb hole at the beginning of the pattern or at the end? I know I’ll have to make the ch longer and make it wider near the elbow and dec at some point , to the original pattern but, I don’t know what I’m doing! Lol

    Thank you!

    Reply
    • Bethany says

      November 27, 2016 at 9:28 am

      Hi!
      Thanks, glad you like it!
      You should just be able to work with a longer ch and make length adjustments as you go, the thumbhole shouldn’t affect making them longer!. It doesn’t decrease, it is stretchy fabric, so it’s a tube shape, so you will have to use your own discretion at to whether you need to make the elbow part larger.

      Reply
  17. Jamie Majors-Neer says

    October 22, 2016 at 6:23 pm

    I love to crochet and find great patterns like this.

    Reply
    • Bethany says

      October 24, 2016 at 8:00 am

      Glad you like them!

      Reply
  18. Erlene Amat says

    October 16, 2016 at 5:38 pm

    Such a cute pattern and I love that the fingers are open to make it easy to do things. Thanks for sharing your pattern with us on Merry Monday.

    Reply
    • Bethany says

      October 16, 2016 at 9:40 pm

      Thank you!

      Reply
  19. Kate says

    October 10, 2016 at 5:43 pm

    Very pretty! I wish I could knit. I can arm knit….I don’t know why I struggle with basic knitting.
    Thanks for sharing with us this week at the Merry Monday link party!
    We hope to see you again next week!
    Kate | TheOrganizedDream.com

    Reply
    • Bethany says

      October 11, 2016 at 2:30 pm

      Thanks!

      Reply
    • Cathy Smihula says

      October 23, 2016 at 9:00 pm

      Kate –
      Do you crochet? The Vintage Arm Warmers are crochet.
      :-)

      Reply
  20. Lee MacArthur says

    October 10, 2016 at 10:49 am

    These look cool and like something I can easily do. Thank you.

    Reply
    • Bethany says

      October 10, 2016 at 3:45 pm

      You’re welcome!

      Reply
Newer Comments »

Leave a Reply Cancel reply

Your email address will not be published. Required fields are marked *

  • START HERE
    • Terms of Use
    • Work with Me
    • Disclosure
    • Disclaimer
    • Privacy Policy
  • Contact
  • Subscribe
  • FAQS
  • Privacy Policy
Copyright ©2021, Whistle and Ivy. Design by Pixel Me Designs
All rights reserved. Unauthorized use and/or duplication of this material without express and written permission from this blog’s author and/or owner is strictly prohibited. Excerpts and links may be used, provided that full and clear credit is given to Bethany and Whistle and Ivy with appropriate and specific direction to the original content. DO NOT take my photos and use them to sell items you make from my crochet patterns and tutorials.

Cookies

This site uses cookies to give you a better browsing experience. For more info, read our privacy policy Read it here