
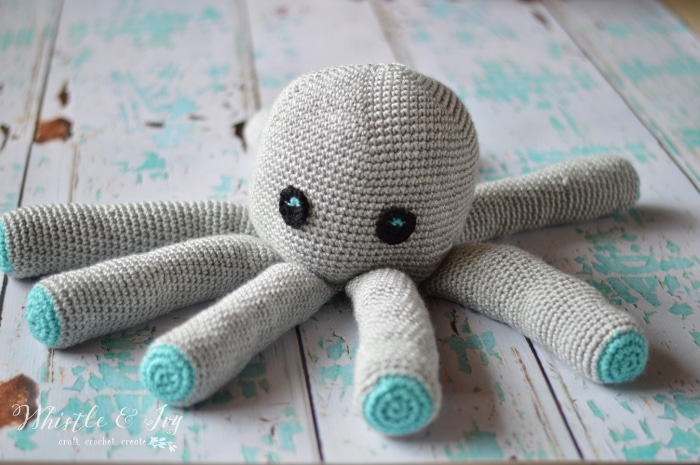
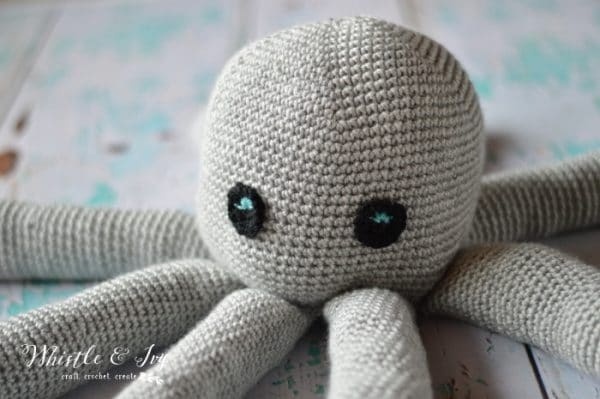
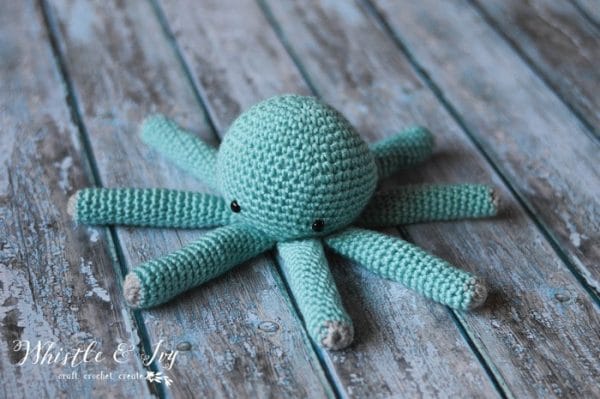
This darling plush crochet octopus is an easy crochet pattern, perfect for beginners. You will love your new squishy, soft sea friend.
This post includes affiliate links, which means I make a small commission if you make a purchase at no extra cost to you. Thank you for your support!
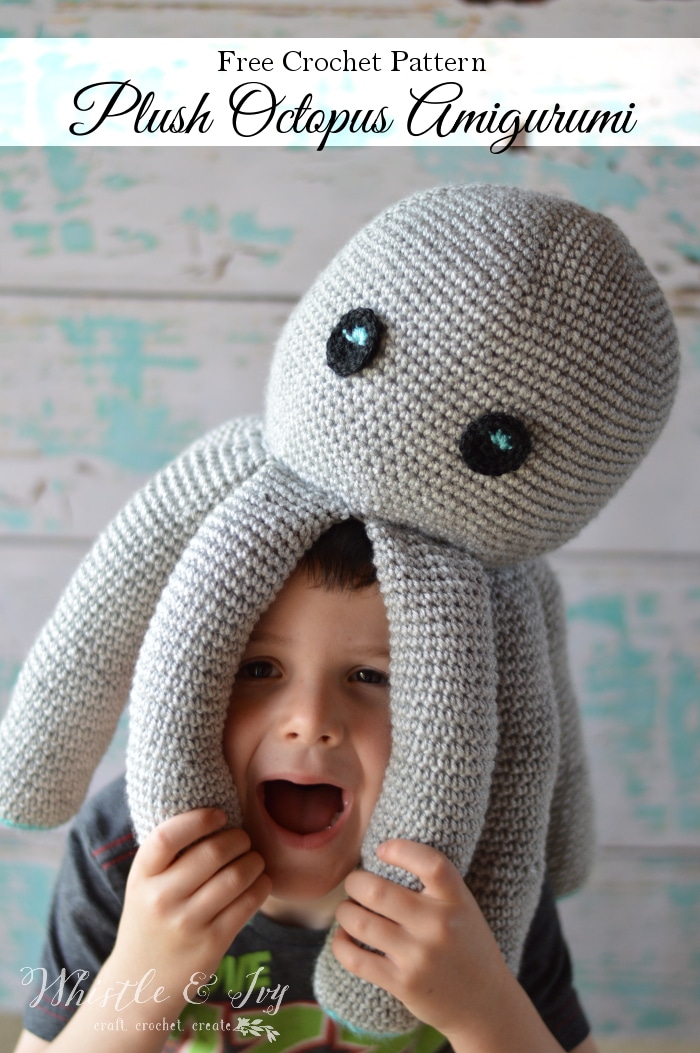
The Boy has been feeling neglected in the crochet arena. He has been asking me to make him something, but I admit I was hesitant. I have made him a few thing before: Muno, a stuffed Sea Turtle and this Button Trapper Hat. However, I completely take it personal when he doesn’t treat these handmade items with the utmost care and respect. You would think my 4-year-old could appreciate the art and work that goes into any crocheted creation (maybe I am asking too much?).
I guess I decided to get over it…kinda. He is a child, after all. I decided to make him one of his requests, a plush crochet octopus (not his exact words).
I am not an advanced toymaker by any stretch of the imagination, so this octopus is made very simply with simple construction, so I think it’s a crochet pattern that is perfect for beginners.
And for some reason kids just love playing with all those soft, floppy octopus arms!
PLUSH CROCHET OCTOPUS – FREE CROCHET PATTERN
Please remember: You are free to use this plush crochet octopus pattern to make and sell, but do not republish or distribute this pattern in any way. DO NOT use my photos in your listings. Please do share my blog links! It’s a quick and FREE way of supporting Whistle and Ivy and more free crochet patterns in the future.
What you need: (affiliate links)
–G hook
-Medium Weight Yarn – 2 Skeins of 1st color (Knit Picks in Dove Heather and Cornflower) + a small amount of black.
–Polyfil
–Darning Needle
Abbreviations: US Terms
Ch – chain
Sc – single crochet
Sc2tog– Sc decrease
Sl st – Slip Stitch
St – stitch
Gauge: Not important, just make sure your stitches are tight so the stuffing doesn’t show through.

You’re tired of sifting through complicated tutorials and patterns that leave you feeling overwhelmed.
Let me help.
PICTURE THIS:
Instant access to a library of modern, easy-to-follow patterns
Gifting your handcrafted treasures to your loved ones.
Feeling accomplished by your beautiful makes
It’s time to make your crafting experience as joyful as it should be.
Plush Crochet Octopus Body: (worked in continuous rounds)
Begin with Magic Ring using 1st color.
1. Sc 10 in ring. (10 sts)
2.Work 2 in each st around. (20 st)
3. *Sc in next 2 sts, work 2 sc in next st* work 6 times. Sc in last 2 sts. (26 sts)
4. *Sc in next 4 sts, 2 sc in next st* work 5 times. Sc in last st. (31 sts)
5. *Sc in next 5 sts, 2 sc in next st* work 5 times. Sc in last st. (36 sts)
6. Sc in next 3 sts, work 2 sc in next st. *Sc in next 6 sts, 2 sc in next st* work 4 times. Sc in last 4 sts. (41 sts)
7. *Sc in next 7 sts, 2 sc in next st* work 5 times. Sc in last st. (46 sts)
8. Sc in next 4 sts, work 2 sc in next st. *Sc in next 8 sts, 2 sc in next st* work 4 times. Sc in last 5 sts. (51 sts)
9. *Sc in next 9 sts, 2 sc in next st* work 5 times. Sc in last st. (56 sts)
10. Sc in next 5 sts, work 2 sc in next st. *Sc in next 10 sts, 2 sc in next st* work 4 times. Sc in last 6 sts. (61 sts)
11. *Sc in next 11 sts, 2 sc in next st* work 5 times. Sc in last st. (66 sts)
12. Sc in next 6 sts, work 2 sc in next st. *Sc in next 12 sts, 2 sc in next st* work 4 times. Sc in last 7 sts. (71 sts)
13. *Sc in next 13 sts, 2 sc in next st* work 5 times. Sc in last st. (76 sts)
14. Sc in next 7 sts, work 2 sc in next st. *Sc in next 14 sts, 2 sc in next st* work 4 times. Sc in last 8 sts. (81 sts)
15. – 32. Sc in each st around (81 sts).
33. Sc in next 4 sts, sc2tog. *Sc in next 8 sts, sc2tog* work 7 times. Sc in last 5 sts. (73 sts)
34. *Sc in next 7 sts, sc2tog* work 8 times. Sc in last st. (65 sts)
35. Sc in next 3 sts, sc2tog. *Sc in next 6 sts, sc2tog* work 7 times. Sc in last 4 sts. (57 sts)
36. *Sc in next 5 sts, sc2tog* work 8 times. Sc in last st. (49 sts)
37. Sc in each st around. (49 sts)
38. *Sc in next st, Sc2tog* work 16 times. Sc in last st. (33 sts)
39. Sc in each st around. (33 sts)
40. *Sc in next st, Sc2tog* work 11 times. (22 sts)
41. Sc in each st around. (22 sts)
42. Sc2tog 11 times. (11 sts)
43. Sc in each st around. (11 sts)
Close the remaining hole with a darning needle.
You may also like:
Arms: (make 8)
Begin with 2nd color. The first small circle is worked the joined rows. The rest of the arm will be worked in continuous rounds.
Magic ring
1. Work 8 sc in ring (8 sts)
2. Ch 1. Sc 2 in same st. Sc 2 in each st around. (16 sts) Join with sl st.
3. Ch 1. *Sc in next 3 sts, work 2 sc in next st* work 4 times (20 sts)
Join 2nd color at the join with a sl st. Work the 1st st of the round in the next st for a smoother transition.
4. – 14. Sc in each st around (20 sts)
15. *Sc in next 4 sts, sc2tog* work 3 times. Sc in next 2 sts.
16. – 35. Sc in each st around. (18 sts)
36. *Sc in next 4 sts, sc2tog* work 3 times. Sc 3. (18 sts)
37. – 38. Sc in each st around. (18 sts)
Leave a long tail.
Eyes: (Make 2)
Start with black.
1. Ch 2. Sc 3 in 1st ch. Start the next sc with same yarn, but finish with blue. Sc 3 with blue. Start the next sc with same yarn, but finish with black. (8 sts) Join with first st.
2. Ch 1. 2 sc in same st. 2 sc in each remaining st. (16 sts). Tie off.
Plush Crochet Octopus Construction:
Sew the arms on the 35th row, all around the bottom of the octopus head. They should meet corner to corner all around.
Pinch the arm in half at the opening, with your tail on one side or the other. Using that tail, sew the arm in place, both pinching the end of the arm closed as well as sewing in place on the head.
Sew or glue the eyes in place. I used hot glue to attach my eyes.


He was playing with his new crochet octopus today. I caught myself a couple times scolding him for being too rough with it.
You guys! What is wrong with me?!?!
Am I alone with being super weird about my creations, even when they are gifted to a dear loved one?
Deep breath. Let it go.
Be sure to check out Octsock’s little brother “Octolegs”, the smaller version of this plushy.
Share your plush crochet octopus in our
Facebook Community! We need YOU!
Want a FREE ebook, Tip Tuesday tips and Free Pattern Friday? Subscribe!
(it’s totally FREE!)
xoxo,


I am so thankful that all of our prayers helped your son heal! Keep your wonderful patterns coming Bethany!
Thank you Laurie! It’s a true miracle!
Hi thanks and Merry Christmas! I want to add a donut mouth piece to the octopus, how?
Hm. What is a donut mouth?
I loved making this for my friend by request! I made a couple tweaks of my own but it turned out great, I would love to show you! Thank you for the pattern!
I would love to see! Share to my Facebook or tag me on Instagram! @whistleandivy
Thank you for your free crochet patterns. I use them to crochet for charities and your contribution is greatly appreciated.
You are very welcome!
That’s just adorable, and you can tell he really likes it! Thanks for sharing at Merry Monday!!
Thank you!
I just spent 3 days making a soft toy for a niece and she had it ripped apart within an hour.
I wasn’t angry about it, but I just made a mental note of not making another until she was past the stage of ripping things apart.
I’m going to make this, it looks great, I’m quite new to crocheting but I think I can manage this.
Thank you for taking the time to publish this pattern.
Oh dear! I am so glad you weren’t upset. You are very welcome, I hope you give this octopus a try :)
That is so cute! My kids will want one too!
If you have time, I would love for you to come and share this post over at the Really Crafty link party that is live right now! (http://keepingitrreal.blogspot.com.es/2016/05/welcome-to-really-crafty-link-party-19.html).
Thank you so much!!
Am I overlooking the amount of yarn required?
No are you aren’t, sorry! You will need 2 skeins of your main color. The color on the bottom of the arms uses a very small amount.
Thank you!!
I am the same way! I am always upset when my kids don’t treat my amigurumi creations with love and respect. Since they aren’t furry, they usually get tossed baby the wayside quickly. They do live and snuggle with my blankets. But my son loves this octopus, so I plan to try it. Thanks for the pattern!
It’s so hard! You are welcome!
Thank you! I can’t wait to make this.
You’re welcome! I hope you like it!
LOVE the octopus and it looks like your little man is enjoying it! I have made so many things for other people and have had to practice really hard to just let them go…*sniffsniff* I am the same way with my kiddo when he is too rough but now I reframe it as product testing. ;)
I know, it’s so hard! Love your attitude though! I decided I would rather him love it to death than throw it under his bed and never look at it again :)