Hello everyone! Have you been joining in on Moogly’s Afghan crochet along? I was honored to be asked to write up a square for the project. I admit, I am not very great with blanket and afghan squares. When I sit down to write the pattern, my heart wants me to make something unique, and not a rehashing of the same granny square. But I am not great with designing them. If you guys saw the design process of this pretty Pixel Heart Afghan square, you would laugh. I am absolutely terrible with math (maybe I should say that I never had a good teacher), so even simple math, like figuring out the length of the sides while factoring in the increases on the corner, trips me up. Tamara graciously accepted my “unique” square and I truly hope it’s something you will enjoy making.

You’re tired of sifting through complicated tutorials and patterns that leave you feeling overwhelmed.
Let me help.
PICTURE THIS:
Instant access to a library of modern, easy-to-follow patterns
Gifting your handcrafted treasures to your loved ones.
Feeling accomplished by your beautiful makes
It’s time to make your crafting experience as joyful as it should be.
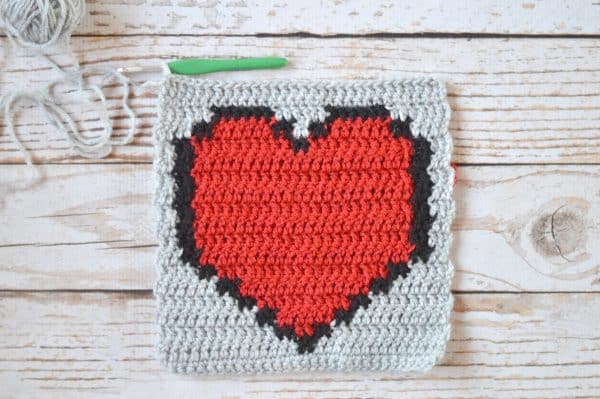
Pixel Heart Afghan Square
What you need:
–I Hook
-Lion Brand Vanna’s Choice in Scarlet, Silver Heather and Black
Gauge: 7 sts = 2″
Begin with Gray.
Ch 31
1. Sc in 2ch ch from hook. Sc in each remaining chain. (30 sts) Turn
2. Ch 1. Sc in each st across. Turn. (30 sts)
3. Ch 2. You will now be working tapestry crochet in dc stitches. When you change colors, yarn over with the next color and finish the stitch, so the color changes are clean. To keep things clean, it’s easier to use bobbins (instead of carrying the yarn) So you will have one gray and one black on either side, and one red in the middle. At times, you will need to pull yarn over from your last finishing point to your next starting point. Simple work back over the yarn tail and you won’t be able to see it.
Dc 14 with gray. Dc 2 with back. Dc 14 with gray. Turn. (30 sts)
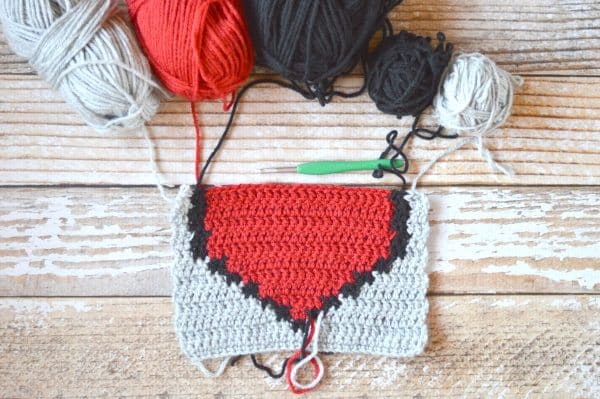
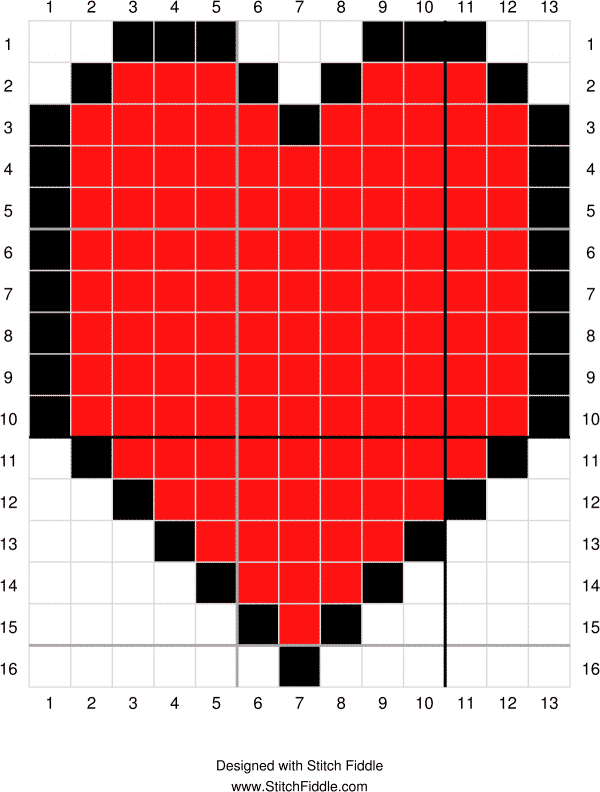
I have included a graph, and you can make the heart shape without the written pattern, if you prefer. It looks distorted here, but it won’t be as tall when it’s finished.
4. Ch 2. Dc 12 with gray. dc 2 with black. Dc 2 with red. Dc 2 with black. Dc 12 with gray. Turn. (30 sts)
5. Ch 2. Dc 10 with gray. Dc 2 with black. Dc 6 with Red. Dc 2 with black. Dc 10 with gray. Turn. (30 sts)
6. Ch 2. Dc 8 with gray. Dc 2 with back. Dc 10 with red. Dc 2 with black. Dc 8 with gray. Turn. (30 sts)
7. Ch 2. Dc 6 with gray. Dc 2 with back. Dc 14 with red. Dc 2 with black. Dc 6 with gray. Turn. (30 sts)
8. Ch 2. Dc 4 with gray. Dc 2 with back. Dc 18 with red. Dc 2 with black. Dc 4 with gray. Turn. (30 sts)
9. – 15. Ch 2. Dc 2 with gray. Dc 2 with black. Dc 22 with red. Dc 2 with black. Dc 2 with with gray. Turn. (30 sts)
16. Ch 2. Dc 2 with gray. Dc 2 with black. Dc 10 with red. (It gets a bit hairy here, but bear with me). Join a third black bobbin here. Dc 2 with black, carrying the red. Dc 10 with red. Dc 2 with back. Dc 2 with gray. Turn. (30 sts).
17. Ch 2. Dc 4 with gray. Dc 2 with black. Dc 6 with red. Dc 2 with black (carrying the red). Join a third gray bobbin (you only need it for 8 sts). Dc 2 with gray, carrying black and red. Dc 2 with black (still carrying red). Dc 6 with red. Dc 2 with black. Dc 4 with gray. Turn. (30 sts)
18. Ch 2. Dc 6 with gray. Dc 6 with black. Dc 6 with gray. Dc 6 with black. Dc 6 with gray. (30 sts)
19. Ch 1. Sc in each st across. Turn. (30 sts)
20. Ch 2. Dc in each across. (30 st)
21. Ch 1. Sc in each st across. (30 sts)
DO NOT TURN.
Border:
1. Continuing exactly where you left off after working the last sc of row 21, work an additional 2 sc in the last st (totaling 3 sts in last st of row 21).
Sc 28 more down the side. Work 3 sc in first foundation ch. Sc 28 across the bottom. Sc 3 in last st. Sc 28 up the side. 2 sc in the first st of row 21 and join with a sl st. (94 sts)
2. Sl st into next 2 sts, joining black. Ch 2, work a 3-dc cluster (a dc3tog in same st).
*Ch 1. Sk next st. Work a 3-dc cluster in next st.* work 13 times. Dc in next st. In the corner, work a 3-dc cluster, ch 2, work another 3-d cluster. Dc in next st. [Work from * to * 14 times down next side. Dc in next st. In the corner, work a 3-dc cluster, ch 2, work another 3-d cluster. Dc in next st. ] work entire contents 3 more times. Ch 1. Sk 1 st. Join with first 3-dc cluster, using gray.
3. Ch 1. Sc all around working the ch-1 spaces and 3-dc clusters. Work 3 sc in each ch-2 corner. (140 sts)
Break yarn, tie off.
Do you like my blocking square? It’s an awesome little gadget by Chetnanigans. The BlocksAll comes in several sizes. Get yours here.
I hope you are enjoying the CAL! The finished blanket is really cool looking, with all the different squares. You can see the Moogly CAL 2016 squares here and make sure you catch up on the 2017 squares here.
Share your work in our Facebook Community!
Happy crocheting!