
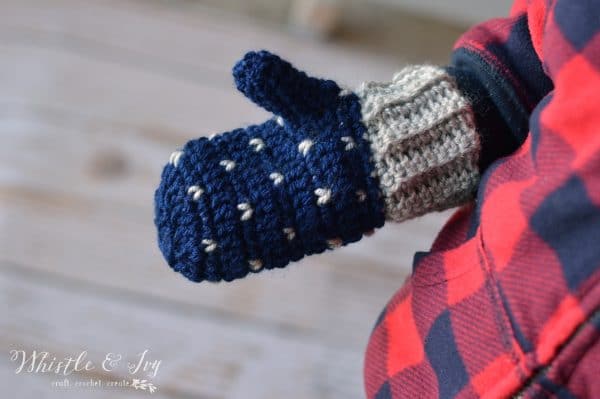
I am racing, ya’ll! I’m racing to publish all the wintery and cold-weather patterns I have on my calendar. Some of them will probably need to wait until fall (I have some super fun things planned for this fall!), but I started designing these Crochet Color Block mittens before Christmas and could never find a time to fit them in. They deserve to be shared this winter, so that’s what I decided to do.


I would definitely call myself a mitten novice. Mittens are not something I have made many times nor designed many times, so the technique on these might be different for you. I found it to be the most logical and seamless way of making a thumbhole, but you will have to share your opinion with me.

You’re tired of sifting through complicated tutorials and patterns that leave you feeling overwhelmed.
Let me help.
PICTURE THIS:
Instant access to a library of modern, easy-to-follow patterns
Gifting your handcrafted treasures to your loved ones.
Feeling accomplished by your beautiful makes
It’s time to make your crafting experience as joyful as it should be.
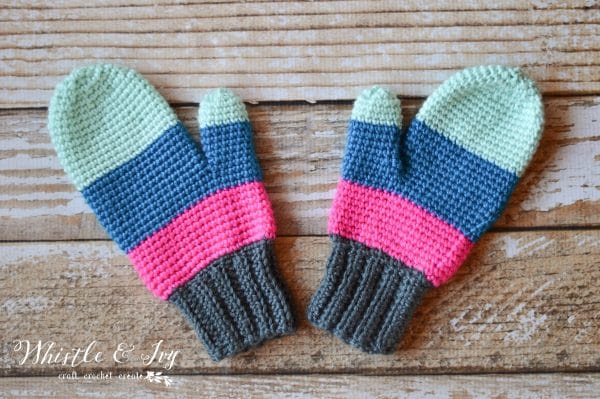
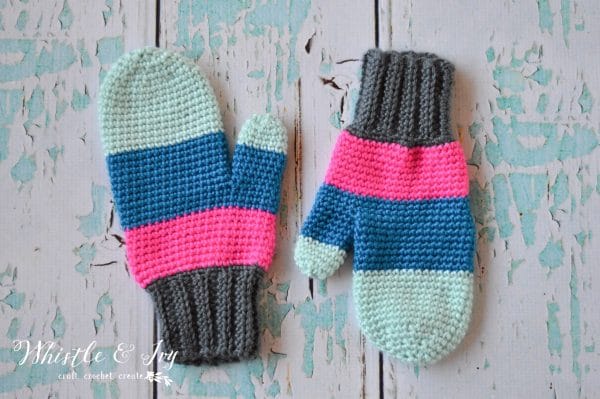
CROCHET COLOR BLOCK MITTENS (Women)
What you need: (affiliates)
-G hook (or whatever hook you need to meet the gauge)
-Medium Weight Yarn in 4 colors
(Knit Picks Mighty Stitch in Ash, Pucker, Gulfstream and Mint)
-Darning Needle (for weaving in ends)
Abbreviations: US Terms
Ch – Chain
Sc – Single Crochet
Hdc – Half Double Crochet
Sl st – Slip Stitch
Sk – Skip
BLO -Back Loops Only
Gauge: 14 hdc = 3″
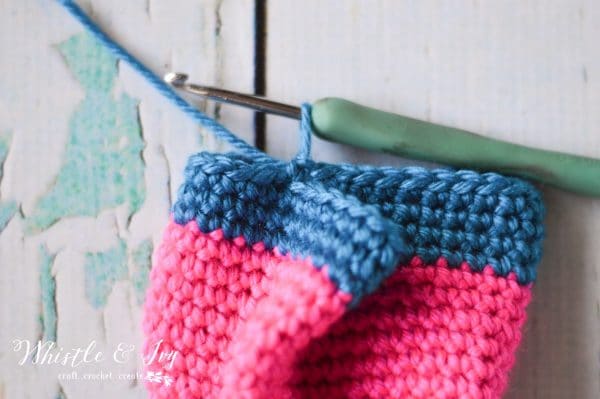
Ribbed Band:
Ch 13
1. Hdc in 2nd ch from hook. Hdc 11. Turn. (12 sts)
2. – 19. Ch 1. Hdc in same st. Hdc 10 in BLO. Hdc in last st, going through both loops. Turn. (12 sts)
Piece should be very stretchy and about 6″ before stretching. Use your judgment if you need yours to be longer. Don’t tie off.
Fold in half, with ribs going vertically. Sl st the two ends together, forming a tube. Turn tube so the seam is on the inside, and the loop is at the top. Continue to step 1 of the body.
Body:
1. Ch 1. Sc all across the top of the band, working an increase every few spaces, achieving a total of 36 sts. Join with a sl st.
Join 2nd color.
2. Ch 1. Sc in same st. Sc 7. 2 sc in next st. *Sc 8. 2 sc in nex st* work 3 times. Join with a sl st. (40 sts)
3. – 9. Ch 1. Sc in each st around. Join with a sl st. (40 sts)|
Join 3rd color.
10. Ch 1. Sc in same st. Sc 18. 2 sc in next st. Sc 19. 2 sc in last st. Join with a sl st (42 sts)
11. – 12. Ch 1. Sc in each st around. Join with a sl st. (42 sts)
13. Ch 1. 2 sc in same st. Sc 11. 2 sc in next st. Sk 12 sts. 2 sc in next st. (Pinch the space out, this will be the thumbhole) Sc 16. (33 sts).
14. – 20. Work around the larger of the two spaces, ignoring the skipped stitches.
Ch 1. Sc in each st around. Join with a sl st(33 sts)
Join 4th color.
21. – 29. Ch 1. Sc in each st around. Join with sl st. (33 sts)
30. Ch 1. Sc in same st. Sc in next st. Sc2tog. *Sc 2. Sc2tog* work 7 times. Sc in last st. Join with sl st. (25 sts).
31. Ch 1. Sc in each st around. Join with a sl st(25 sts)
32. Ch 1. Sc in same st. Sc2tog. *Sc. Sc2tog* work 7 times. Sc in last st. Join with a sl st.(17 sts)
33. Ch 1. Sc in each st around. Join with a sl st. (17 sts)
34. Ch 1. Sc in same st. Sc2tog 8 times. Join with a sl st. (9 sts)
35. Ch 1. Sc in same st. Sc2tog 4 times. Join with sl st. (5 sts)
Tie off. Use the tail to sew small hole shut.
Thumb:
Join 3rd color anywhere on the thumbhole (I suggest the first st, next to the body of the mitten).
1. Ch 1. Sc 16 around the hole opening (a few of the stitches will not be in a stitch, just find a place to work it). (16 sts)
2. Ch 1. Sc2tog. Sc 12. Sc2tog. Join with sl st. (14 sts)
3. – 6. Ch 1. Sc in each st around. Join with sl st. (14 sts)
Join 4th color.
7. – 10. Ch 1. Sc in each st. Join with sl st. (14 sts)
11. Ch 1. Sc2tog 7 times. Join.
Tie off, use tail to close small hole.
It’s a good thing the thaw is coming. It’s been my experience that crochet mittens are rather better during cool weather, instead of sub-zero weather.
That may just be me, though!
Be sure to share your beautiful version in the group>>>
You may also like these FREE patterns:
Cheers!


I love these and have made a few already but will need a smaller teenager size. Did you have a pattern for a teenager?
I don’t Amy! Very sorry! This has been on my list to add additional sizing but I haven’t been able to get it it :(
I love this pattern – thank you for sharing
Thank you! You are welcome!