
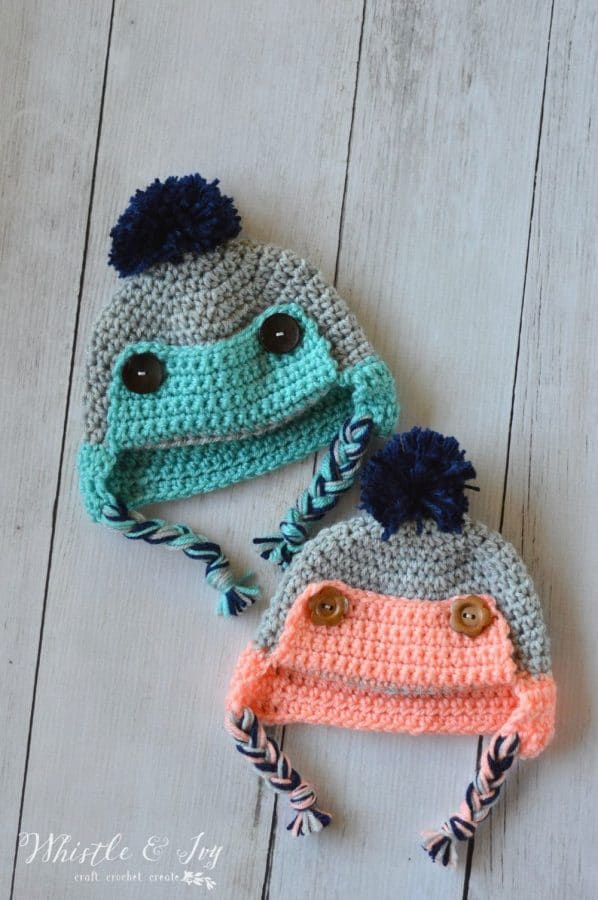
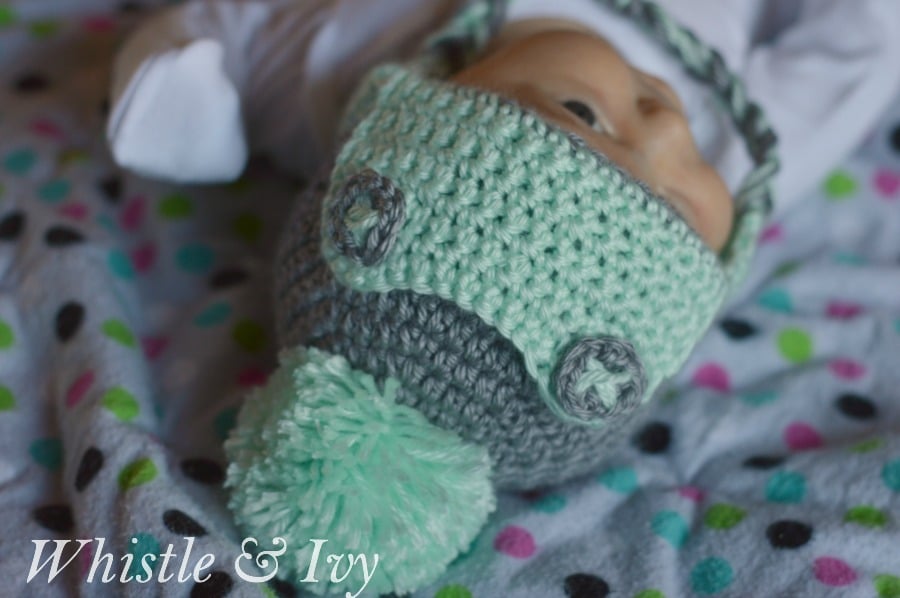
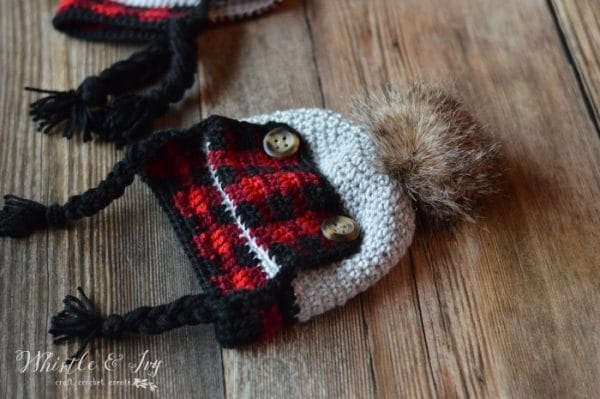
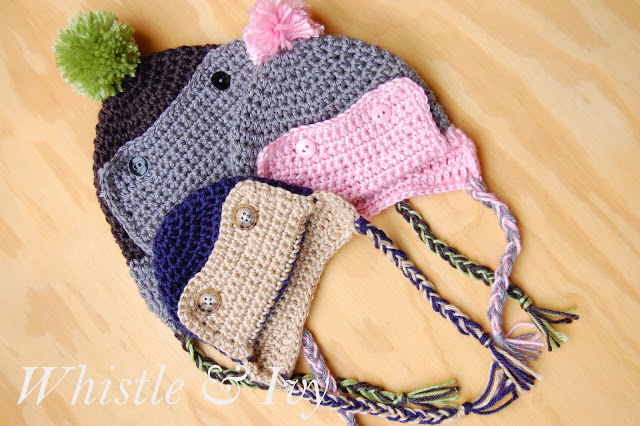
This classic crochet baby trapper hat is warm and cozy for baby! It looks cute with large buttons, or crochet your own. Be sure to finish this cute hat with a big poofy pom-pom on top! This post contains affiliate links (for more info, click here) Thanks for your support!
Does it feel like Autumn yet? In Vegas, not quite yet, but I am pretending my crocheting some cozy crochet stuff. Apparently my toddler is no longer a baby, but I got the idea for this hat and had to make it anyway.
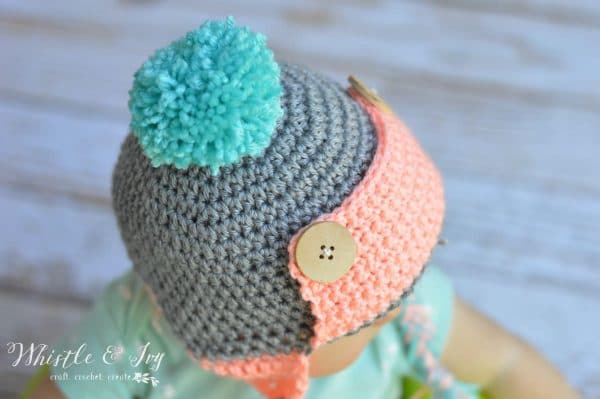
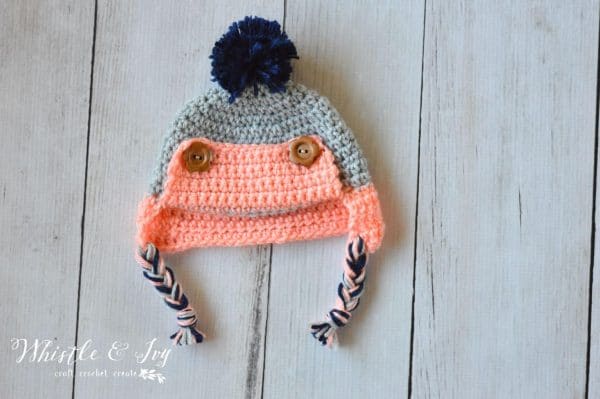
This Baby Crochet Trapper Hat will keep your little one warm all autumn and winter long. You can switch up the colors to make it for a boy or a girl.
Can you tell that I love buttons?

I also made a hat with crocheted buttons and I love how they look. I have included the small crochet buttons in the pattern as well.
And because a thoughtful reader suggested it, I made it in plaid! Get the pattern here.
[convertkit form=711319]
BABY CROCHET TRAPPER HAT – FREE CROCHET PATTERN
Please remember: You are free to use this pattern to make and sell, but do not republish or distribute this pattern in any way. DO NOT use my photos in your listings. Please do share my blog links! It’s a quick and FREE way of supporting Whistle and Ivy and more free crochet patterns in the future.
What you need:
– Size G Hook
– Worsted Weight Yarn (Knit Picks Brava – Navy, Seashell, Dove Heather, Cornflower, Mint)
– 2 large buttons
Abbreviations: (American Terms)
Sk – Skip
St – Stitch
Ch – Chain
Sc – Single crochet
Dc – Double Crochet
Hdc – Half Double Crochet
Sc decrease – Sc2tog
Dc decrease – Dc2tog
Sl st – Slip Stitch
Gauge: See Step 4
Note: The free pattern is for size 3-6 months. However, if you are interested in other sizes (0-3 months, 6-12 months and toddler) you can get an ad-free PDF from my pattern shop!

CROCHET TRAPPER HAT PATTERN: SIZE 3-6 MONTHS
Start with Magic Ring or 3-ch loop.
1. Hdc 8 in ring. Join with sl st.
2. Ch 1. Work 2 hdc in same st. Work 2 hdc in next 7 sts.(16 sts) Join with sl st with your first ch.
3. Ch 1. Hdc in same st. Work 2 hdc in next st. *Hdc in next st. Work 2 hdc in next st* repeat around the hat. (24 sts) Join with a sl st.
4. Ch 1. Hdc in same st. Hdc in next st. Work 2 hdc in next st. *Hdc in next 2 sts, work 2 hdc in next st* repeat around the hat.(32 sts) (your piece should have a 3” diameter) Join with sl st.
5. Ch 1. Hdc in same st. Hdc in next 2 sts. Work 2 hdc in next st. *Hdc in next 3 sts, work 2 hdc in next st* repeat around the hat. (40 sts) Join with sl st.
6. Ch 1. Hdc in same st. Hdc in next 3 sts. Work 2 hdc in next st. *Hdc in next 4 sts, work 2 hdc in next st* all around the hat. (48 sts) Join with sl st.
7. Ch 1. Hdc in same st. Hdc in next 10 sts. Work 2 hdc in next st. *Hdc in next 11 sts, work 2 hdc in next st* work 3 times. (52 sts) Join with sl st.
8. -14. Ch 1. Hdc in same st. Hdc in each st around. (52 sts) Join with sl st. Tie off.
FRONT FLAP:
1. With your seam in the middle back of the hat, lay your hat flat and find a stitch that 2-3 sts from the side on the front (it doesn’t have to be exact) . Use this st at your starting point. Join your new color with a sl st. Work from the inside. Ch 1. Sc in same st. Sc 18. Turn.
2. – 7. Ch 1. Sc in same st. Sc in next 18 sts. (19 sts) Turn.
8. Ch 1. Sc in same st. Sc in next st. Ch 2. Sk 2 sts and sc into next st. Sc in next 10 sts. Ch 2, sk 2 sts, sc into next 2 sts. (19 sts) Turn.
9. Ch 1. Sc2tog. Sc in next 15 sts. Sc2tog.
(make sure to work 1 sc in each of the chs from the last round). (17 sts) Tie off.
BACK PIECE:
Start with your hat upside down, working from the outside. Join your yarn with a sl st on the left of the flap. Start in the last worked st. You will work all the way across the back until you meet the front flap:
1. Ch 1. Hdc in same st. Hdc in next 34 sts. (35 sts)Turn.
2. – 3. Ch 2. Dc in same st. Dc in next 5 sts. Hdc in next 23 sts. Dc in next 6 sts. (35 sts) Turn .
4. Ch 2. Dc2tog. Dc in next 4 sts. Hdc in next 23 sts. Dc in next 4 sts. Dc2tog. (33 sts) Turn.
5. Ch 1. Sc2tog. Sc in next 29 sts. Sc2tog. (31 sts)
Tie off.
CROCHET BABY TRAPPER HAT CONSTRUCTION:
Finish by sewing buttons on the hat, corresponding with your button holes. Be sure to sew them on very securely, and finish with a dot of super glue or nail polish to seal the threads.
To make crocheted buttons, start with a magic ring. Hdc 12 into the ring. Join and tie off. Using your second color, stitch an X pattern across the top of the circle. Sew on where the button holes meet the hat, or apply with a small dab of hot glue.
To make tassels, cut 6 arm-length pieces of yarn (from your chin to your extended arm). {You can go shorter for the smaller hat} Pull the six pieces through the corner stitch on your hat (you now have 12 pieces to work with) Braid them together and tie a knot. Trim the ends. Repeat for the other side.
Want to add a pom-pom on top? Use this tutorial.
You might also like these other hats:
xoxo,


How many skeins of yarn do I need to make a 3-6mos hat? Also how do I make the adorable pompom?
I use caron simply soft, and I use about 1/4, or 1/3 of the ball. I have a bit more info on how to make a pom pom here:
http://www.prettyprovidence.com/shabby-chic-pom-pom-flowers/
Here a great tutorial too
http://www.danamadeit.com/2010/12/pom-poms-a-very-simple-tutorial.html
Hi,
Adorable hat! The 6-12 mos. seems to work up fine but I am having issues with the stitch counts on the other 2 available sizes. 0-3 mos. increases to 48 but then only 46 are mentioned to be used on the front flap and back piece and the 3-6 mos increases to 52 but then only 44 are mentioned to be used on the front flap and back piece. Can you assist me in what I might be doing incorrect?
Thanks Liz! It looks like I had an outdated, older version on here, I am terribly sorry! The correct one is now available.
I’d like to make the baby eskimo hat but don’t know how it starts. don’t you need to chain before doing a HDC ? to make the ring?
I start with a magic ring, it eliminates that hole at the top, but you are welcome to just start with a 3-ch loop if you prefer.
Hi! Love these hats!!! Wondering what size you would use to make one for a 12 month old??
Thank you! The size 6-12 month should work (their heads don’t grow as fast as their feet) but if you are worried, you can go up a hook size.
Thanks Bethany for the quick response!! :)
Just subscribed to your page. Will be making some of these starting today. My niece is going to be born very soon!! Going to surprise my sister with booties! Thanks for sharing!!
Thanks for subscribing!! You are welcome :) :)
Hi. I really want to make some of these, but you didn’t put the gauge in your pattern. You should tell us how many of the (design) stitches make how many inches. For example, say for the 0-3 months size, you say 20 stitches and 20 rows will = 2″ wide and 2″ high. So many online pattern designers leave this important step out. I don’t know how big a hat for a newborn should be, that why a gauge is necessary. Thanks.
I don’t have the gauge you are specifically asking for, but I added how many inches wide your circle should be after the steps. Did you try measuring the diameter of your circle to see if it matches my measurements ?
Hi I am a beginner and woul like to know what ya4n brand did u used ti do these? Thank u!
Hi Emma! I used Caron Simply Soft.
I could not find anything after opening the pdf file. it is just a blank page. wonder what is going on???
Hm. It’s just a PDF uploaded to Google Drive. Can you normally view documents there? If you can’t get it to work, email me and I will send it to you.
This comment has been removed by the author.
Yup, pretty much. I think a real eskimo hat was cut out of animal skins, and so it was easier to cut a round shape and then just fold up the front, then to cut an irregular hat shape with ear flaps. That is just my own personal speculation, though!
I’m not familiar with “Eskimo Hats”. What is the purpose of the button flap? Is it just decorative?
Super cute hats! I really like the pink and gray hat!
Navy Wifey Peters @ Submarine Sunday
These little Eskimos-hats are sooooooooooo adorable!!
These are so adorable – and yes, you definitely need to start selling your work, girl. If not on Etsy, then you should start a page on your blog with your goods! (Or Xmas is coming up, what about any craft shows/fairs in your area? You’d do so well!)
how cute! I wonder if I could get away with upscaling this and wearing it myself? ;0)
So cute! Thank you for sharing.
Following your blog now.xx
Hi, the hats that you made are adorable and you did a good job. I saw it on homemade ginger.
Julie from julieslifestyle.blogspot.com
Thank you, Julie!
I love these hats! I might need to make one for my little guy that is coming in November :)
Perfect! I have a niece coming in November, so I will be making one for her :)
So cute Bethany!! I want my own!! I’d love for you to link your hat to our Fall Clothing Party!!!
Are you going to sell these? I LOVE them!
Thank you! I need to, I just don’t know how :( Etsy is so saturated, and I am clueless about online sales. Maybe I will figure it out someday, lol!