
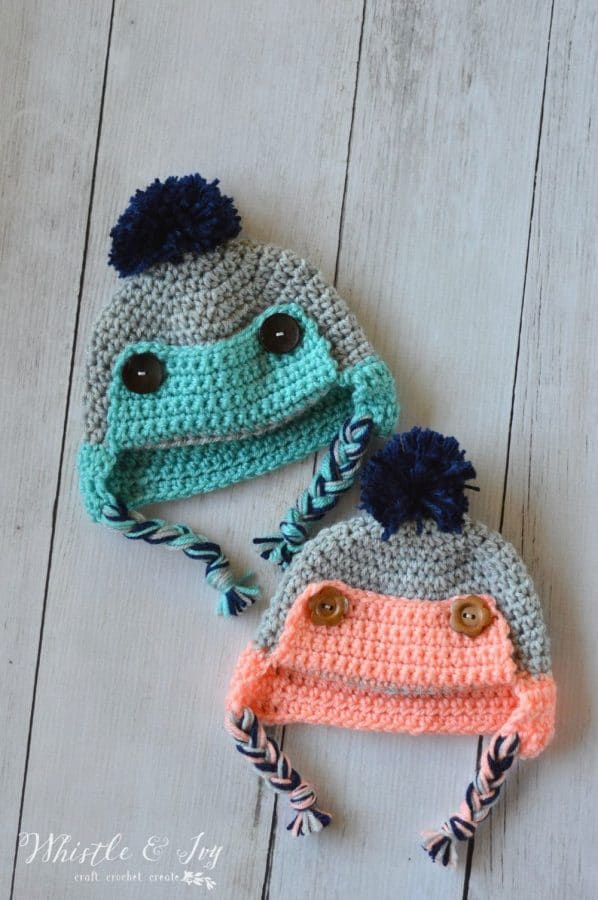
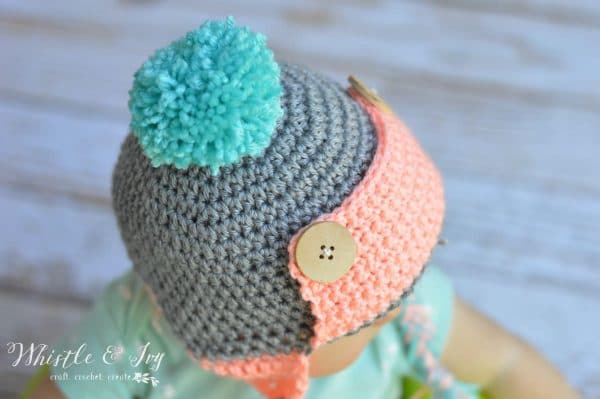
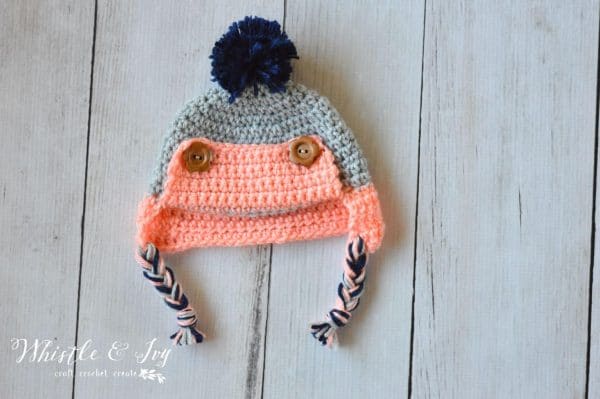
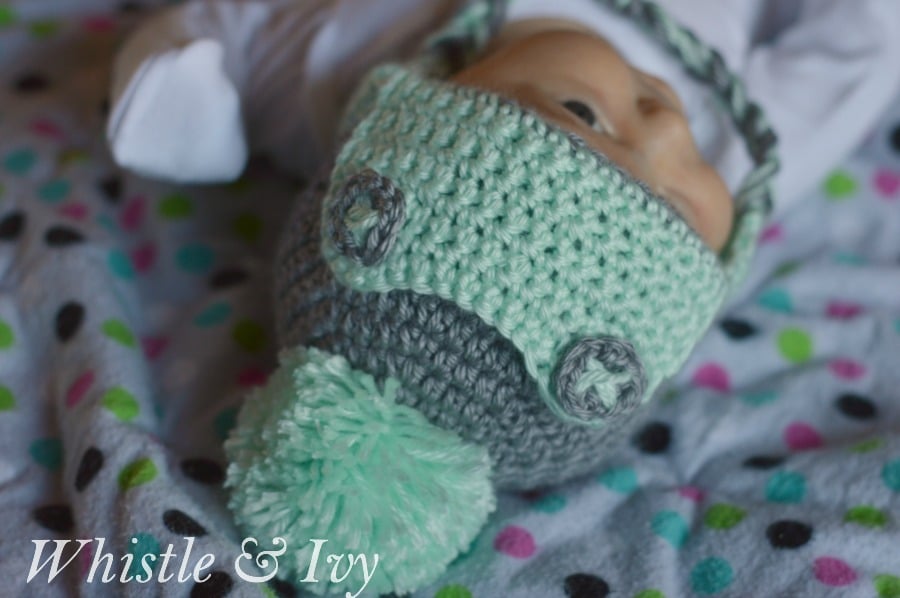
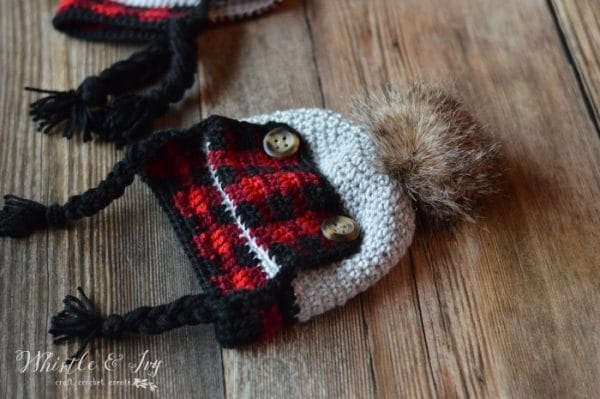
This classic crochet baby trapper hat is warm and cozy for baby! It looks cute with large buttons, or crochet your own. Be sure to finish this cute hat with a big poofy pom-pom on top! This post contains affiliate links (for more info, click here) Thanks for your support!
Does it feel like Autumn yet? In Vegas, not quite yet, but I am pretending my crocheting some cozy crochet stuff. Apparently my toddler is no longer a baby, but I got the idea for this hat and had to make it anyway.
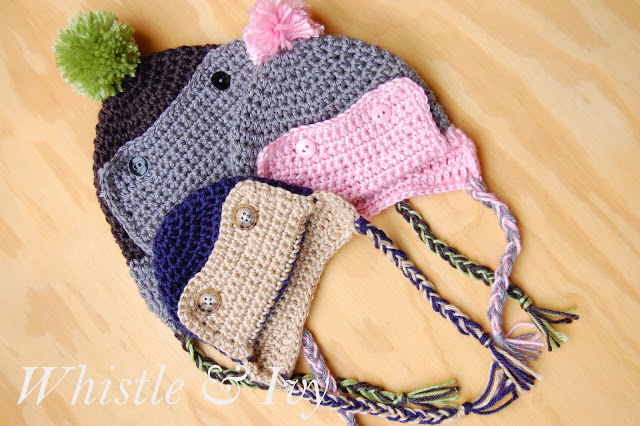
This Baby Crochet Trapper Hat will keep your little one warm all autumn and winter long. You can switch up the colors to make it for a boy or a girl.
Can you tell that I love buttons?

I also made a hat with crocheted buttons and I love how they look. I have included the small crochet buttons in the pattern as well.
And because a thoughtful reader suggested it, I made it in plaid! Get the pattern here.
[convertkit form=711319]
BABY CROCHET TRAPPER HAT – FREE CROCHET PATTERN
Please remember: You are free to use this pattern to make and sell, but do not republish or distribute this pattern in any way. DO NOT use my photos in your listings. Please do share my blog links! It’s a quick and FREE way of supporting Whistle and Ivy and more free crochet patterns in the future.
What you need:
– Size G Hook
– Worsted Weight Yarn (Knit Picks Brava – Navy, Seashell, Dove Heather, Cornflower, Mint)
– 2 large buttons
Abbreviations: (American Terms)
Sk – Skip
St – Stitch
Ch – Chain
Sc – Single crochet
Dc – Double Crochet
Hdc – Half Double Crochet
Sc decrease – Sc2tog
Dc decrease – Dc2tog
Sl st – Slip Stitch
Gauge: See Step 4
Note: The free pattern is for size 3-6 months. However, if you are interested in other sizes (0-3 months, 6-12 months and toddler) you can get an ad-free PDF from my pattern shop!

CROCHET TRAPPER HAT PATTERN: SIZE 3-6 MONTHS
Start with Magic Ring or 3-ch loop.
1. Hdc 8 in ring. Join with sl st.
2. Ch 1. Work 2 hdc in same st. Work 2 hdc in next 7 sts.(16 sts) Join with sl st with your first ch.
3. Ch 1. Hdc in same st. Work 2 hdc in next st. *Hdc in next st. Work 2 hdc in next st* repeat around the hat. (24 sts) Join with a sl st.
4. Ch 1. Hdc in same st. Hdc in next st. Work 2 hdc in next st. *Hdc in next 2 sts, work 2 hdc in next st* repeat around the hat.(32 sts) (your piece should have a 3” diameter) Join with sl st.
5. Ch 1. Hdc in same st. Hdc in next 2 sts. Work 2 hdc in next st. *Hdc in next 3 sts, work 2 hdc in next st* repeat around the hat. (40 sts) Join with sl st.
6. Ch 1. Hdc in same st. Hdc in next 3 sts. Work 2 hdc in next st. *Hdc in next 4 sts, work 2 hdc in next st* all around the hat. (48 sts) Join with sl st.
7. Ch 1. Hdc in same st. Hdc in next 10 sts. Work 2 hdc in next st. *Hdc in next 11 sts, work 2 hdc in next st* work 3 times. (52 sts) Join with sl st.
8. -14. Ch 1. Hdc in same st. Hdc in each st around. (52 sts) Join with sl st. Tie off.
FRONT FLAP:
1. With your seam in the middle back of the hat, lay your hat flat and find a stitch that 2-3 sts from the side on the front (it doesn’t have to be exact) . Use this st at your starting point. Join your new color with a sl st. Work from the inside. Ch 1. Sc in same st. Sc 18. Turn.
2. – 7. Ch 1. Sc in same st. Sc in next 18 sts. (19 sts) Turn.
8. Ch 1. Sc in same st. Sc in next st. Ch 2. Sk 2 sts and sc into next st. Sc in next 10 sts. Ch 2, sk 2 sts, sc into next 2 sts. (19 sts) Turn.
9. Ch 1. Sc2tog. Sc in next 15 sts. Sc2tog.
(make sure to work 1 sc in each of the chs from the last round). (17 sts) Tie off.
BACK PIECE:
Start with your hat upside down, working from the outside. Join your yarn with a sl st on the left of the flap. Start in the last worked st. You will work all the way across the back until you meet the front flap:
1. Ch 1. Hdc in same st. Hdc in next 34 sts. (35 sts)Turn.
2. – 3. Ch 2. Dc in same st. Dc in next 5 sts. Hdc in next 23 sts. Dc in next 6 sts. (35 sts) Turn .
4. Ch 2. Dc2tog. Dc in next 4 sts. Hdc in next 23 sts. Dc in next 4 sts. Dc2tog. (33 sts) Turn.
5. Ch 1. Sc2tog. Sc in next 29 sts. Sc2tog. (31 sts)
Tie off.
CROCHET BABY TRAPPER HAT CONSTRUCTION:
Finish by sewing buttons on the hat, corresponding with your button holes. Be sure to sew them on very securely, and finish with a dot of super glue or nail polish to seal the threads.
To make crocheted buttons, start with a magic ring. Hdc 12 into the ring. Join and tie off. Using your second color, stitch an X pattern across the top of the circle. Sew on where the button holes meet the hat, or apply with a small dab of hot glue.
To make tassels, cut 6 arm-length pieces of yarn (from your chin to your extended arm). {You can go shorter for the smaller hat} Pull the six pieces through the corner stitch on your hat (you now have 12 pieces to work with) Braid them together and tie a knot. Trim the ends. Repeat for the other side.
Want to add a pom-pom on top? Use this tutorial.
You might also like these other hats:
xoxo,


You have created a very nice website. I appreciate the time and effort you have put in to present nice patterns and tips. And for whatever reason the name “Whistle & Ivy” makes me feel nice inside. Thank you very much.
Thanks so much Lesa!!!
Hi! I’m making this hat for my new nephew, and I’m a bit confused about the front flap. Do you make it and the sew the flap up, or crochet into the stitches of the hat? Thank you!
So cute. thank you
I just love this pattern, so stinkin’ cute! I did a baby boy hat & it’s adorable! 💖💖💖
Thank you!! So glad you like it!
I would love to make this pattern but would need a pattern for size 18 months. Do you have suggestions on how to re-size this?
They are SO adorable!!
Hi Megan! I have a toddler size here:
https://www.whistleandivy.com/toddler-eskimo-hat/
I want to make this hat but i need a 36 month size? how would i adjust this?
I have a toddler size here:
https://www.whistleandivy.com/2014/12/toddler-eskimo-hat.html
I keep getting an extra stitch while I’m working around the circle! Maybe I’m just confused on how to work into the chain but someone please help! At the end of the repeated parts (all of them) I always have an extra half double crochet to do. What am
I doing wrong??
I am not sure! Are you counting the total stitches in each row?
I love this pattern it’s so adorable! I’ve made a few and wanted to post them on my Etsy page but I was confused on what to do. Do I post this link to my post? or is there another way you’d like me to share who the pattern was written by? Sorry for the confusing questions I just want to make sure I’m doing this right 🙂 thank you!
Thanks! You can just post “Pattern by Bethany from Whistle and Ivy” or something to that effect. A link would be a bit clunky in your listing I think. Thanks so much!
To start how many do I need for the magic ring?
You hdc 8 into the magic ring.
Omg thank you! I was reading it wrong!! Now it makes sense lol!!
Haha! no problem!
Hello Bethany!
I am quite confused about how to start the back piece for the 0-3 month hat.
I’ll try to explain what I’m having difficulty with the best I can!
I started by holding my hat upside down, should the flap be facing toward me or away from me?
Next you say to begin in the last worked stitch, my last worked stitch is in my flap I don’t completely understand where to start! If I slip stitch on the left of the flap how do I get to my last worked stitch?
Next you say work all the way across the back until you meet the front flap, what kinda stitch are you doing across the back?
Sorry I just bombarded you with questions! This is such a wonderful pattern an I’m absolutely thrilled to make it for my little nephew! I’m loving your patterns so far!
Eayaira
Yes, so you will be working is stitch which is also worked in by the front flap. So 2 stitches worked there, but it works because one folds upwards, and the other folds downward. Holding your hat down with loops facing up, you will begin to work like any other row, from the outside, going through the loops. The instructions for which stitch begin in the 1st round. You will be working a hdc. Hope this helps! Let me know if you need more assitance.
Thank you Bethany! Just one more question I came across now, going across the back piece the very first time you say you should have 30 stitches then turn, but that leaves me one stitch not worked in and the stitch only worked in once by the front flap. Should I go just all the way around? Or turn after just 30? Thanks for your patience with a beginner like me:)
Never mind figured it out! Thank you so much for all your halo though!
I’m confused on something, why for the flap and bottom portion of the hat does the pattern call for SC when in the pictures the rows are HDC? it’s very small and doesn’t look right with SC. Is it supposed to be SC or HDC?
I used a sc for the top flap. The hat in the photo is worked in sc as well. Did you work 9 rows? It should come halfway up the hat. The back piece is worked in various stitches, not just sc or hdc. Feel free to send me a photo and I can try to help if I can.
Thank you for sharing this pattern. It was so easy to follow. I made it in 2 hours with a few phone interuptions. Love it
Great! You are very welcome!!
Very adorable hat! Thank you for sharing.
Thank you Jane!!
Hi
I am half way through making this hat for my niece’s new baby and just wanted to say thank you for such a lovely pattern and for making it so easily available!
You are very welcome!! <3 <3
Just wonderimg, what is the approximate height for this hat in all the sizes?
About 5″, the smaller hats are shorter than the larger hat.
In the 3-6 on number 8.) what is the -14 for?
It means rows 8 through 14