
Craftgawker is an awesome craft feature website that can get your blog more traffic, but it can also be frustrating as you try to get your project photos accepted. I am definitely no expert on getting my photos accepted, but I have learned a few things as my photos have gotten accepted or declined (mostly declined!), so hopefully these tips can help you.
1. Size and quality –
This is an easy one to fix. Your photo needs to be at least 500 pixels, and no more than 500 kb. I will usually keep the original quality of the photo, but simply resize or crop it to 500 x 500 pixels, and it will usually be less then 500 kb.
2. Lighting-
Lighting is very important. Make sure you take your photos with lots of natural light, or use a photo box. Never use a flash. If you are taking a photo of a still object, consider using a tripod. You can adjust your shutter speed without getting a blurry effect.
3. White balance-
Make sure the white in your photo is actually white, not yellowish, pinkish or bluish. Adjust your camera settings accordingly. Sometimes, you can easily adjust this in editing software, but try to get it right on your camera first.
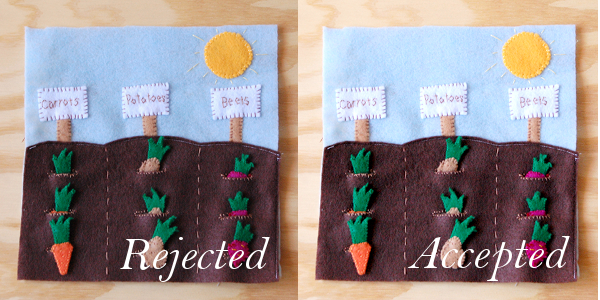
4. Wide shots-
Your photo will automatically be cropped down to a square for the thumbnail, so make sure that your photo can be nicely cropped without cutting off anything from your subject. If it’s too tight of a shot, they won’t accept it. Better yet, crop your photo into a square first, and then upload it.
5. Content-
Even if your photo is absolutely gorgeous and perfect, Craftgawker will still decline it if your post isn’t informative or doesn’t contain a tutorial of some kind. Make sure your post has great content!
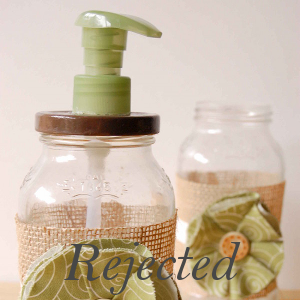
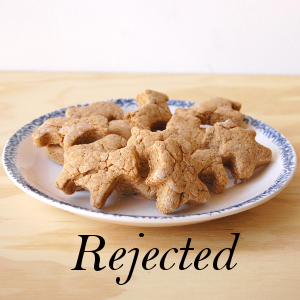
6. Angle-
I tend to take my pictures directly in front, especially if it’s food or a small craft item. It gets a nice bokeh, which I like, however, these pictures will mostly get declined because the photo needs to be a clear shot of the subject. Try to shoot from a higher angle if you tend to shoot like me. You want a nice, informative representation of your subject. (This was rejected from Foodgawker)
7. Showcase the Subject-
This may be a no-brainer, but make sure that the subject of your post is the subject of your photo. For example, if your post is about a cute chair you built out of wood, make sure it’s a good shot of the chair. If your post is about the crackle paint job on the chair, get a good shot of the paint job, the chair itself isn’t as important.


I owe you a big “Thank you!!!” I had never submitted anything to craftgawker before, but after reading your post I submitted two projects and both were accepted! Thanks so much for the great tips!
~Abby =)
Just a Girl and Her Blog
Yay Abby! I am SO glad :) I hope you get lots of traffic because of it! Thanks for reading :)
Thanks for sharing such great tips!
You are welcome, I hope you find them useful!
These are great tips. I really do think different Craftgawker workers have different opinions, though, and it’s sometimes I luck. I submitted one I thought for sure would get accepted-nope, rejected. I sent another I thought would most likely not make the cut (it was very overcast outside and the lighting wasn’t great) but I sent it anyway-accepted. It baffles me sometimes.
Thanks for linking this to What’d You Do This Weekend? We’re having a Burger Bash June 29 – July 3 to get ready for the 4th. Come on over.
Wishes for tasty dishes,
Linda @ Tumbleweed Contessa
Thanks for sharing all the tips! So glad I came across your blog! I love to learn as much as I can about photography.
Have a lovely weekend!
Debi
Sadly I’ve never heard of craftgawker, but great info!!
Great tips. Guess I better get working on fixing my photos.
Thanks, I hope they help you!
this is so interesting I have never heard of craftgawker. Thank you for sharing. I’m hopping over from Megan’s Brag About It hop xo
Great tips. I did not even know anything about that site. Thanks for sharing!
Gina
Gina’s Craft Corner
http://ginascraftcorner.blogspot.com
You should give it a try! I get great traffic for weeks when I get one accepted! Thanks for stopping by!
Thanks for the tips, I have been experimenting with foodgawker and my rejects were deemed too tight. I’m not sure I know what that means, too close-up? I also am confused about the pixel size, and have been using the preview to try to figure this out. I will keep trying! Your tips will be helpful for sure!
Jenna
Yes, too tight means you are too close, and might be cutting off some of your subject. And they want 500 pixels, which you can fix in editing software, but “scaling” your image. I have found that foodgawker is actually more picky and harder than craftgawker! I have yet to get one accepted :(
It was rough at first and SO frustrating! I started to think it was personal haha but then I kinda understood what they were looking for. You covered everything but a tip I would give is to use the ‘preview’ feature. Once you’ve seen how it would look your photo among the others you can see if it works or not. Also, since it’s a very large gallery of photos you should check that it stants out.
Yes, thanks for that! That is a good idea!
Yes, good one-I sent one that was slightly off centered and they did not like that at all. I had no idea until I sent it.
Thanks for sharing these great tips! I have tried (& failed!!) to submit photos to Craftgawker, so will definitely be giving these a go :)
Thanks so much for these tips! I think these could even be applied to getting more repins on Pinterest.
Sarah M Schultz
Oops! Bethany! My daughter’s are Joy and Bethany and I typed the wrong one. Don’t mom’s always get their kid’s names mixed up? Haha! Patti
It seems everyone has suffered rejection by CraftGawker! Thank you for sharing these tips and I will, try, try again. Blessings dear Joy (my daughter’s name too), Patti
I have recently started submitting to Craftgawker. It has been challenging, I have been rejected many many times, and I have currently have five images in my Craftgawker gallery. It has been a great way to drive new visitors to my blog. Thanks for sharing your tips. ;o)
Before I started blogging, I never realized how important the photography was. My skills are seriously lacking in this department, but at least now I have a greater appreciation for the beautiful images I see. Before, I just took all that hard work for granted!
Me too! It’s been a learning process, for sure. My old posts are pretty gross looking! I am in the process of retaking and redoing all the projects so they don’t look horrible.
Thanks so much for visiting :)
Craftgawker can be frustrating, can’t it?! I finally got a couple of pictures accepted, but there was a lot of rejection first. I definitely keep craftgawker submission in mind AS I take pictures now…making sure I get one that will look good cropped to a square. I do think it’s improved my photography skills, so that’s never a bad thing. I have better luck with dwelling gawker…partially because I do more that fits in there and partly because they’re less popular and therefore less picky.
Great tips! I haven’t tried getting anything on Craftgawker yet. Sounds like you have learned a ton for your blog. Your example photos really drive in the point.
Great tips! I was just thinking about this today since more than half the stuff I submit gets rejected, but I’ve learned a lot over the past year of trying to get stuff on craftgawker. I think you’ve just about covered everything!