
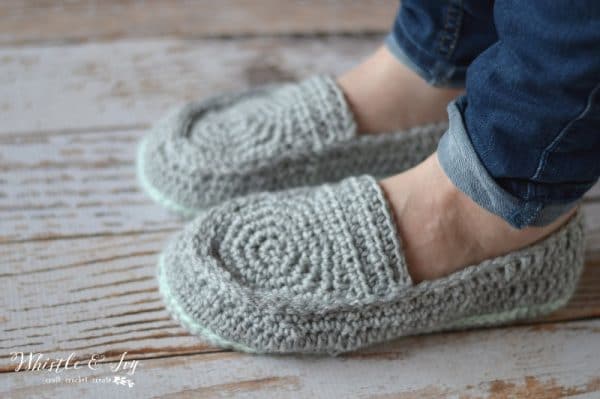
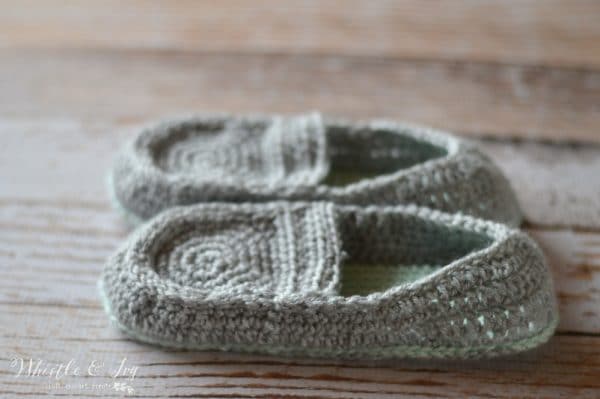
These darling crochet loafer slippers are fun to make and comfortable to wear! They feature a double sole for extra comfort and are made with simple construction. Make a pair for baby too! This post included affiliate links, which means I get small commission if you make a purchase at no extra cost to you. Thank you for your support!

I finally finished a pattern that I have been working on! It felt like these women’s loafer slippers took way longer than they should have, but I am SO glad to be finished (and I might not be making slippers again in the near future, phew!). I really love how they turned out, and they are so comfortable! The double sole is so lovely. It’s pretty fun to mix and match colors for these crochet slippers.

You’re tired of sifting through complicated tutorials and patterns that leave you feeling overwhelmed.
Let me help.
PICTURE THIS:
Instant access to a library of modern, easy-to-follow patterns
Gifting your handcrafted treasures to your loved ones.
Feeling accomplished by your beautiful makes
It’s time to make your crafting experience as joyful as it should be.
WOMEN’S LOAFER SLIPPERS – FREE CROCHET PATTERN
Please remember: You are free to use this pattern to make and sell, but do not republish or distribute this pattern in any way. DO NOT use my photos in your listings. Please do share my blog links! It’s a quick and FREE way of supporting Whistle and Ivy and more free crochet patterns in the future.
What you need:
-Size 4.5mm hook (be sure to check the gauge)
-Medium Weight Yarn (Brava Knit Picks in Dove Heather and Mint)
-Darning Needle
Abbreviations: (American Terms)
Ch – chain
Sc – single crochet
hdc – half double crochet
Dc – double crochet
Dc2tog – Dc decrease
Sc2tog – Sc decrease
Sl st – Slip Stitch
St – stitch
Gauge: 8 sts = 2”
Thank you for working this pattern! The free version includes size 8. You can change the sizes for yourself by going up 2 chains on the foundation for each size up (or eliminate 2 chains on the foundation for a smaller size). You can also buy an ad-free PDF from my Ravelry shop that includes sizes 6, 7, 8 and 9. Thanks for your support!
Size 8 Loafer Slipper Pattern
Ch 26
1. Work 3 sc in 2nd ch. Sc in next 16 chs. Hdc in next 3 chs. Dc in next 4 chs. Work 7 dc in last ch
Working across opposite side of chain: dc in next 4 chs, hdc in next 3 chs, sc in next 16 chs. (56 sts)
Place a marker and move up with each round.
2. Work 2 sc in the next 3 sts. Sc in next 24 sts. Work 2 sc in the next 5 sts. Sc in next 24 sts. (64 sts)
3. *Sc in next st, work 2 sc in next st* work 3 times. Sc in next 24 sts. *Sc in next st, work 2 sc in next st* work 5 times. Sc in next 24 sts. (72 sts)
4. *Sc in next 2 sts. Work 2 sc in next st,* work 3 times. Sc in next 24 sts. *Sc in next 2 sts, work 2 sc in next st* work 5 times. Sc in next 24 sts. (80 sts)
5. *Hdc in next 3 sts, work 2 hdc in the next st* work 3 times. Hdc in next 24 sts. *Hdc in next 3 sts, work 2 hdc in the next st* work 5 times. Hdc in next 24 sts. (88 sts)
Join with sl st and tie off.
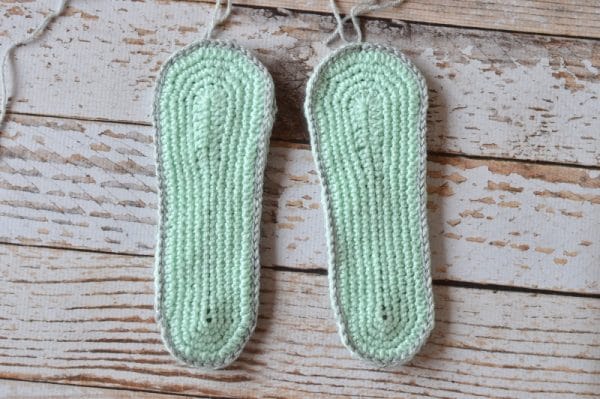
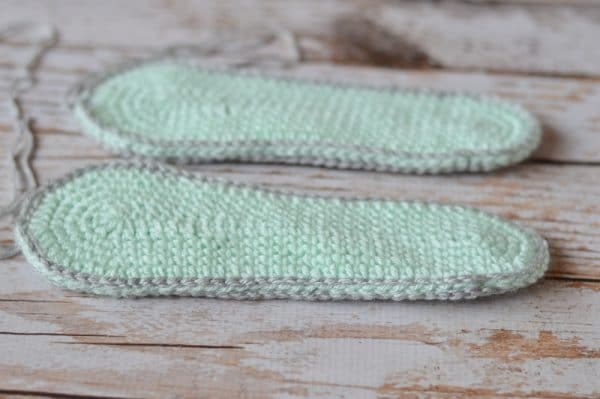
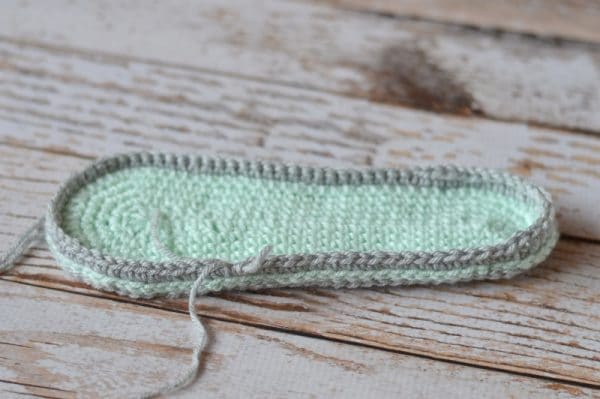
Match up your two sole pieces and using a sl st, stitch the two soles together, going through both loops of each sole. Use the color you want the slipper body to be. (88 sts)
Body:
Start your round on st 18 from the middle of the toe. Face the toe downwards and count 18 to the right. Going through the sl st loops (and going towards the toe): (Ch 1 does not count)
1. Ch 1. Sc in same st. Sc in next 50 sts. Hdc in next 5 sts. Dc in next 14 sts. Hdc in next 5 sts. Sc in next 13 sts. (88 sts) Join with sl st with first st.
2. Ch 1. Hdc in same st. Hdc in next 50 sts. Dc in next 24 sts. Hdc in next 13 sts. (88 sts)
3. Ch 1. Sc in same st. Sc in next 3 sts. Sc2tog twice. *Sc in next 2 sts. Sc2tog* work 5 times. Sc in next 2 sts. Sc2tog twice. Sc in next 15 sts. Hdc in next 4 sts. Dc in next 4 sts. Dc2tog. Dc in next 8 sts. Dc2tog. Dc in next 4 sts. Hdc in next 4 sts. Sc in next 11 sts. (77 sts)
4. Ch 1. Sc in same st. Sc in next 29 sts. Sc2tog 5 times. Sc in next st. Hdc in next 4 sts. Dc in next 4 sts. Dc2tog 5 times. Dc in next 4 sts. Hdc in next 4 sts. Sc2tog 5 times. (62 sts)
5. Sl st all around the top of the shoe. (62 sts)
TOE FLAP: (Ch 1 does not count)
Begin with a magic ring:
1. Ch 1. Sc 8 in the ring. Join with sl st. (8 sts)
2. Ch 1. Work 2 sc in each of the 8 sts. (16 sts) Join with sl st.
3. Ch 1. Sc in same st. Work 2 sc in next st. *Sc in next st, work 2 sc in next st* repeat all around the circle. (24 sts) Join with sl st.
4. Ch 1. Sc in same st. Sc in next st. Work 2 sc in next st. *Sc in next 2 sts, work 2 sc in next st* repeat all around the circle. Join with a sl st. (32 sts)
5. Ch 1. Sc in same st. Sc in next 2 sts. Work 2 sc in next st. *Sc in next 3 sts, work 2 sc in next st* repeat all around the hat (40 sts) Join with a sl st.
(This starts the turning part of the flap. You will work in turning rows instead of going around the circle )
6. Ch 2. Dc in same st. Hdc in next 2 sts. Sc in next 6 sts. Hdc in next 2 sts. Dc in next st. Turn (12 sts)
7. – 11. Ch 1. Hdc in same st. Hdc in next 11 sts. Turn. (12 sts)
Leave a long tail.
Construction:
Attach your toe flap to your shoe using your
darning needle and the long tail on the toe flap, using a simple running stitch.
Note: You can adjust the tightness of your slipper by making your toe flap circle smaller or bigger. Adjust the sts in step 6 accordingly
*I have had a few people who have comments and concerns about the sole. If it appears to be too small for your foot, you are doing it right!! Don’t be tempted to go up a size, your finished slipper will be too big*
xoxo,


i followed the pattern and im just at the toe spiral part, but i tried my slipper on and even tho the sole had room to stretch, the heel is way too tight with the slip stitch, i cant get it on my foot and im a size 8 so i followed this free blog pattern, but i think i may need a 9, my gauge is accurate but the heel portion is just so snug it cuts into my heel if i stretch to get it on, and my big toe really pushes through , so they are too short, any suggestions on making this a bit looser or do i need to purchase your pattern to try size 9?
Hi Kels!
Hm, that is surprising. You can try making them with a larger hook, that will make the whole slipper larger. When you make the sole, measure it against your foot, it should be smaller than your foot, but only slightly.
Would you happen to have a video of this? I am left handed and for what ever reason I am not grasping where to start the body? It feels strange when I do it so I am not sure if I am doing it correctly. BTW I am sort of newish thought myself through videos on how to crochet just a couple of years ago. Thank you for any advise of this
Oof, I have such a hard time with helping Lefthanders, I am so sorry. I hope I can help. You will want to orient the sole on a flat surface with the toe down and heel up. Find the middle of the toe, and count 18 sts to the left (it’s right for right handers, so I think you would go the other way around.) Mark that stitch and join yarn. You will being working from the outside, so your stitches should face out, which means you will work down toward the toe, not up to the heel. Does that help at all?
Yes very very much I am so thankful.
Ok one thing..am I counting 18 toward the big toe part of the sole? Or the little toe?
A few years ago, I made slippers for my daughter for Christmas, and struggled with a number of different patterns until I eventually finished a pair.
I wish I had this pattern then! This was so easy, and they’re so snuggly and comfortable.
Thank you!!
yay! I am happy you like them, thank you!
Best slippers Ever!!!
Oh wow, thank you!!!!