
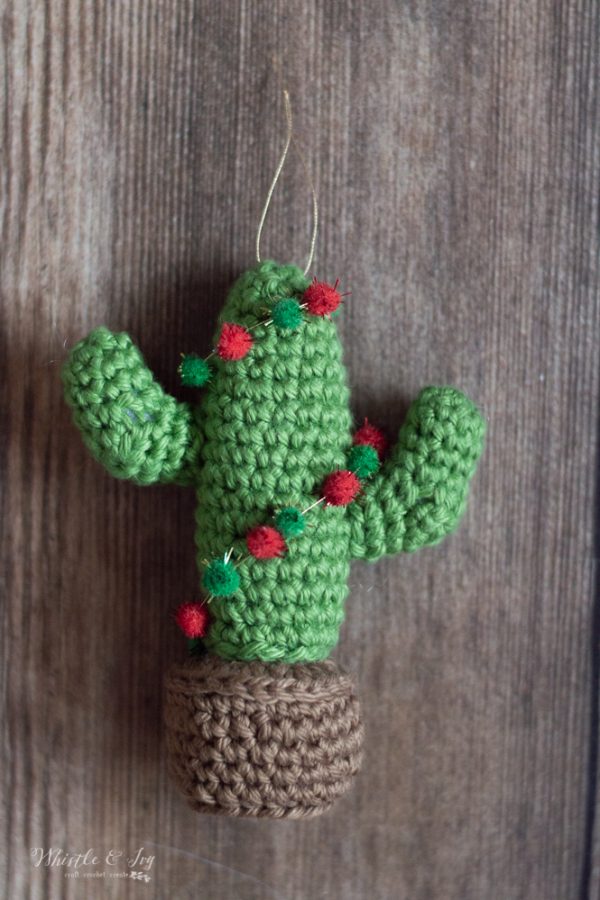
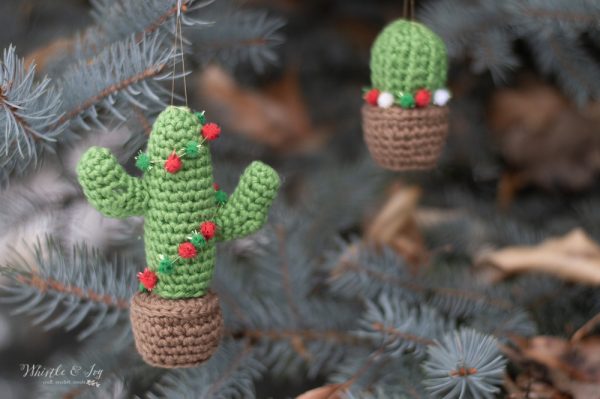
This cute crochet ornament brings boho desert flair and a southwest modern touch to your holiday decor. This cute little cactus could double as cute desk decor as well. Make one this holiday season! This post contains affiliate links which means I get a small commission at no extra cost to you. Thanks for your support!

Some of you may be aware of my cactus obsession. This mostly stems from the fact that cactuses are the only plants I can keep alive (and one resilient poinsettia). I had the idea to make up a crochet cactus ornament last year (and half worked up, actually!) so I excited to see it come to fruition this year.
The cactus I imagined had some fun holiday flair wrapped around her, so I added some tiny little felt balls to mine.
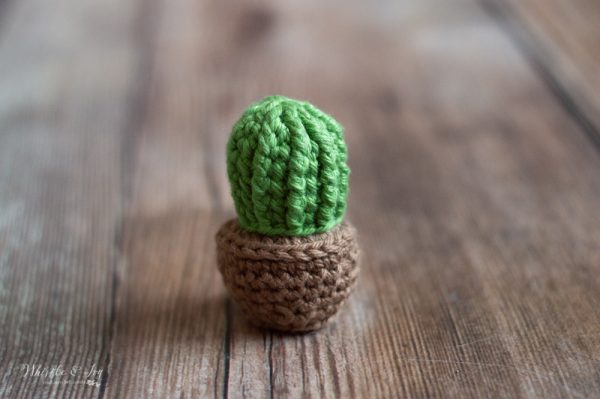
I decided to add a cute little barrel cactus to the PDF download. Sis couldn’t get over how cute this tiny guy is! I admit I agree (insert heart eyes emoji).
[convertkit form=1044470]

I SEE YOU, BUSY MAKER
You’re tired of sifting through complicated tutorials and daunting patterns that leave you feeling overwhelmed.
Let me help.
Picture this:
🧶 Joining a thriving community of fellow crocheters who share your passion.
📚 Access to our ENTIRE library of patterns that will buildsyour confidence.
🎁 Gifting handcrafted treasures to be cherished by your loved ones.
🌟 Modern, easy-to-follow patterns that will leave you feeling accomplished.
It’s time to make your crafting experience as joyful as it should be. We can’t wait to meet you!
CROCHET CACTUS ORNAMENT – CROCHET PATTERN
Please remember: You are free to use this crochet cactus ornament pattern to make and sell, but do not republish or distribute this pattern in any way. DO NOT use my photos in your listings. Please do share my blog links! It’s a quick and FREE way of supporting Whistle and Ivy and more free crochet patterns in the future.
PLEASE read my Disclaimer before working my free patterns!
What you need: (affiliate links)
– 4mm Hook
– Shine Worsted (Peapod and Doe)
– 7mm felt balls
– Darning Needle
– Polyfil
– Gold Thread
– Needle
– Hot Glue Gun
Abbreviations: US Terms
Ch – chain
Sc – single crochet
Sc2tog – Sc Decrease
Hdc – Half Double Crochet
Sl st – Slip Stitch
St – stitch
BLO – Back Loops Only
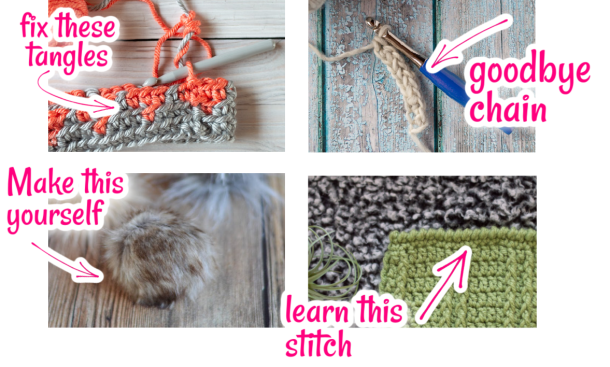
Gauge: not important, just make sure your stitches are tight enough that the stuffing doesn’t show through.

READY TO MAKE YOUR CROCHET CACTUS ORNAMENT?
This pattern for this cactus ornament pattern can be purchased in my shops! It includes a cute barrel cactus ornament as well! Where would you like to shop today?
CACTUS ORNAMENT TRUNK:
Start with Peapod. (work in continuous rounds)
Ch 2.
1. Sc 8 into 1st ch.
2. *Sc in next 3 sts. Work 2 sc in next st.* work twice. (10 sts)
3. *Sc in next 4 sts. Work 2 sc in next st.* work twice. (12 sts)
4. Sc in each st around. (12 sts
5. *Sc in next 5 sts. Work 2 sc in next st.* work twice. (14 sts)
6. *Sc in next 6 sts. Work 2 sc in next st.* work twice. (16 sts)
7. – 17. Sc in each st around. (16 sts)
Sl st into next 5 sts. Tie off, leaving a long tail.
ARMS:
(make 2)
Begin with Magic Ring
1. Sc 8
2. – 4. Sc in each st. (8 sts)
5. Turn. Ch 1. Hdc in next 4 sts. (4 sts)
6. Turn. Ch 1. Sc in next 4 sts. (4 sts)
7. Starting in the next unworked st, sc in next 4 sts. Sc in first st at the top of the turning part. Sc in next 3 sts. Move st marker up. (8 sts)
8. – 9. Sc in each st around. (8 sts)
Sl st into next st. Leave a long tail.
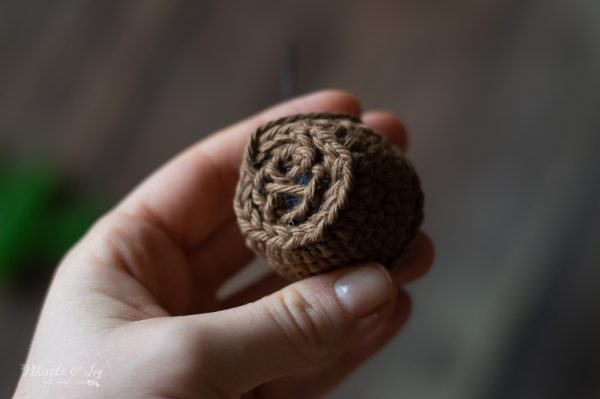
CACTUS POT:
(Use Doe)
(work first st in same st as chain)
Magic ring
1. Ch 1. Sc 8 into ring. Join (8 sts)
2. Ch 1. Work 2 sc in each st around. Join (16 sts)
3. Ch 1. *Hdc in next st. Work 2 hdc in next st* work 8 times. Join.(24 sts)
4. Work this round in the 3rd loop, the loop on the back of the hdc behind the top two loops.
Ch 1. Sc in each st around. Join. (24 sts)
5. (working in regular loops)
Ch 1. *Sc2tog. Sc in next 6 sts* work 3 times. Join. (21 sts)
6. Ch 1. Sc in each st around. Join (21 sts)
7. Ch 1. Sc in next 3 sts. Sc2tog. *Sc in next 5 sts. Sc2tog.* work twice. Sc in next 2 sts. Join (18 sts)
8. Ch 1. Hdc in each st around. Join (18 sts)
9. In BLO: Ch 1. Sc2tog 9 times. Join. (9 sts)
Leave a long tail.
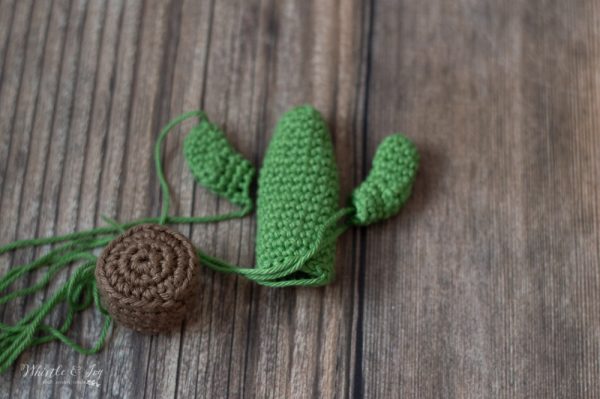
CONSTRUCTION:
Stuff the pot. Don’t overstuff or it will lose its shape.
Using the long tail and a darning needle, stitch a star shape across the remaining hole. Pull the end tight, closing the hole. Weave in and clip all ends. Set aside.
Next, stuff the two arms. It helps to use the handle of your hook to get the stuffing at the very end. Stuff the cactus trunk as firmly as you can. Using the arm tails, sew them to either side of the cactus trunk.
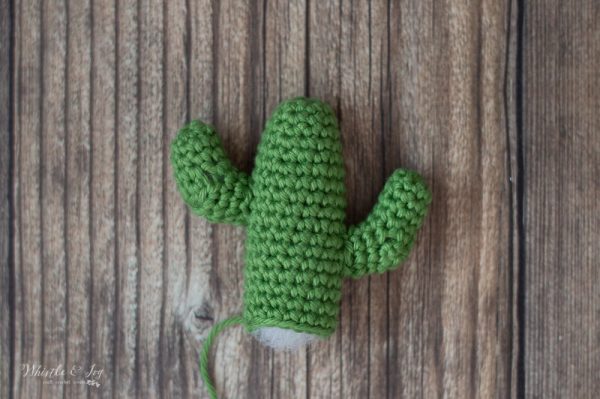
Next, using the long tail of the trunk, sew the cactus to the completed pot.

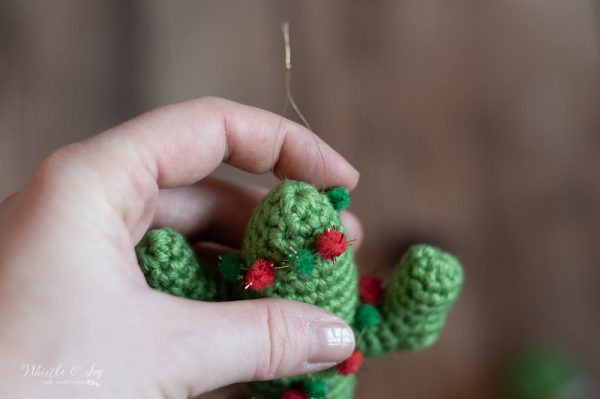
This is an awesome place to call it done. However, if you want to add some extra festive flair, add some holiday colored felt balls.
To do this, simply thread your needle into some gold thread. Then, push your needle up through the middle of each felt ball, stringing them onto the thread.
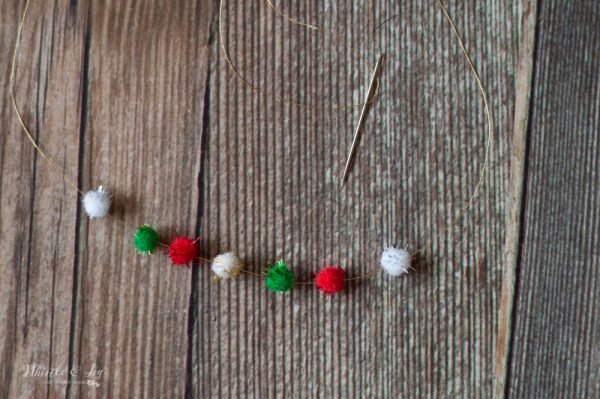
Twist it around your cactus, gluing the first one in place near the base, and the last one in place at the top. Make sure to secure both ends of the thread, and clip the ends.
To finish, thread a small bit of yarn into your needle and attach it to the top of the crochet cactus ornament.
I am excited to adorn my new tree with these cute little crochet cactus ornaments! We have been using the same artificial tree since we were first married, and I bought a more realistic-looking one this year. It’s funny how I get excited over completely different things as an adult!
Enjoy your holiday making!
xoxo,


On the cactus ornaments pot what did you mean by “Work this round in the 3rd loop, the loop on the back of the hdc behind the top two loops.”?
I’m having trouble figuring it out
It’s a loop on the back of the hdc. If you look at the back of it, it’s a loop just behind the top loops. You work into that loop for the round.
Can you explain how you did the eyes?
What do you mean eyes?
Muito muito lindo, o detalhe dos espinhozinhos nas florzinhas é muito delicado. Lindo.