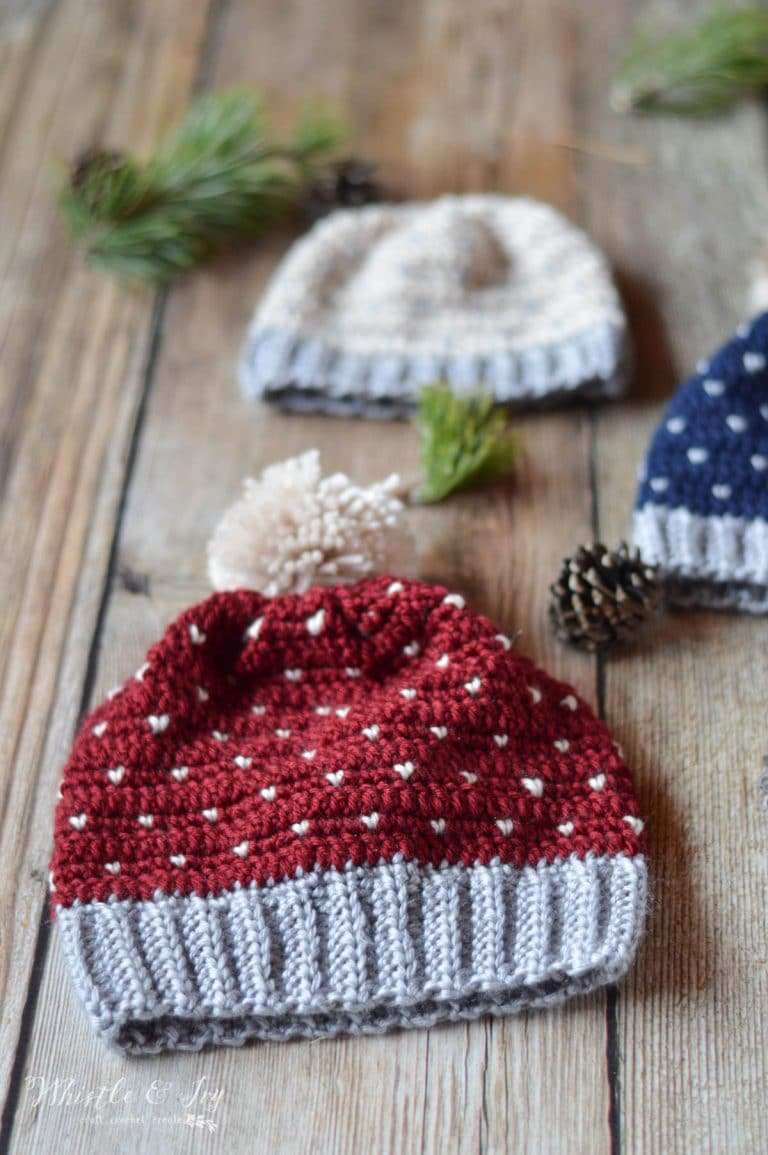
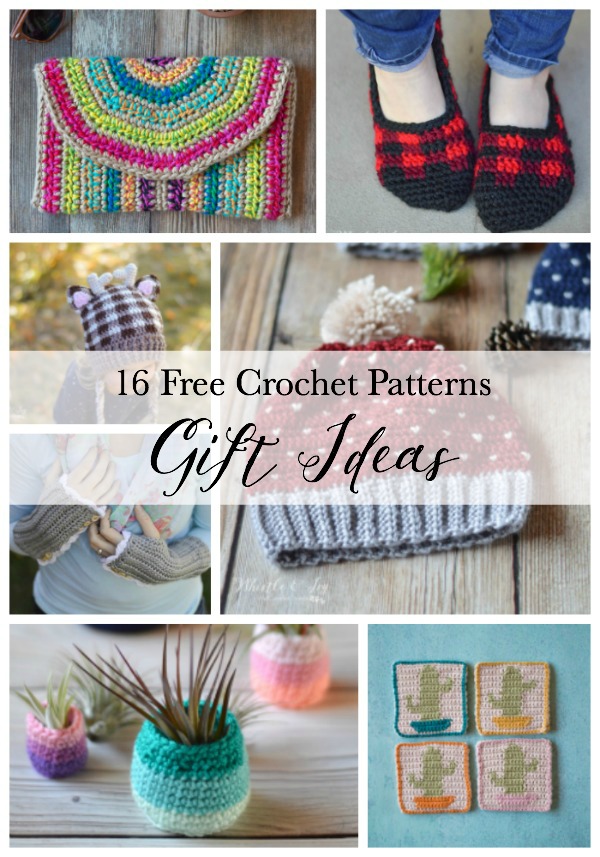
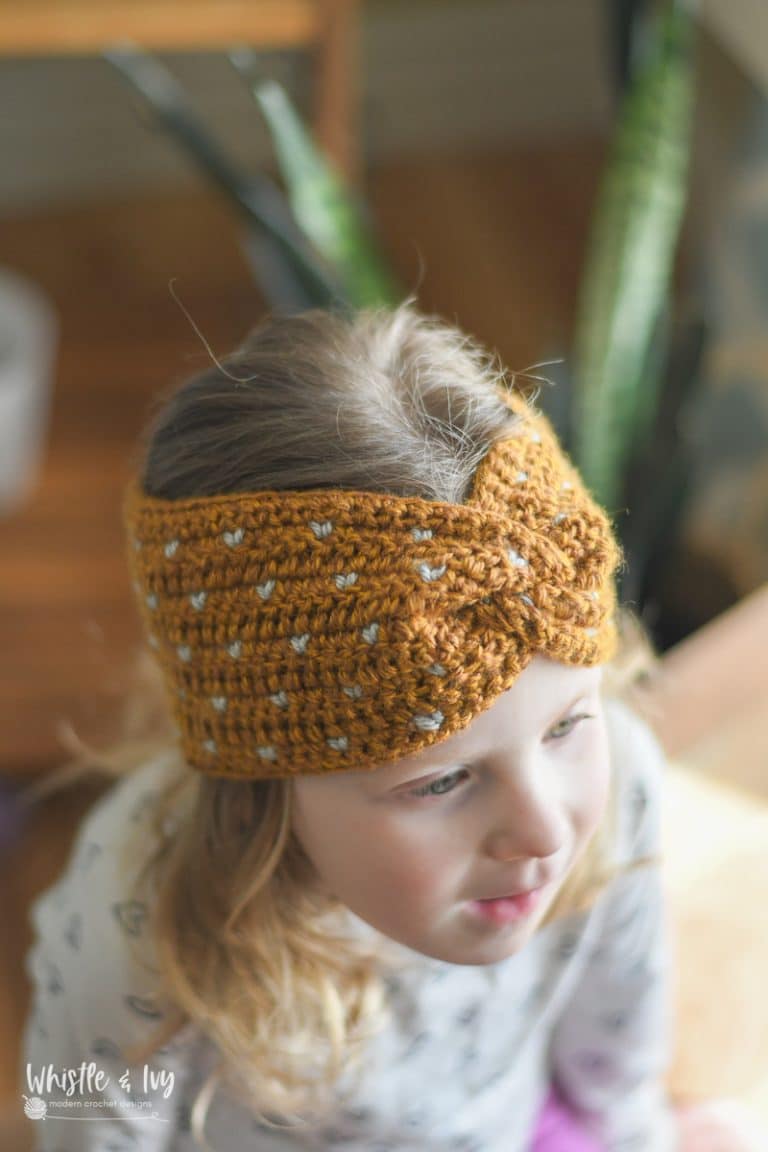
This beautiful crochet fair isle hat is a quintessential part of a winter wardrobe! The little crochet knit stitch hat is easier to make than you think and you will love the finished look. This post includes affiliate links which means I get a small commission at no extra cost to you. Thanks for your support!
Search Results for: snowfall
Snowfall Crochet Mittens – Crochet Pattern
These darling crochet mittens feature a pretty contrasting stitch that resembled knit! It’s easy and you will love the look. Pattern includes adult (men and women) and child sizes.
This post contains affiliate links. For more info click here.

Faux Knit Crochet Pencil Pouch – CROCHET PATTERN
This cute little crochet pencil pouch features cute little stitches that look that knit! But this pouch contains only crochet stitches!
This post in brought to you by WeCrochet, an online yarn shop just for crocheters! Get yarns, hooks, bags and more!
This post contains affiliate links, which means I get a small commission at no extra cost to you. Thanks for your support!

I have recently been going through some long forgotten patterns in my WIP bins. I found a half-done snowfall pouch, and thought maybe I was time to give it a new life!
Back when I published my snowfall hat, I wanted to make all the patterns I could think of with that cute stitch. It looks so pretty and is so easy to do.

I still have quite a few half-done “snowfall” projects using this technique, and I hope I can get to all of them.
Although the technique does has an inherit wintry feel, this pouch is definitely note solely a cold weather project. Making it in bright colors would so fun and perfect for any season.

I used WeCrochet Shine Worsted to make this cute little crochet pencil pouch. Shine is one of my very favorite cottons to work with. It is a cotton and beechwood blend, so it has a silky texture and sheen that you won’t find with other cotton yarns, and it still made of all-natural fibers.


FAUX KNIT PENCIL POUCH – CROCHET PATTERN
What you need:
– 5 mm Hook
– WeCrochet Shine Worsted in Sailor and White
– 2 large buttons of your choice
Abbreviations: US Terms
Ch – chain
Sc – single crochet
DC – Double crochet
Sl st – Slip Stitch
St – stitch
WANT MORE?
You will LOVE The Endless Bundle – it’s literally ENDLESS! My membership program includes the entire Whistle and Ivy ad-free pattern library (to download and keep!) videos, full tutorials, courses (including my Learn Crochet Plaid course!), community, and much more. See you on the inside!
⭐️ LEARN MORE ⭐️
The ad-free PDF for this Faux Knit Crochet Pencil Pouch is also available in my shops!
Where would you like to shop today?
Whistle and Ivy Shop
Ravelry
Etsy
Need help with the snowfall stitch? Watch a video below (if it doesn’t load, please disable your ad-blocker).
Ch 29.
1. Work 2 sc in 2nd ch from hook. Sc in next 26 chs. Work 4 sc in last ch.
Working back across the other side of the chain, sc in next 26 chs. Work 2 sc in last ch (same ch as the first 2 sc). Join with first sc. (60 sts)
2. Ch 1. Work 2 sc in same st. Sc in next 28 sts. Work 2 sc in next 2 sts. Sc in next 28 sts. Work 2 sc in last st. Join. (64 sts)
3. Work this round through the Back Loops Only:
Ch 1. Sc in each st around. Join. (64 sts)
4. Ch 1. Sc in each st around. Join. (64 sts)
5. This round starts the “snowfall stitch”. See the video above if you need help working this technique. For the sake of the pattern, I will use the phrase ” work a snowfall stitch'” when you are working the small white knit-look stitch.
Ch 1. *Sc in next 3 sts with main color. Work a snowfall stitch in next st* work 16 times. Join. (64 sts)
6. With main color, Ch 2. Dc in each st around. Join with first dc. (64 sts)
7. Ch 1. Sc in next st. Work a snowfall st in next st. With main color, sc in next 3 sts. Work a snowfall stitch in next st* work 15 times. With main color, sc in last 2 sts. Join. (64 sts)
8. With main color, Ch 2. Dc in each st around. Join. (64 sts)
9. – 12. Repeat rows 5 – 8 respectively.
13. Ch 1. Sc in next 10 sts. Ch 8. To form a button loop, sc in next st. Sc in next 13 sts. Ch 8. Sc in each remaining st. Join. Tie off.

CONSTRUCTION:
To finish your cute crochet pencil pouch, sew large button on the outside of the opposite side of the pouch from the button holes.


Finished! Perfect for carrying all your favorite pens and markers!
Be sure to check out WeCrochet to see all their fabulous yarns and crochet accessories.
xoxo,

Magic Flying Key Ornament – CROCHET PATTERN
Bring a little magic to your holiday and Christmas Tree with a magic flying key ornament! Made with Palette, a gorgeous fingering weight wool that comes in over 150 colors! Get Palette and so many other gorgeous yarns at WeCrochet. The post is provided by WeCrochet, an online yarn shop just for crocheters. Find your next favorite yarn!
This post contains affiliate links, which means I get a small commission at no extra cost to you. Thanks for your support!

I have wanted to make magical-themed crochet patterns (specifically magical Christmas-themed) for a long time. I have a running list of ideas but never seemed to make it happen in year’s past.
When I had the simple idea for these crochet magic flying keys a few weeks ago, I decided this year will be the year of the Potter Christmas Tree.
I have already dreamed of having a Harry Potter Christmas tree, but I am a maker (as you are as well) and I wanted to make most of the ornaments. Once I started brainstorming, the ideas just kept coming!
I have so many ideas swirling around; I currently have 3 WIPS and so many more I can’t wait to add to my WIP list.

I wanted the wings to be thin and light, light fairy wings, so I chose Palette yarn for this project. Palette is a 100% wool fingering weight yarn. You can pick up from WeCrochet. This is the same yarn I use for my Rustic Crochet Nativity! I used Cream, but I think any light color, even light grays or blues would work wonderfully.

This is the first pattern magical pattern in my library, with many more the come.
I have mostly Christmas ideas and Halloween ideas (I feel like the Potterverse holds rich fodder for both holidays!)
However, the rest of the patterns will be inside the Endless Bundle! A few of them I will sell in my shops, but mostly access will be inside the membership.
⭐️ Learn more about the Endless Bundle here!

MAGIC FLYING KEY – CROCHET PATTERN
What you need:
– 3.5 mm Hook
– Palette Fingering Weight in Cream
– Brass/bronze Skeleton Keys
– Fabric Stiffener
– Foam Brush
– Super Glue
Abbreviations: US Terms
Ch – chain
Sc – single crochet
Hdc – Half Double crochet
Dc – Double Crochet
Sl st – Slip Stitch
St – stitch
Gauge: Not important
WANT MORE?
You will LOVE The Endless Bundle – it’s literally ENDLESS! My membership program includes the entire Whistle and Ivy pattern library (to download and keep!) videos, full tutorials, courses (including my Learn Crochet Plaid course!), community, and much more. See you on the inside!
⭐️ LEARN MORE ⭐️
The ad-free PDF is also available in my shops!
Where would you like to shop today?
Whistle and Ivy Shop
Ravelry
Etsy

CROCHET FLYING KEY WINGS
Ch 30.
1. Sl st in 2nd ch from hook. Sc in next 2 chs. Hdc in next ch. Dc in next 2 chs. Tr in next 3 chs. Dc in next 2 chs. Hdc in next ch. Sc in next ch. Sl st in next 3 chs. Sc in next ch. Hdc in next ch. Dc in next 2 chs. Tr in next 3 chs. Dc in next 2 chs. Hdc in next st. Sc in next 2 chs. Sl st in last ch.
Working on other side of the ch: Ch 3. insert hook on the opposite side of last sc (not sl st). Sc in that ch. Sc in next ch. Hdc in next ch. Dc in next 2 chs. Tr in next 3 chs. Dc in next 2 chs. Hdc in next ch. Sc in next ch. Sl st in next 3 chs. Sc in next ch. Hdc in next ch. Dc in next 2 chs. Tr in next 3 chs. Dc in next 2 chs. Hdc in next ch. Sc in next 2 chs. Sl st in last ch.
Tie off.

CONSTRUCTION
From here, you will need to block your wings so they lay nicely, then apply Stiffy.
To wet block, simply mist with water, lay under a cloth and place a book on top to flatten.
Once they are flat enough (you don’t need to wait for them to dry), you can apply Stiffy with a wet foam brush. Gently dab until the piece is lightly dampened. Take particular care that the thin center part is fully saturated. You will need to apply to both the front and back.
For a bent shape, you can droop the wing piece over some folded cardboard to make them bend slightly when dry.

I recommend these keys. I spent some time reading reviews and looking at different choices. I went with these keys because I liked that they weren’t flat on the back, they look like real keys from both side. They also have a loop on the top so they can easily hang from a branch.
I was very pleased when I saw them in person. They are perfect!

Once your wing piece is dry, you can glue it to the back of your keys with a dab of super glue. I tried hot glue, but it does not adhere very well to the metal keys. All of my hot glued ornaments popped apart very easily, so be sure to use a stronger glue.
To finish, add a loop of yarn or string on the top of your key.

So easy! You will want to whip out a few of these!
Want some more WeCrochet Yarn recommendations?
Make bags, dishcloths and towels with Dishie! A 100% cotton yarn that comes in a large, beautiful color palette. I made my mini shoulder bag with Dishie.
Super soft and luscious City Tweed HW, used to make my Tartan Hat.
Silky soft Mighty Stitch is an acrylic/superwash wool blend, perfect for hats and mittens. (Pictured: Snowfall Hat)
Happy crochet season y’all! and Happy Halloween!
Be sure to check out WeCrochet to see all their fabulous yarns and crochet accessories.
xoxo,

Crochet Wall Pennant – Crochet Pattern
This cute crochet wall pennant is a great way to decorate your walls with crochet! Add some fun words or phrases with heat transfer vinyl. The free pattern includes one cut file, while the PDF download found in my shops includes the crochet wall pennant pattern written completely out plus FIVE different cut files! These crochet pennants are worked with WeCrochet Dishie, a 100% Cotton yarn that comes in beautiful array of solids, variegated colorways and bright and beautiful twists! This free pattern is brought to you by WeCrochet. All opinions are 100% my own. Thank you for your support!

This crochet wall pennant is a project I started several year ago. I tabled it because I wasn’t sure exactly how to get the words on it. I had bought a bunch of sticky-back felt letters, but they didn’t look as pretty as I had imagined.
So in a bin it went.
When I was cleaning out my stash, I stumbled upon my old sample. I have a couple heat transfer crochet projects under my belt, (my plaid wall hanging and my snowfall wall hanging), so I knew that iron-on vinyl was the answer!

Because natural fibers are imperative for heat transfer vinyl, I chose Dishie for this project, which is a 100% cotton yarn. My blush-colored sample was made with Comfy, which is mostly cotton with a touch of acrylic and it worked well with the iron as well.
The Dishie line has certainly expanded over the last little while, and it now comes in Solids, Twist, Multi Color, and Cones!

I actually designed a few cut files for you to use to make your crochet pennant. The freebie is the cut file that says “HOOK + YARN” . The other 4 say “CROCHET”, “IT’S NOT KNIT.”, “CROCHET”, and “HOOKER”.

Aren’t they cute? I can’t wait to get them up on my wall! I honestly went into this project thinking I would prefer the bold black lettering, but I definitely prefer the white, it looks a bit more modern.
I can’t wait to see yours! Be sure to tag me on Insta when you make your Whistle and Ivy creations! @whistleandivy
CROCHET WALL PENNANT – FREE CROCHE PATTERN
What you need:
– 4mm Hook
– Yarn (1 ball of Dishie 100% cotton)
– Cut File
Abbreviations: US Terms
Ch – chain
Sc – single crochet
Dc – Double Crochet
Sl st – Slip Stitch
St – stitch
Gauge: 22 dcs = 5” (Gauge Pattern)
The written pattern below is FREE in-text! If you would like an ad-free PDF The PDF download pattern is also formatted for easy crocheting on-the-go or for easy printing, it doesn’t include ads or comments. The pattern file pack also includes 5 different cute files in both PNG and SVG format. Thanks for your support!
WANT MORE?
You will LOVE The Endless Bundle – it’s literally ENDLESS! My membership program includes the entire Whistle and Ivy pattern library (to download and keep!) videos, full tutorials, courses, community, and much more. See you on the inside!
CROCHET PENNANT PATTERN
(Worked from the tip down)
Ch 3.
1. Work 3 dc in 1st ch. Turn. (3 sts)
2. Ch 2. Dc in each st. Turn. (3 sts)
3. Ch 2. Work 2 Dc in same st. Dc in next st. Work 2 dc in last st. Turn. (5 sts)
4. Ch 2. Dc in each st across. Turn. (5 sts)
5. Ch 2. Work 2 dc in same st. Dc in next 3 sts. Work 2 dc in last st. Turn. (7 sts)
Repeat this sequence of increasing in the first and last st, and then working a st in each st the following row, turning after each row, until you have 38 rows, consisting of 39 sts.
BORDER:
Continuing where you left off (alternately, you can break yarn and join a contrasting yarn) and work down the raw side. Ch 2. Work a row of sc down the side of the pennant, spacing them as evenly as possible. When you get to the sharp tip, work 2 sc, ch 1, work another 2 sc. Sc up the other side of the pennant. Join with a sl st.
Weave in ends.
Adding Heat Transfer Vinyl to your crochet pennant
Be sure to mirror the design and cut it with the shiny side down.
I get all my vinyl at Expressions Vinyl. They have the best quality and the best prices by far!
When ironing on, you will have to remember that your piece is not flat like a t-shirt, so you will need to iron for extra time and apply extra pressure so the vinyl conforms to the shape of your stitches. When in doubt, try the tip of the letters and if they don’t stay, try ironing again. DO NOT peel all the plastic up if your design isn’t sticking properly.
You will not get as firm of a hold as you would with fabric, so keep that in mind. It just needs to stick well enough to stay in place. This will not be an item that needs to be constantly laundered, so a firm hold is all you need.

xoxo,
