
This post contains affiliate links. For more info click here.
I am so happy to report that we survived the week! My 3 year old came down with a stomach bug, and naturally, we were both up all night. The broccoli from dinner did not receive a welcome return…
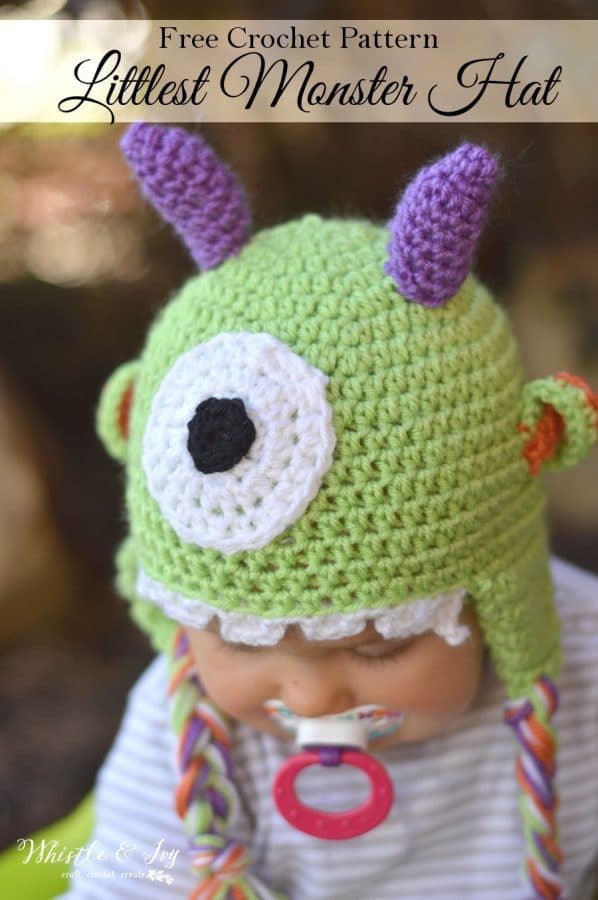
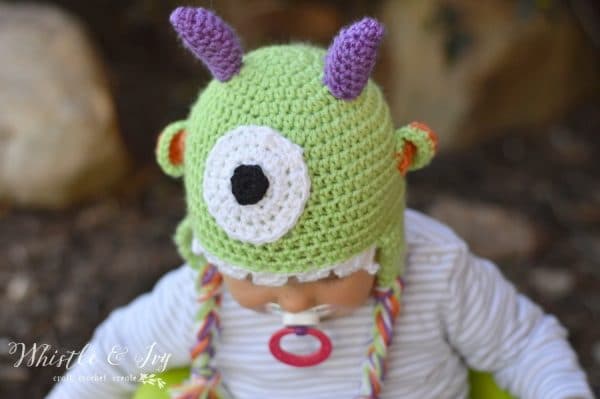
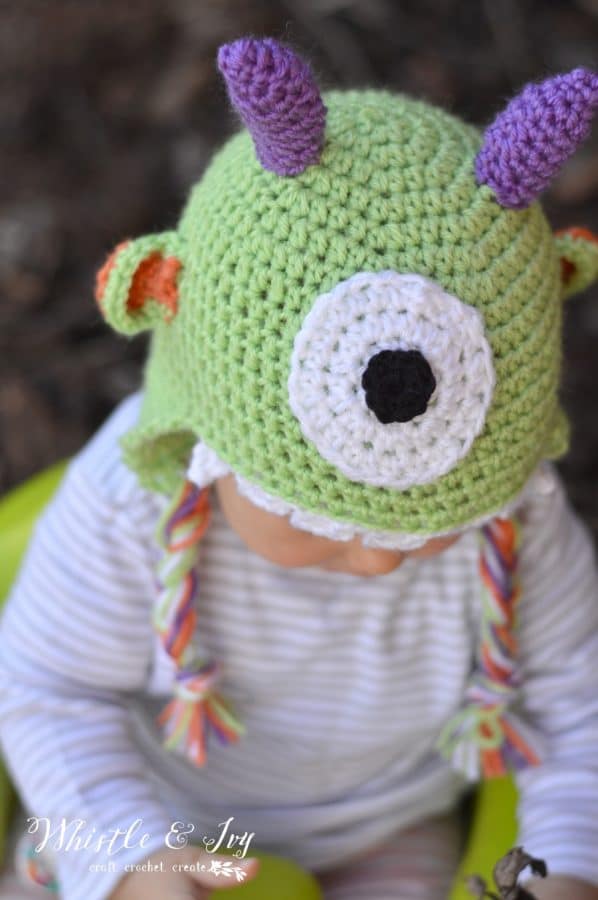
So far, he claims he is no longer sick and protests the bland food I am allowing him to have. I am being super cautious, and also hoping the rest of the family somehow avoids the same fate. I was able to finish up this Halloween hat I have been designing. It was not terribly difficult or time consuming, but I only had bits of time here and there to work on it. This Littlest Monster Crochet Baby Hat is a fun addition to your Halloween festivities. I know it’s a tad early, but I figured I would get the ideas out early so you can budget your time accordingly!
I am quite sad to report that Little Miss no longer enjoys wearing hats or headbands (it’s more likely that she now has the mobility to rip it off by herself). Either way, she has made photo shoots difficult! I hope she comes around to the idea. The Boy was such a good little model for me when he was little.
Littlest Monster Crochet Hat – Size 6-12 months
What you need:
- G hook
- Worsted Yarn (Knit Picks Brava – Alfalfa, Orange, Freesia, Black, White)
- Yarn Needle
- Small amount of Polyfil
Start with Magic Ring, using alfalfa
1. Ch 2
Hdc 8 inside the ring. (8 sts)
Join with a sl st.
2. Ch 1.
Hdc 2 in same st. Hdc 2 in next 7 sts. (16 sts)
Join with sl st.
3. Ch 1.
Hdc in same st. hdc 2 in next st.
*Hdc 1, hdc 2 in next st* work 7 times. (24 sts)
Join with a sl st.
4. Ch 1.
Hdc in same st. Hdc 1 in next st. Hdc 2 in next st.
*Hdc 2, hdc 2 in next st* work 7 times. (32 sts) (3 “ diameter)
Join with sl st.
5. Ch 1.
Hdc in same st. Hdc 2. Hdc 2 in next st.
*Hdc 3, hdc 2 in next st* work 7 times. (40 sts)
Join with sl st.
6. Ch 1.
Hdc in same st. Hdc 3. Hdc 2 in next st.
*Hdc 4, hdc 2 in next st* work 7 times. (48 sts)
Join with with a sl st.
7. Ch 1.
Hdc in same st. Hdc 4. Hdc 2 in next st. (Hdc 5, hdc 2 in next st) all around the hat. Join with sl st. (56 sts)
8. – 17. Ch 1.
Hdc in same st. Hdc in each st all around the hat. (56 sts)
Join with sl st.
Tie off.
Lay hat flat, upside down. put seam in exact middle. Count 7 to the left of the join and start there.
Ear Flaps:
1.-2. Ch 1. Sc in same st. Sc 11. Turn. (12 sts)
3. Ch 1. Sc2tog. Sc 8. Sc2tog. Turn. (10 sts)
4. Ch 1. Sc in same st. Sc 9. Turn
5. Ch 1. Sc2tog. Sc 6. Sc2tog. Turn
6. Ch 1. Sc in same st. Sc 7. Turn
7. Ch 2. Sc2tog. Sc 4. Sc2tog. Turn
8. Ch 1. Sc in same st. Sc 5.
9. Sc2tog. Dc 2. Sc2tog.
Count 20 sts to the right of where you left off (holding he upside down still). Repeat ear flap pattern for second ear flap.
Teeth:
Starting with hat upside down and front facing, join white at the first unworked stitch to the left of the flap. Work in back loops and back post, leaving the front loop unworked.
Ch 4. Sl st in 2nd ch from hook. Sc in next ch. Hdc in last ch. Sl st into next st. *Sl st 3. Ch 2. Hdc 2 in same st. Ch 2, sl st into same st.* work 5 times. Ch 4. Sl st in 2nd ch from hook. Sc in next ch. Hdc in next ch. sl st in last st (you should meet the other flap, working all the stitches between them).
Horns: make 2, using freesia
Start with magic ring
1. Sc 4 in ring. Join with sl st
2. Ch 1. Sc in same st. Sc 3. Join with sl st. (4 sts)
3. Ch 1. Sc in sam st. Sc 2 in next st. Sc in next st. Sc 2 in last st. Join. (6 sts)
4. Ch 1. Sc in same st. *sc 2 in next st, sc in next st* work twice. Sc 2 in last st. (9 sts)
5. – 8. Ch 1. Sc2tog. Sc 3. Sc 2 in next st. Sc 3. Join with sl st. (9 sts)
Leave a long tail. Stuff with Polyfil.
Eye:
Magic circle, using white.
1. Ch 2.
Dc 10 in circle. Join with sl st.
2. Ch 1. Hdc 2 in each st around (20 sts)
3. Ch 1. Hdc in same st. Hdc in next st. Hdc 2 in next st. *hdc 2, hdc 2 in next st* work 5 times. Hdc in last st. ( 26 sets) Join with a sl st.
Leave a long tail.
Make the pupil with black.
Start with magic ring. Ch 1. Sc 8 into the ring. Join with sl st. Tie off.
Ears: make 2, start with orange
Ch 5.
1. Sc in 2nd ch from hook. Sc 2. Sc 3 in last ch. Working across the other side, work a sc in last 3 chs. Turn.
Sc 3. Dc 2 in next 3 sts. Sc 3. Turn.
Join alfalfa.
Sc 3. *Sc, sc 2 in next st* work 3 times. Sc 3. Leave your tails.
The construction is rather self-explanatory. Sew the pupil on the eye, and sew the eye in place using your yarn needle and a length of white yarn. Sew the horns on using the long tail of each horn.
The ears are attached by pulling the 4 tails through the hat, each in their own hole.
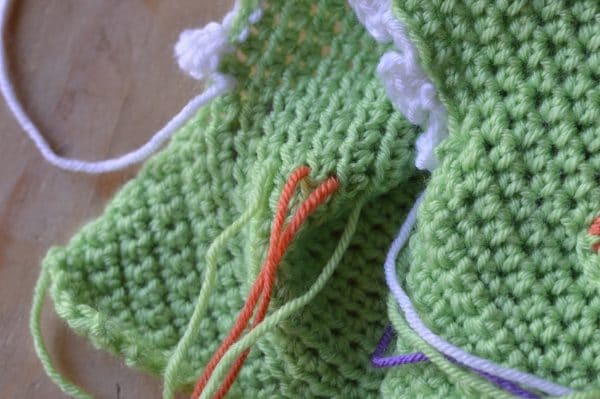
Tie two secure knots, tying two ends together. Clip ends.
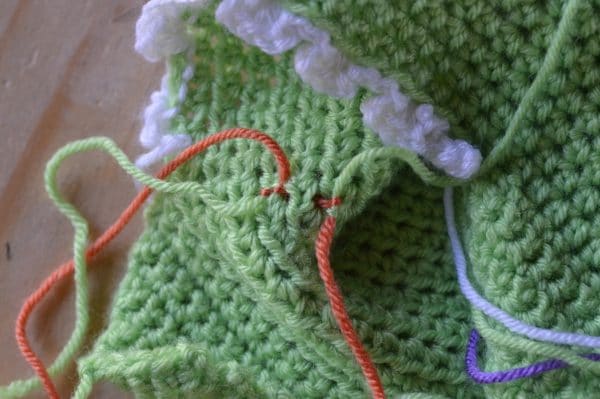
Finish the ears by tacking them back slightly. Sew a few stitches near the bottom on the sides, going up 2-3 stitches.
Finish the hat by attaching tassels on either side. Using equal lengths of yarn, simply pull through the middle end of each ear flap, and braid the yarn together.
Such a cute little monster! I sure hope she learns to appreciates a cozy hat when the weather turns cold. She doesn’t have much hair yet, so it will be a bit drafty for her bald head.
Plus, I love how this little hat gets me in the spooky, Halloween spirit!
How about you?
Like this free monster baby hat pattern? Subscribe!
(and get a free gift!)

Join our Facebook Community! We need YOU!
You may also like these FREE crochet patterns:

Happy crocheting,


Bethany, Very cute hat! is there a print friendly link on the page anywhere that I am missing?
No, I don’t use print friendly, I am sorry!
Could you please add to ravelry! Thanks
it’s already on Ravelry. You can find it here:
https://www.ravelry.com/patterns/library/littlest-monster-baby-hat
Such a cute hat! I just made one for my son for this coming winter. He’s 2 months old now and it fits him airway! I think I’ll make another one just with a larger hat.
Thank you so much Nancy! I am so glad you like the pattern!
I have crocheted for years , the hat is adorable, made it without difficulty, but must be reading more into it, had trouble with the teeth, got some made but not like yours, just kept getting pointed fang like?
The two outside one are fangs. Maybe you are missing stitches? Are you working the ch 2 at the end of each tooth?
Super cute!! Thank you for the pattern.
Thank you!
Ahhhh…Bethany this is so sweet. I’d love to have your share this at Five Star Frou-Frou too. Love, Mimi xxx
http://atrayofbliss.blogspot.com.au/2015/10/five-star-frou-frou-23pretty-things.html
Thanks so much Mimi!
Bethany ~ This hat is so cute! I’m not a crocheter, but this project makes me want to be one. Thanks for sharing with us at the Merry Monday Link Party! Hope to see you again on Sunday night! :0)
Thank you Tiffany! You should give crochet a try! ;) Thanks for hosting!
I really want to make this for my 4 year old grandson.I’m thinking I can just make the hat to fir his head and maybe leave the accessories the same size. What do you think?
Jae
Oh, I’ve love making loads of booties for my new twin grand daughters.
I think so! I think that would work fine. If you are worried, you could use a larger hook, maybe?
And twins!? That sound like so much fun :)
I absolutely love that pattern!! I can’t wait to make one for my own little monster! He was born with a head full of hair and now at three months, he is losing it all! This will definitely keep his noggin warm in this cooler season!
Oh dear! I have heard of that happening, although not first-hand, both my babies were bald! So glad you like the hat, thanks for your sweet comment!
Hello, I want to make this adorable hat for my newborn granddaughter. How can I make it smaller? Should I go down one or two hook sizes? Would that do it?
Thank you,
Michelle
Hi! Thanks so much!
You can use my eskimo baby hat as a guide, or you can definitely go down a hook size. I am not sure how many, it would depend on your gauge.
http://www.whistleandivy.com/2013/09/button-eskimo-baby-hat.html